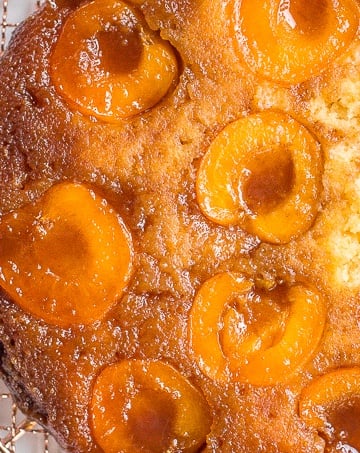
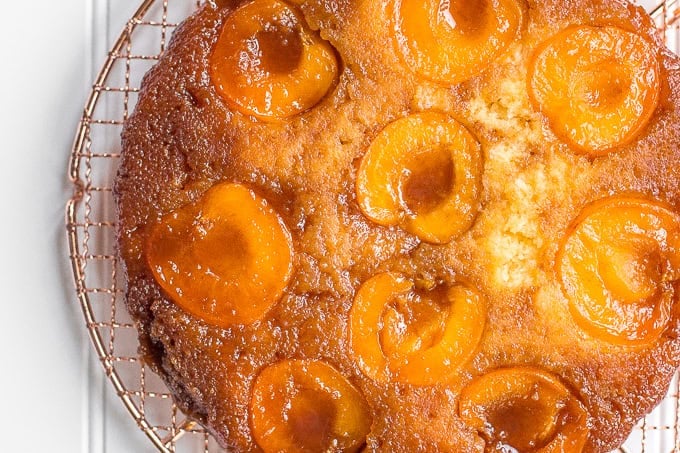
Apricots are finally, FINALLY here and it's time to rejoice! To celebrate, I made an upside-down caramel apricot tart. Trust me, it's worth the wait.
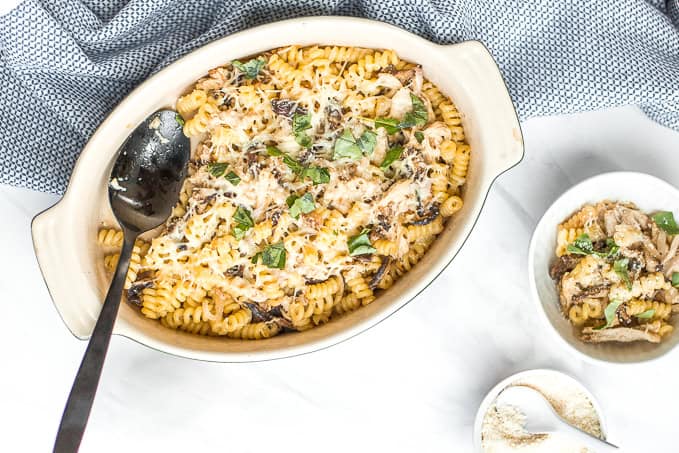
Baked Pasta with Rotisserie Chicken and Shiitake Mushrooms
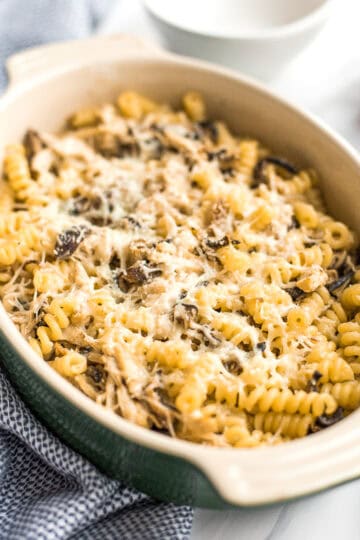
Baked pasta with rotisserie chicken and shiitake mushrooms is my personal hero. It's quick prep and cook time (under 30 minutes!) makes it easy enough for a weeknight meal, but has enough pizazz to be the star of your next dinner party. And the flavour - oh my gosh! Don't get me started on that!
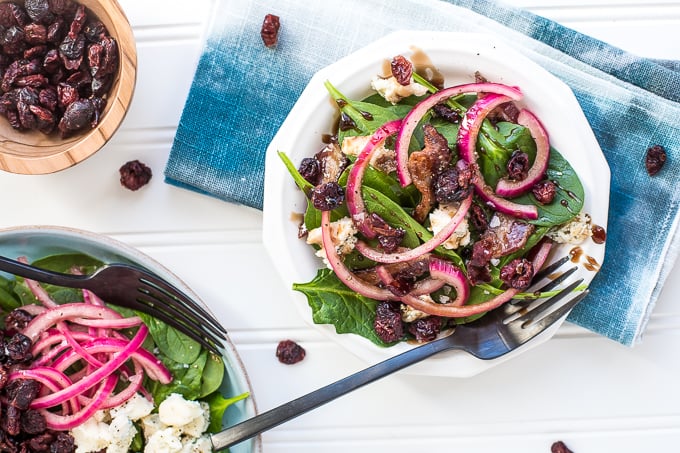
Pickled Red Onion and Blue Cheese Spinach Salad
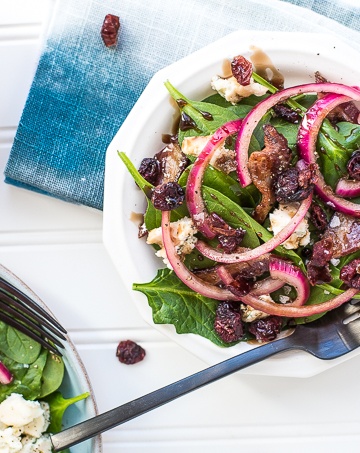
I don't know about you, but I could eat spinach salad every single day. Here, the bold flavours of blue cheese, maple bacon, and dried cranberries compliment the pickled red onions, creating the perfectly balanced dish - salty, sweet, acidic. Every bite of pickled red onion and blue cheese spinach salad is the perfect bite!
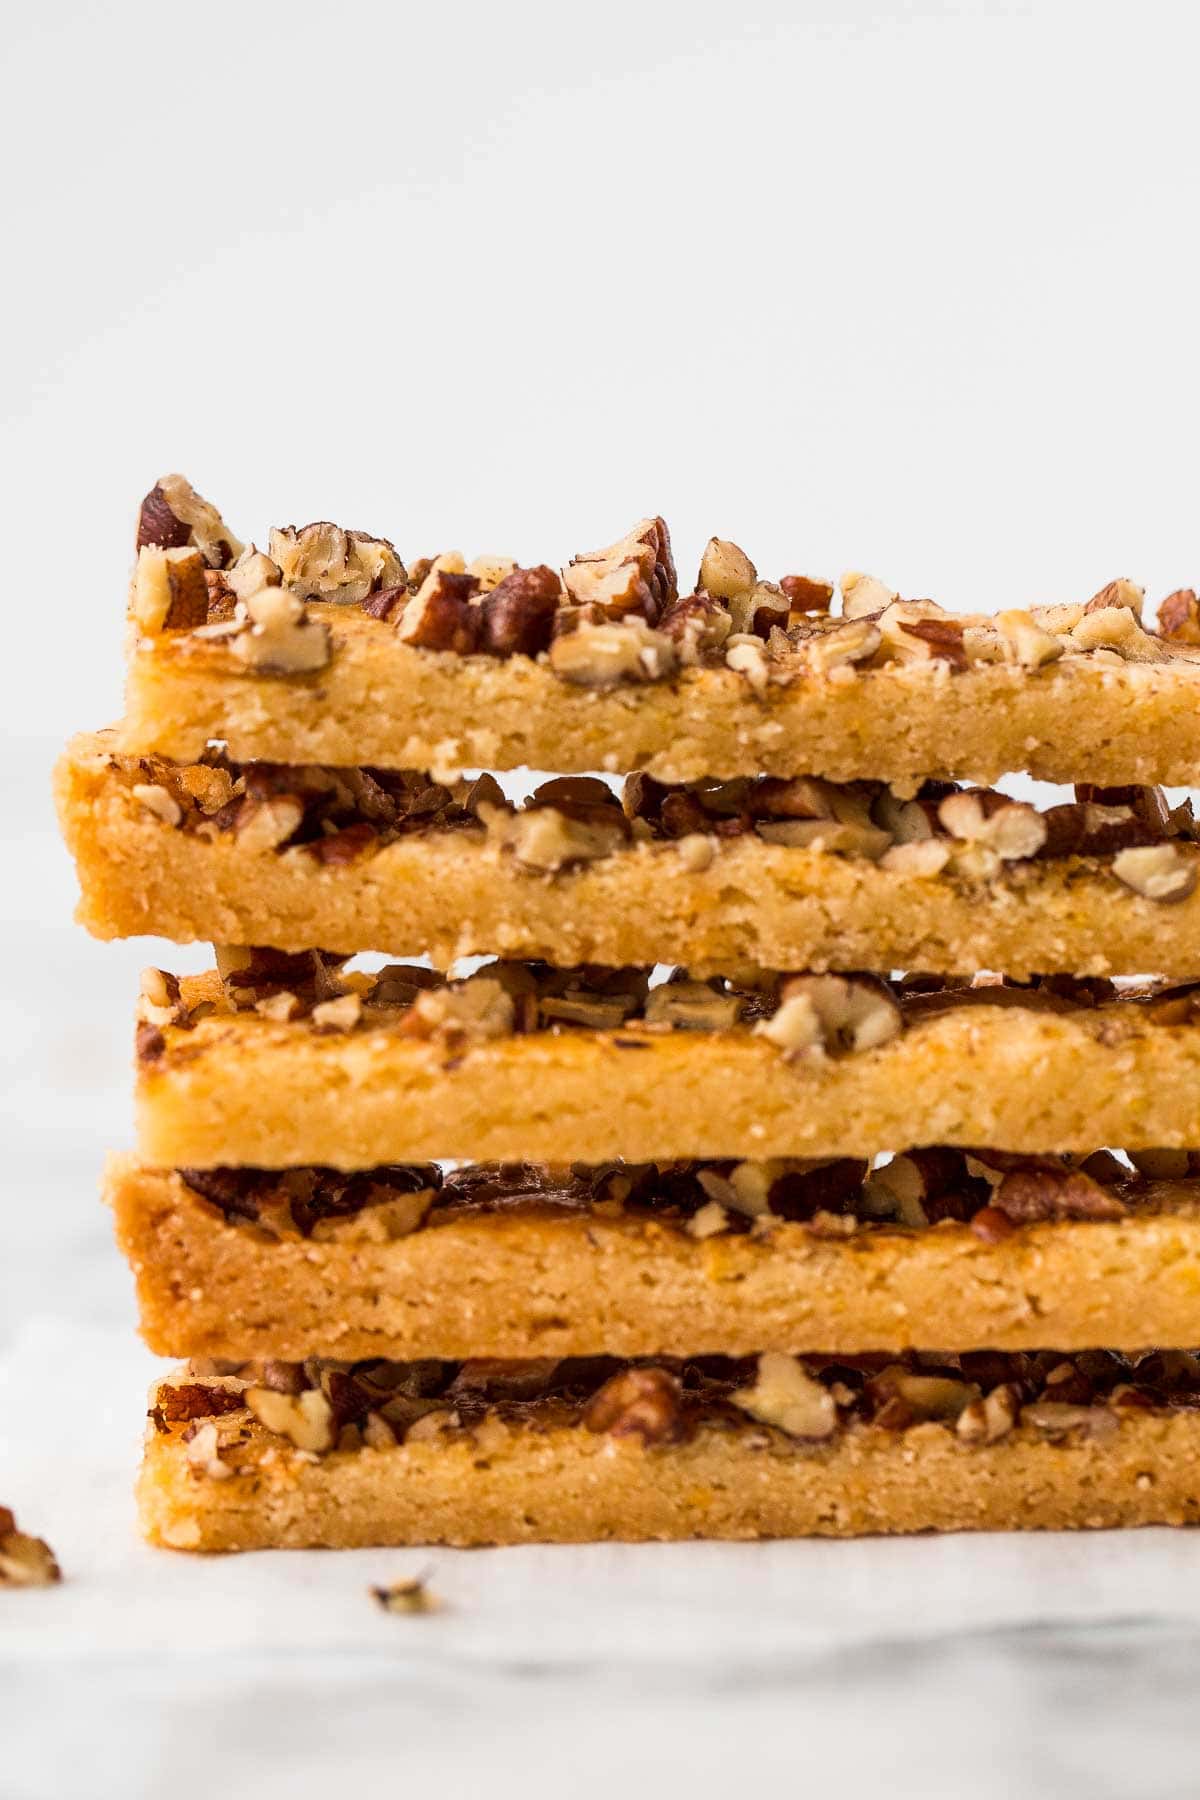
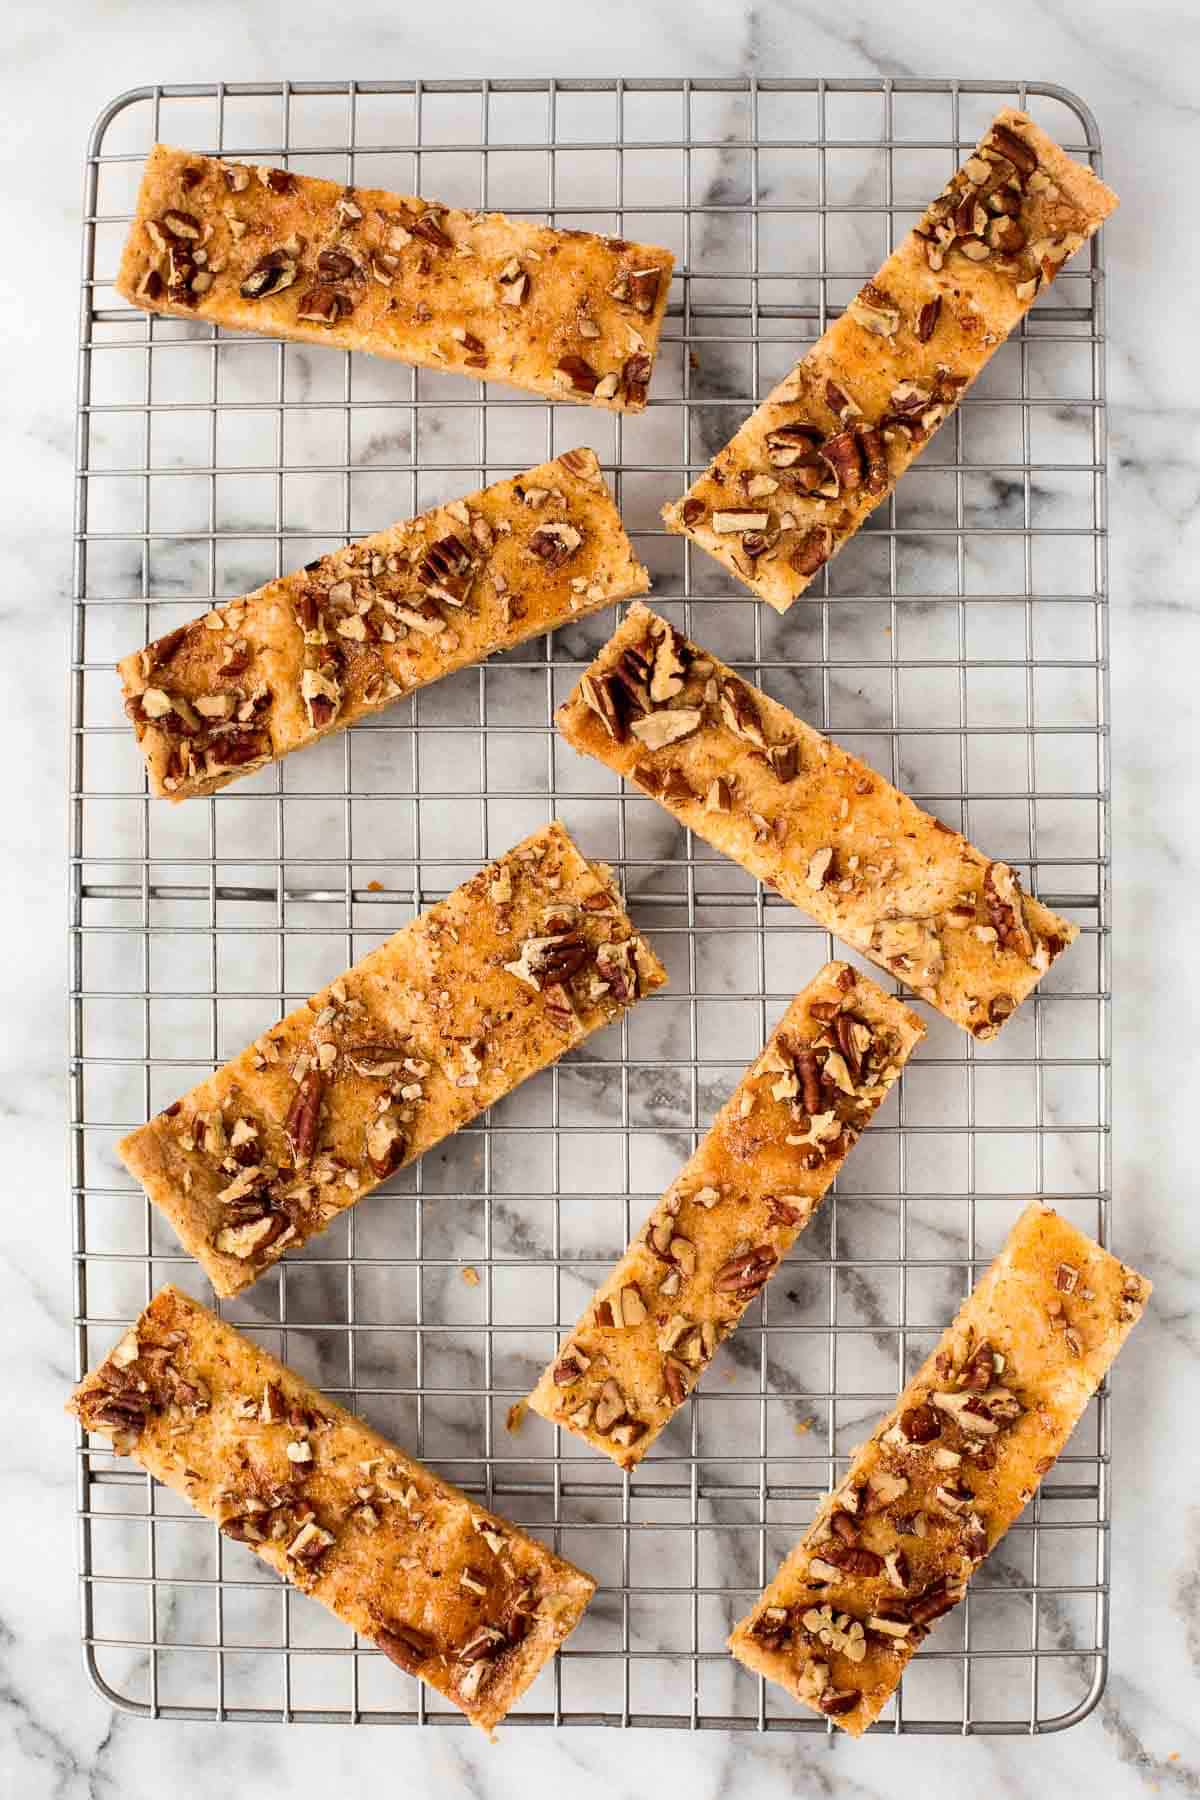
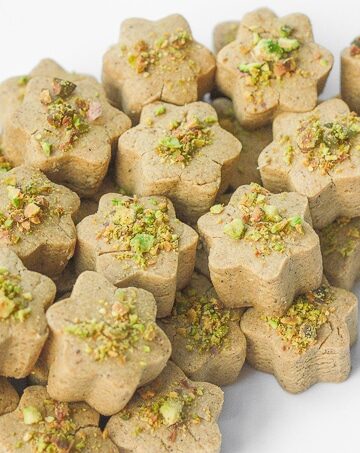
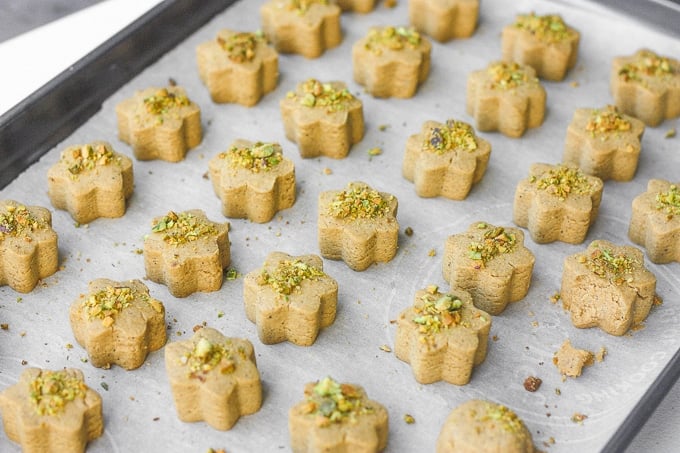
Pecan Toffee Bars

Pecan Shortbread Bars are delicious strips of buttery shortbread topped with crunchy nuts. These homemade cookie bars are the perfect treat to enjoy with a hot cup of coffee or tea, or as a snack throughout the day.
The best part? You just to spend 10 minutes of prep before placing these in the oven to bake. Seriously, if you love shortbread, then you will love shortbread topped with pecans.
Why You'll Love these Pecan Toffee Bars
- It's quick and easy to make. These bars take less than 10 minutes to prepare with only 6 simple ingredients which you probably already have in your pantry.
- A lighter version of pecan pie. These pecan toffee bars will remind you of a much lighter version of pecan pie but with minimal calories. This is huge if you are like me and obsessed with all things pecan pie - from Classic Pecan Pie to Pecan Pie Bars to Caramel Pecan Pie Cheesecake Bars.
- The perfect handheld snack. Because these bars are not super sweet, they classify in between a dessert and a snack. Which means that you can enjoy these as a snack any time of day. You can even sneak in a piece after breakfast.
Ingredient Notes
To make these delicious Pecan Toffee Bars, you will need the following ingredients:
- all-purpose flour
- sugar
- butter
- vanilla extract
- egg
- pecans - If you don't have pecans in your pantry, switch out the nuts with walnuts, slivered almonds, or chopped pistachios. Anything!
You will also need measuring cups and spoons, mixing bowls, and a quarter sheet baking pan.
How to Make the Best Pecan Toffee Bars
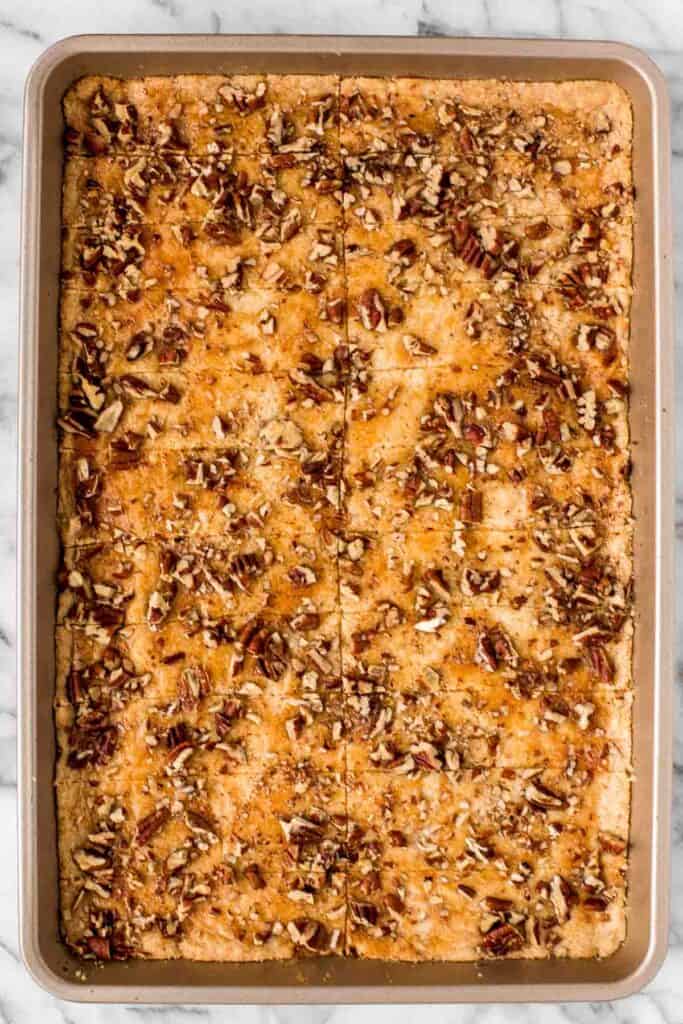
- Combine ingredients. In the bowl of a stand mixer, combine flour, sugar, butter, vanilla, and egg yolk. Beat until blended well, scraping down the sides as needed. Spray a small quarter sheet baking pan with baking spray. Turn the dough out into the prepared baking sheet and press with the palms of your hand to even out.
- Add egg wash and pecans. In a small bowl, beat the egg white and brush it on top of the prepared dough. Add chopped pecans. You could add 1 teaspoon of sea salt along with the nuts for a different taste.
- Bake. Bake in a 275 F preheated oven for one hour, or until golden. Cut into strips immediately before the bars harden. Transfer bars to a wire cooling rack to cool.

Recipe Variations
- Change the nuts. If you don't have pecans in your pantry, switch out the nuts with walnuts, slivered almonds, or chopped pistachios. Anything!
- Add chocolate. You can pull the bars out 5 minutes early and add chopped chocolate or chocolate chips, then return to the oven and finish baking.
- Give it a salty twist. For a savory twist, add 1 teaspoon of sea salt to the top along with the nuts.

Storing and Freezing Instructions
How to Store
Store in an airtight container at room temperature for up to 3 days, or in the refrigerator for up to one week.
How to Freeze
To freeze, arrange the shortbread bars in a single layer in an airtight container. Then add a layer of parchment paper and place another layer of shortbread cookies on top. You can also transfer them to a freezer bag once frozen.
More Shortbread Recipes
- Classic Shortbread Cookies
- Slice and Bake Pecan Shortbread Cookies
- Pecan Snowball Cookies
- Cranberry Orange Shortbread Cookies
- Carrot Cake Shortbread Cookies
- Jam-Filled Thumbprint Cookies with Almond Glaze
Tried this recipe?
I'd love to hear what you think! Leave a comment and rating below to share your feedback. Your reviews help others discover this recipe and help me keep creating more free recipes for you. Snap a photo and tag me on social media @aheadofthyme too.
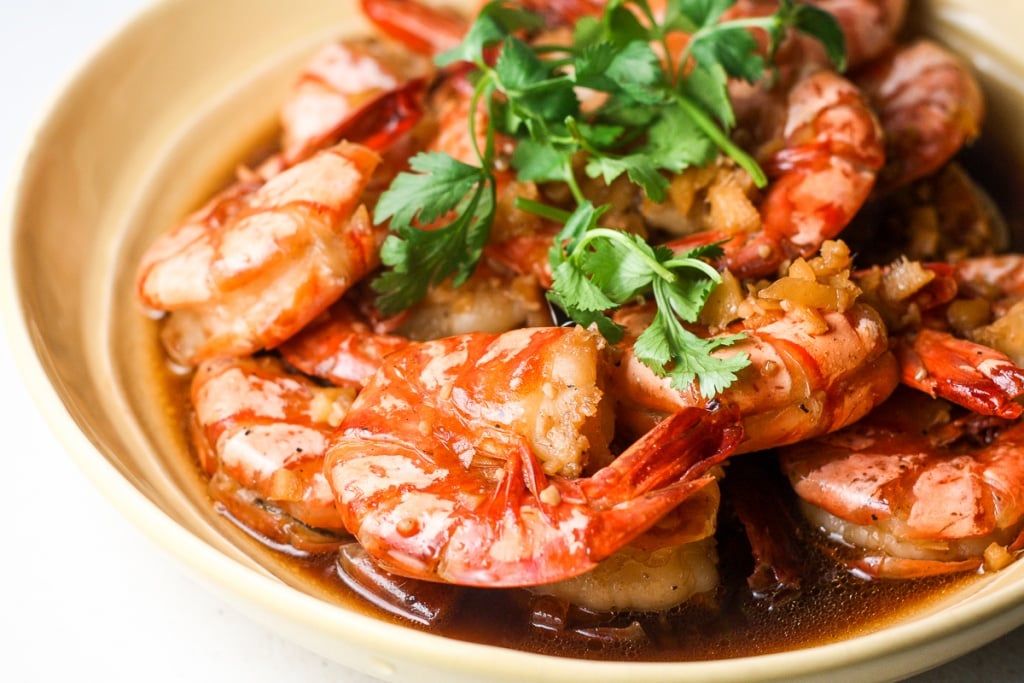
Tiger Prawns in Garlic Ginger Soy Sauce
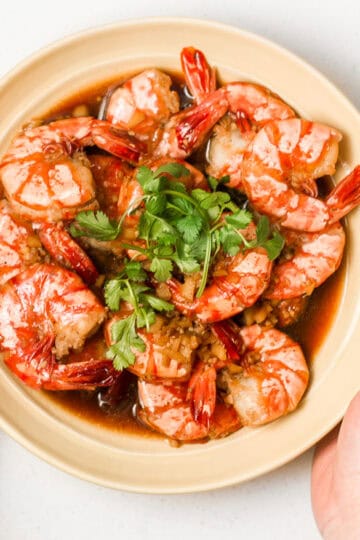
Happy Chinese (or Lunar) New Year! My favourite thing about Chinese New Year is that my hubby will whip up a bunch of delicious Chinese dishes. This year he surprised me with my favourite perfectly cooked, juicy, tender tiger prawns in delicious garlic ginger soy sauce. So, of course I had to photograph and share his masterpiece recipe with you.
BBQ Chicken Stuffed Baked Potatoes

If you’re looking for an easy weeknight meal, I’ve got you covered. Throw a couple things in the oven when you get home from work and within an hour you’ve got a gourmet meal ready to go. It's called BBQ chicken stuffed baked potatoes.

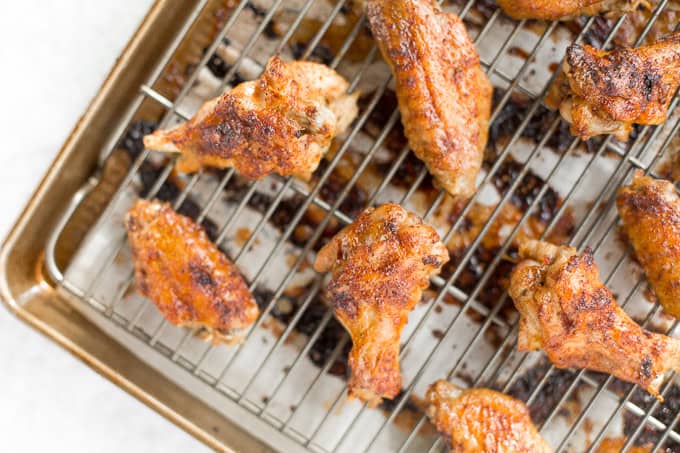
Crispy Baked Asian Chicken Wings

Chicken wings are the quintessential game day food, and for good reason! They’re so simple to make and in one batch you can feed a whole crowd. I usually make typical game day buffalo hot wings, but this year I am switching things up and giving my game day wings a bit of Asian flavour in recipe #3 of our Countdown to the Super Bowl series — crispy baked Asian chicken wings.
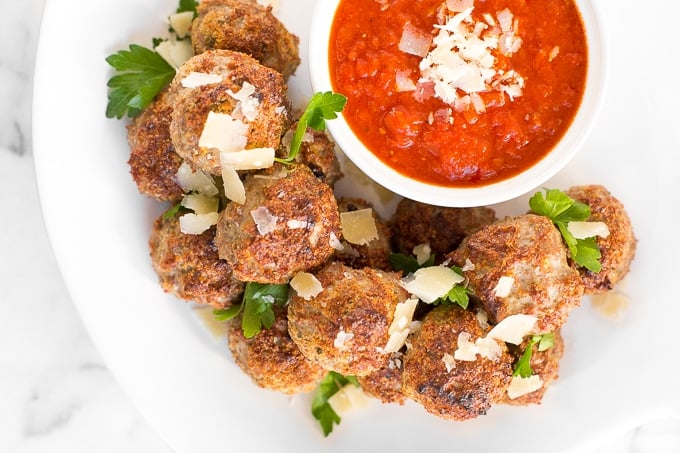
Baked Turkey Meatballs

When it comes to weeknight menu planning, meatballs reign supreme. Say good-bye to slaving away for hours in the kitchen and hello to dinner in under 20 minutes. Yes, 20 minutes from prep to table! It's called baked turkey meatballs.
Candy Cane Layered Cake

It's The Most Wonderful Time Of The Year! It's the hap -happiest season of all! One of my favourite things about the holidays are the delicious festive treats. Every holiday party needs a showstopper and boy do I have one for you!! It's called candy cane layered cake!!

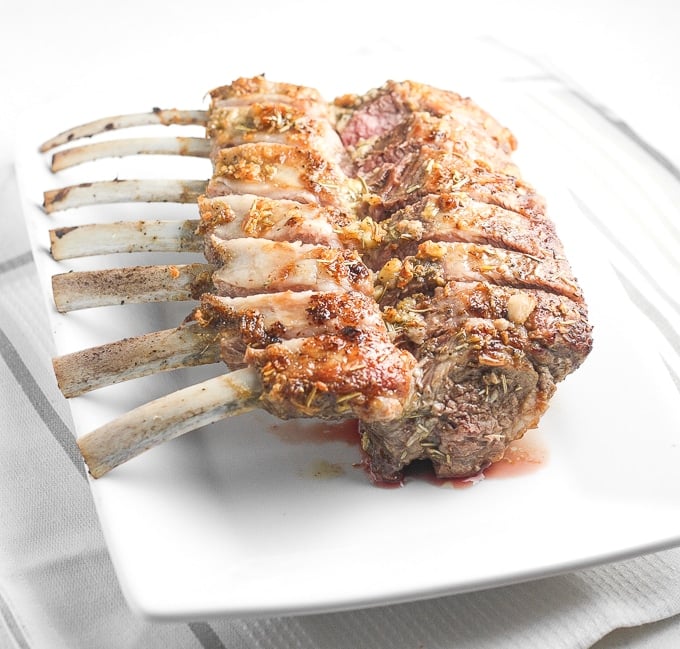
Garlic Rosemary Rack of Lamb

5 words. Garlic rosemary rack of lamb.
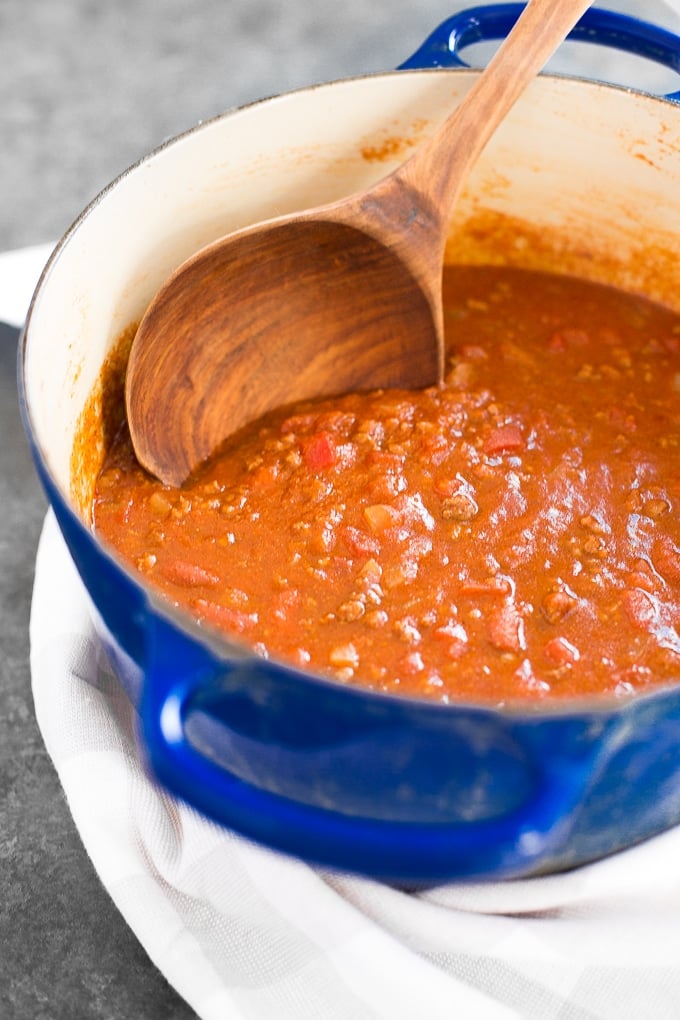
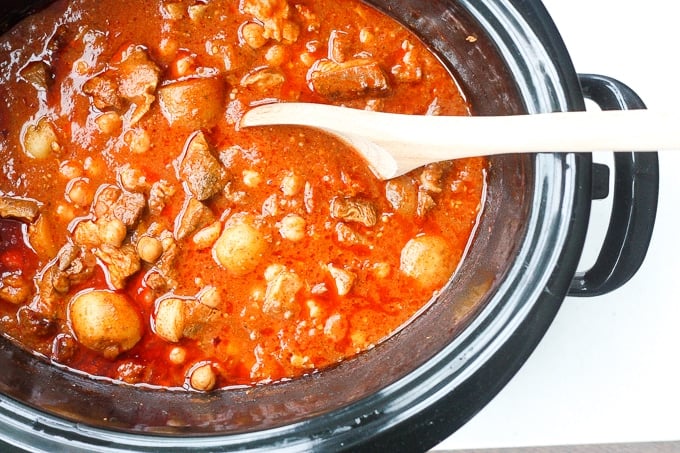
Easy One Pot Chili

Is there anything more comforting than a bowl of chili? I think not. Easy one pot chili, I am coming for you!
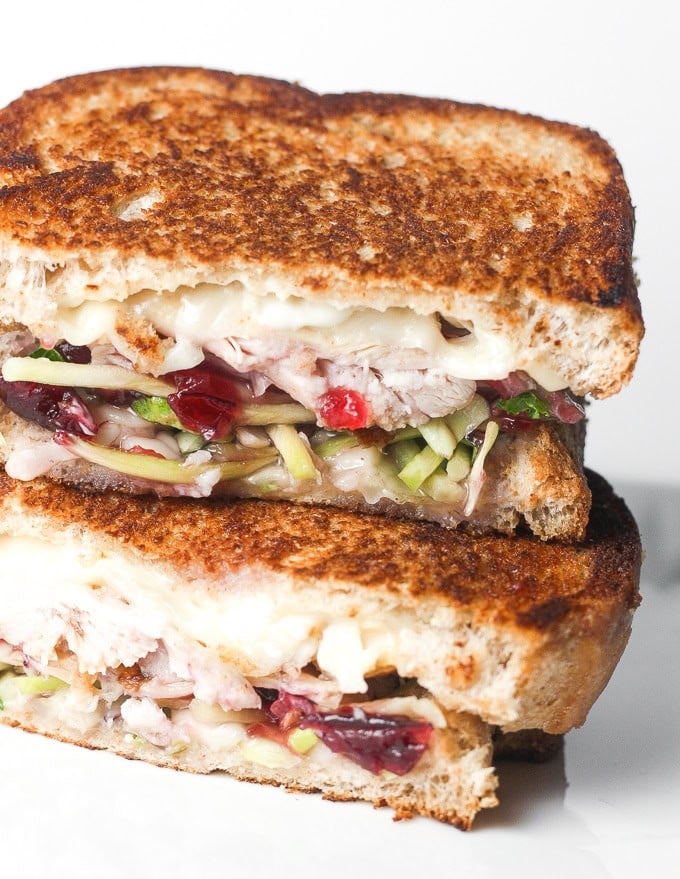
Leftover Thanksgiving Turkey Sandwich with Cranberry Sauce
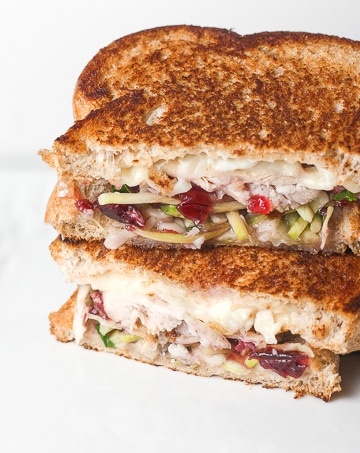
Once Thanksgiving is over, the focus turns to those leftovers! There is only so many classic turkey dinners that you can consume in a week. Put those leftovers to good use and make this delicious and festive, leftover Thanksgiving turkey sandwich with cranberry sauce. This stuff is drool-worthy good.
Chopped Pecan Pie

Sometimes you just don't want to serve the same typical desserts at your holiday table, yet you still crave those classic fall flavours. Pecan pie is my favourite holiday dessert and I have changed things up this year by giving traditional pecan pie a twist and using finely (or coarsely) chopped pecans instead of pecan halves to create a smooth crispy topping on what I like to now call, chopped pecan pie!

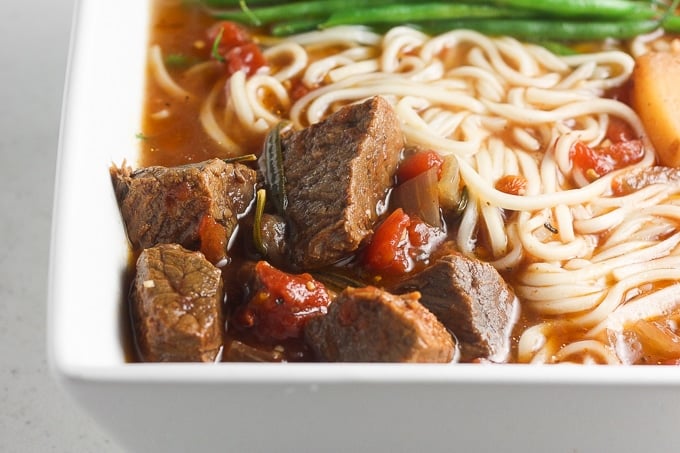
Slow Cooker Beef Stew Ramen

We officially had our first, although short-lived, snow fall this year. It is only the beginning of November! What is happening people? The good news is that it's time to bring out the slow cooker and enjoy more warm, comforting foods and soups at home. Foods such as flavourful, slow cooker beef stew ramen. Drool.
Apple Cardamom Cake with Caramel Pecan Butter Frosting
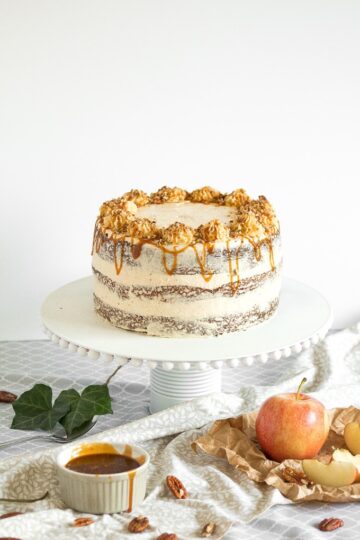
When you combine the warm and cozy flavours of apples, cardamom, caramel and roasted pecans together, something called magic happens. It is also called the perfect fall cake. Yes this is happening right now people! Apple cardamom cake with caramel pecan butter frosting.
Greek Salad Hummus Flatbread

How is it already mid-August? Where has this summer gone!? After a 2-month break from work, I am starting a new job tomorrow. Which unfortunately means that my weekly posts will be going back down from two to one. Hey, it's quality over quantity, right? Well, quality is the theme of today's recipe aka. my new favourite appetizer. Greek Salad Hummus Flatbread. Yes.

This post was sponsored by Frontier Co-op. The recipe and opinions are my own. [Read more...]
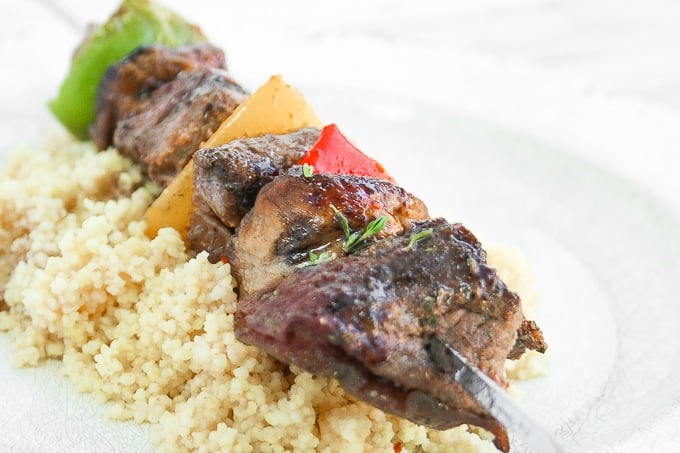
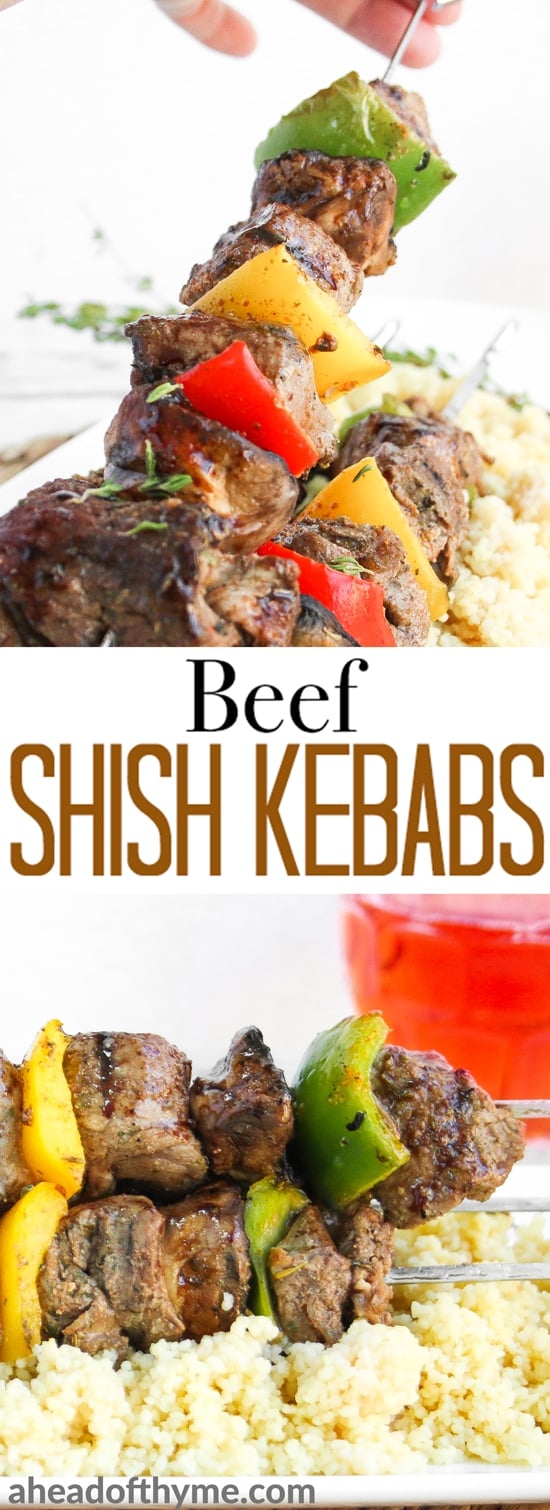
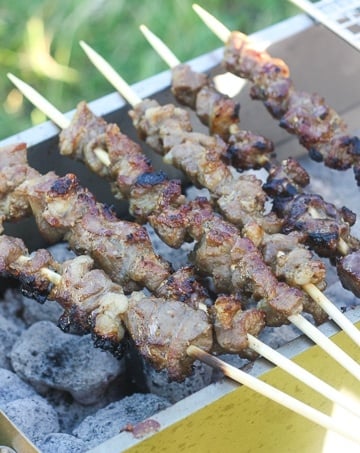
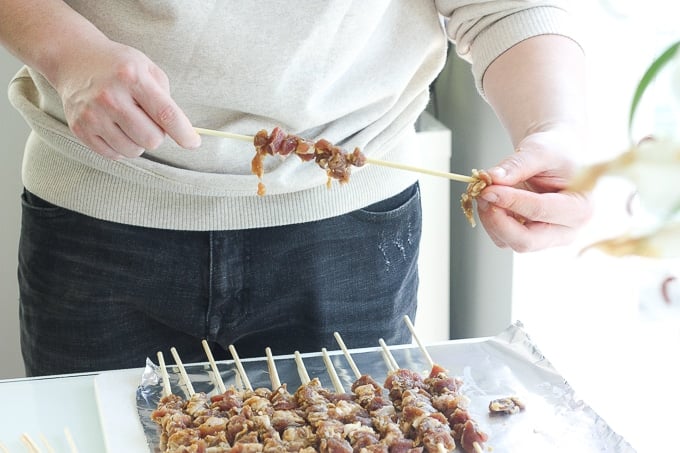
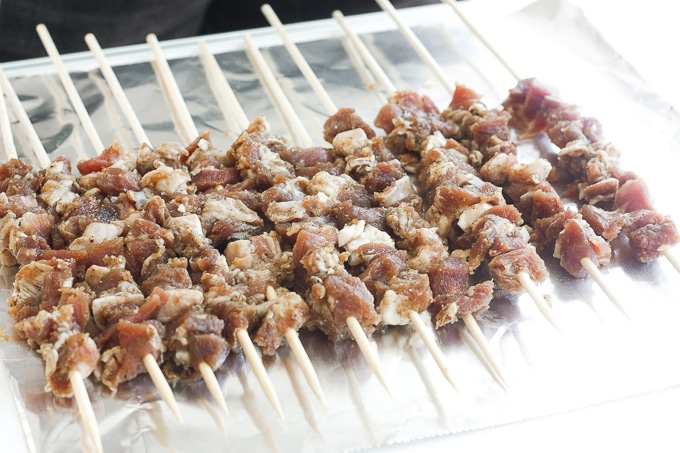
Beef Shish Kebabs

If you are running out of ideas to make for your BBQ picnic this summer, look no more! Nothing completes the perfect summer barbecue more than juicy and tender beef shish kebabs. They are as amazing to look at as they are to eat! Meat and vegetables on a stick? Where do we sign up?
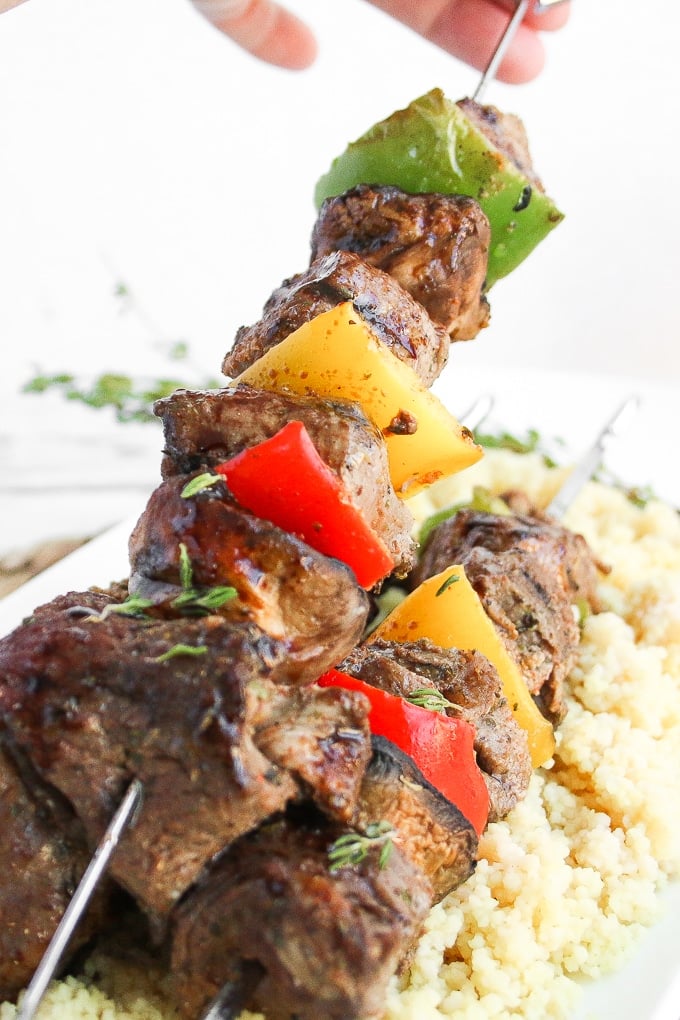
These juicy beef shish kebabs are made with beef steaks that are marinated in a lovely blend of cilantro, mixed herbs and garlic powder. Be sure to also toss your vegetables in little olive oil before skewering to prevent them shrivelling up and drying out on the BBQ.
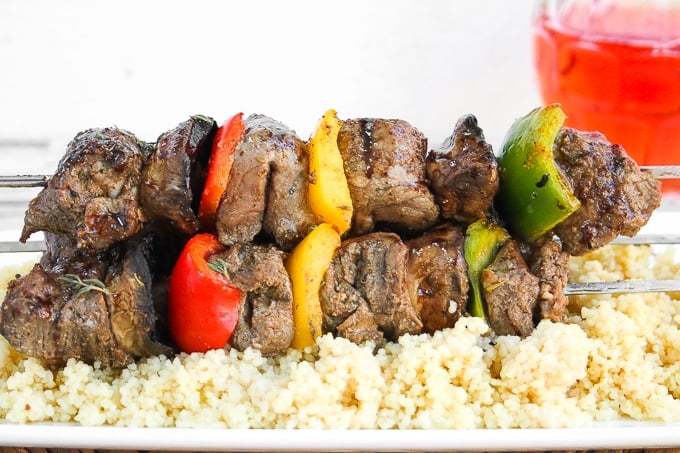
Once marinated and skewered, these beef shish kebabs take 10-15 minutes to be grilled to perfection! All you have to worry about is figuring out what dishes to serve alongside these. How about some couscous or rice, roasted corn, a fresh green salad, or just on their own with a tall glass of refreshing sparkling strawberry lemonade? Yes, please!
This recipe is perfect for 2 people, but If you are planning to make more, simply double or triple the recipe below. Go wild!
Variation
These kebabs can be relatively lean when using beef steak which are trimmed of visible fat. But if you are watching your hips very closely, this recipe will work equally well with lean chicken breasts. Just make sure to adjust the cooking time to ensure that the chicken is cooked properly and thoroughly.
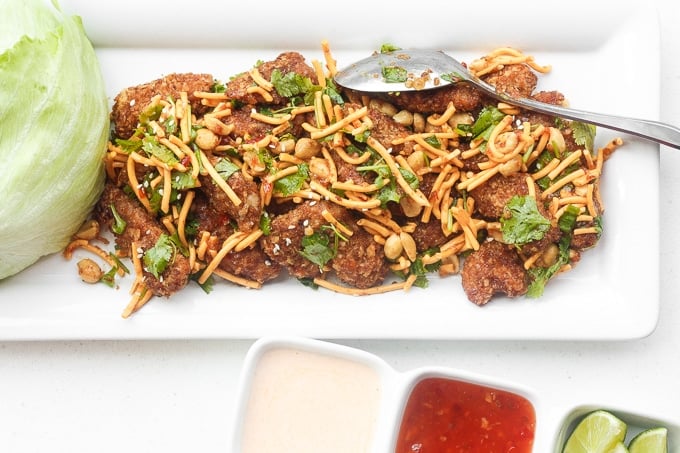
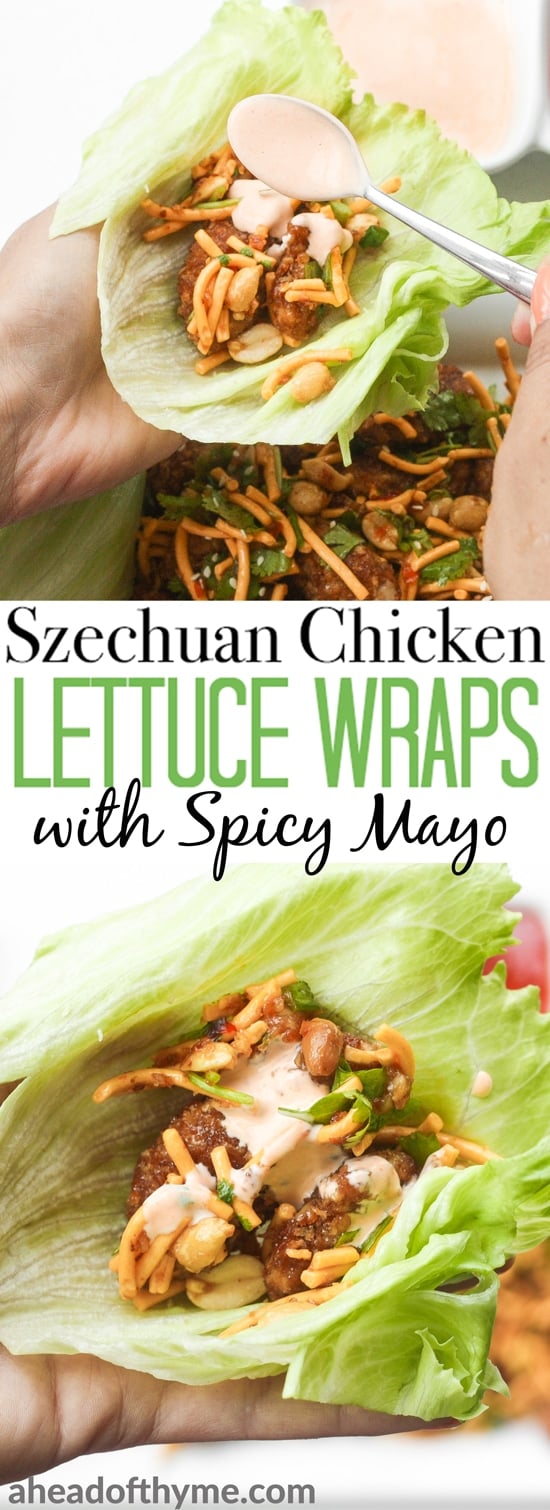
Szechuan Chicken Lettuce Wraps with Spicy Mayo (Cactus Club Copycat)
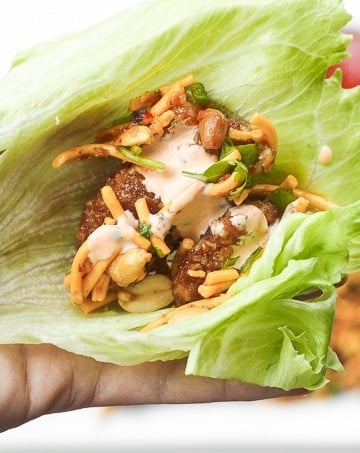
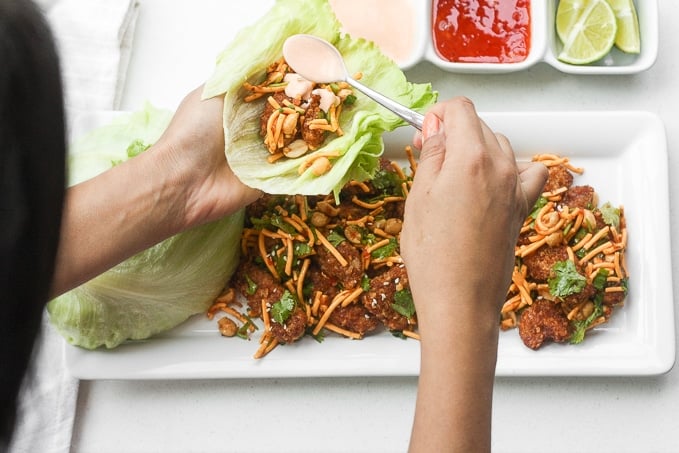
One of my favourite restaurants here in Canada is Cactus Club Cafe. And I kid you not, I order their spicy chicken lettuce wraps every time that I go there. Whether it's to share with my friends as an appetizer or to devour as my main course. This dish is always on the bill. So, I was inspired to recreate this favourite at home. I was pretty impressed with my results and now I am sharing it with you. Brace yourselves and experience Szechuan chicken lettuce wraps with spicy mayo!
Szechuan cuisine originates from southwest China in the province of Sichuan. The cuisine is comprised of bold and spicy flavours and these lettuce wraps are no exception. Each bite is bursting with bold and spicy flavours. Although this dish isn't very spicy compared to traditional Szechuan dishes, which are immersed in cups of chilli peppers. But that being said, these chicken lettuce wraps still have a little kick to them. I wouldn't recommend these for the faint-hearted.
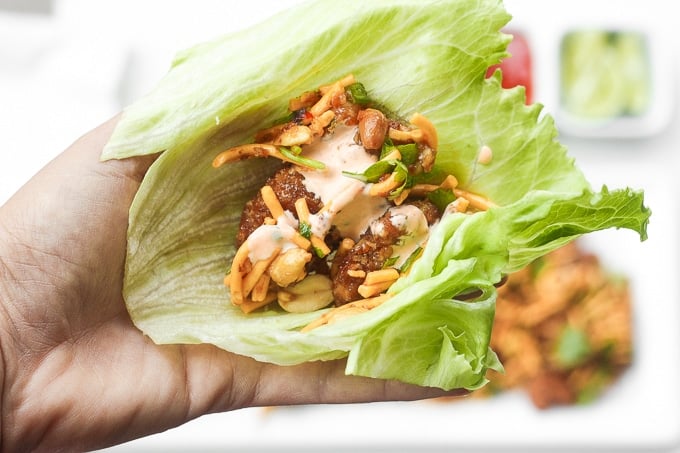
Just imagine, crispy chicken strips coated in Asian flavoured breadcrumbs, yes I am talking soy sauce, rice vinegar, and sesame oil. And it doesn't stop there. Toss the chicken in noodles, cilantro, green onions, sweet chilli sauce and sesame seeds. Wrap it all up in a piece of iceberg lettuce, dip it in homemade spicy mayo and crunch away.
How to Make Spicy Szechuan Chicken Lettuce Wraps
To make these lettuce wraps, here's exactly what you will need to do:
- Prepare the panko breadcrumb mixture. Heat sesame oil over medium heat. Add panko breadcrumbs and cook until they start to brown. Remove from heat and mix in soy sauce, rice wine vinegar, salt and pepper. Toss to combine.
- Prepare the chicken. Fully coat each piece of chicken with flour, then dip into an egg and mayonnaise mixture, and lastly into the panko breadcrumb mixture. Place onto a lined cooking tray and bake for 20-25 minutes, until golden brown.
- Prepare lettuce wrap filling. Place chicken into a large bowl and add chow mein noodles, green onions, cilantro, peanuts, and sweet chili sauce. Toss to coat.
- Serve. Transfer mixture into serving dish and sprinkle sesame seeds on top and add some lime wedges. Serve with a head of iceberg lettuce, cut in half through the stem.
- Prepare spicy mayo. In a small bowl, mix mayonnaise, hot sauce, and lime juice together.
- Eat. Scoop a couple spoonfuls of the chicken mixture into a piece of iceberg lettuce, drizzle some spicy mayo on top, wrap it like a taco, and crunch away. Life does not get better than that.
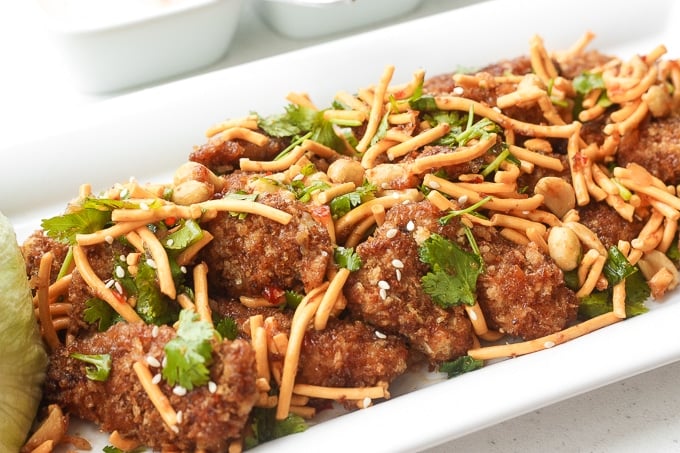
And guess what? Our version is healthier because the chicken is baked and not deep-fried in a bucket of oil! Finally, a dish that you won't feel guilty about! You're welcome 🙂
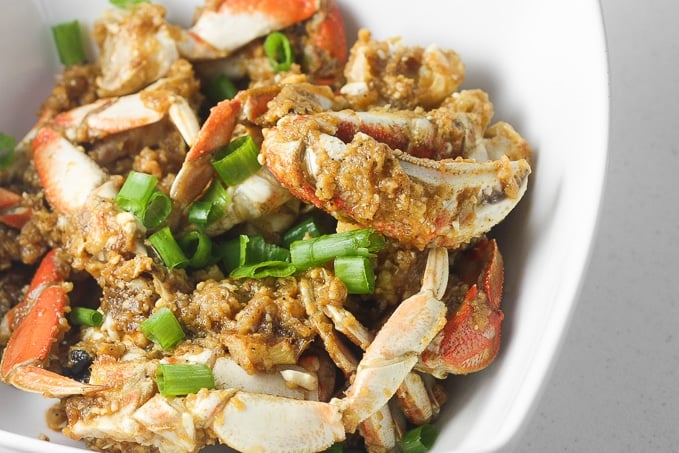
Ginger and Scallion Dungeness Crab
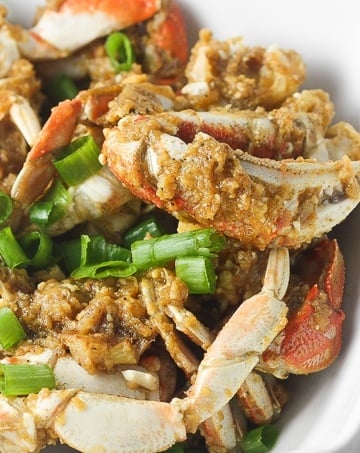
When your husband takes on a new fishing and crab catching hobby, new seafood dishes are born in your house. We are lucky here in Vancouver for the abundance of Dungeness crabs in our waters. Yesterday my hubby came home with 3 crabs! He went straight to work in the kitchen and created this ginger and scallion Dungeness crab dish. Umm... yum!
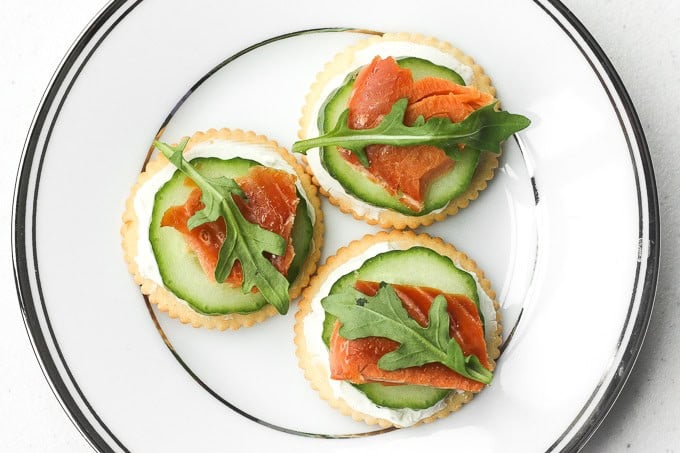
Smoked Salmon and Cream Cheese Cracker Bites

Do you know what the easiest bites to make are? I do. It's called smoked salmon and cream cheese cracker bites. It takes literally 10 minutes to make and about 5 minutes to eat! I probably eat about a dozen of them while I am making them. I mean.. come on! Cream cheese spread over a thin crunchy cracker topped with refreshing cucumber, smoked salmon and spicy arugula. How can you not?
Tomato and Mozzarella Tart

Looking for the perfect appetizer or light lunch? Look no further! Pair beautiful ripe tomatoes, decadent fresh mozzarella and jammy red onions together with a scatter of basil leaves and a pomegranate molasses drizzle to create what is known in simpler terms as a tomato and mozzarella tart.

Grilled Spicy Cumin Lamb Skewers
I love everything about summer. The weather, the patios, the outdoor activities and last, but certainly not least, the barbecues! Last weekend, my hubby and I went to the local Asian night market here in Vancouver. The night market has grown into a huge event full of hundreds of vendors. If you want any type of Asian street food, it is there. We have probably tried almost every single vendor! But each year, our go-to favourites are the barbecue skewers. My husband claimed he could make them better so I put him to the challenge. And boy did he do well. He made a batch of mouthwatering, juicy, grilled spicy cumin lamb skewers.
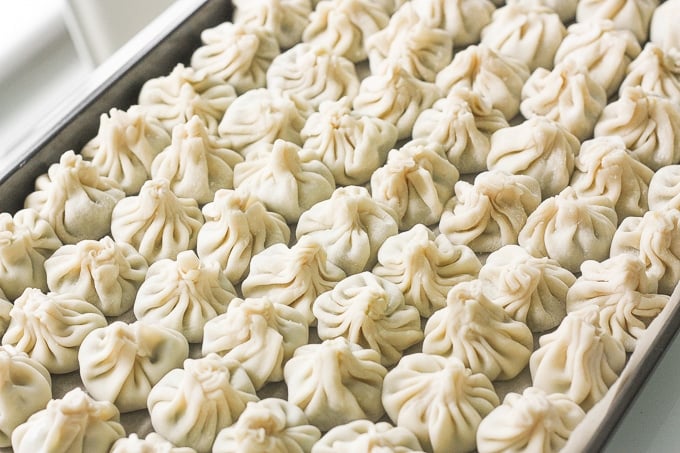
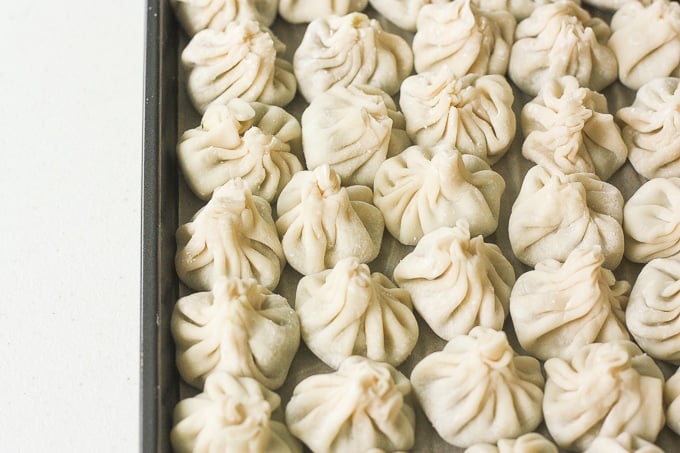
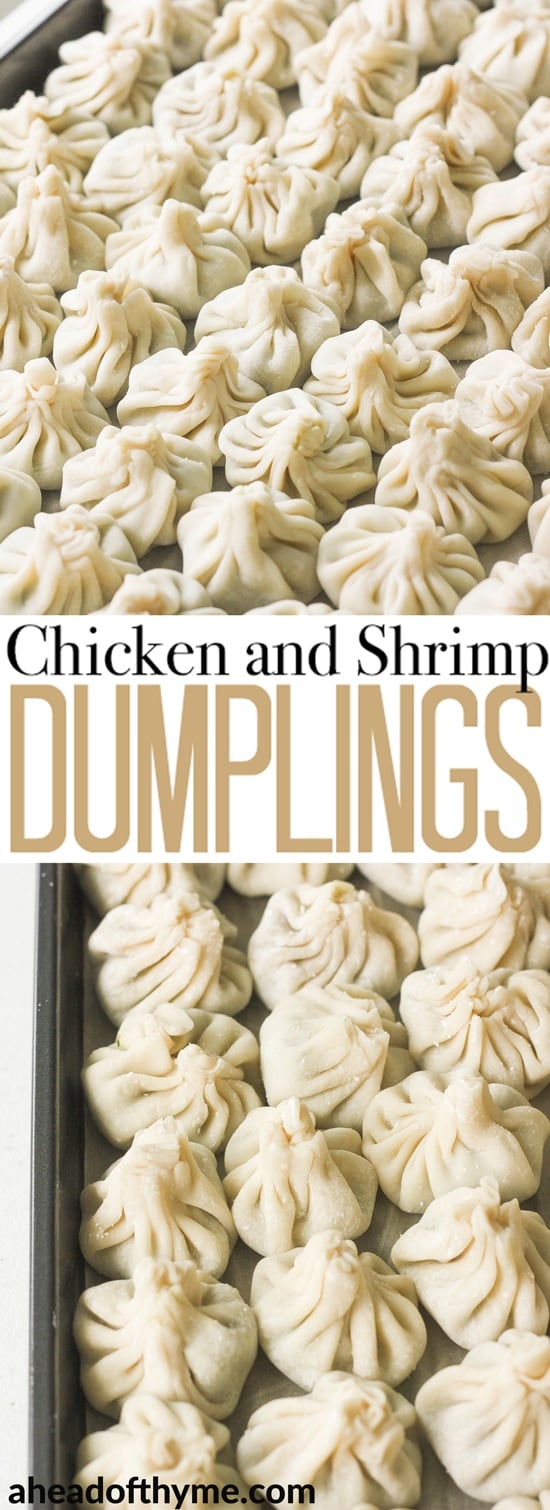
Chicken and Shrimp Dumplings
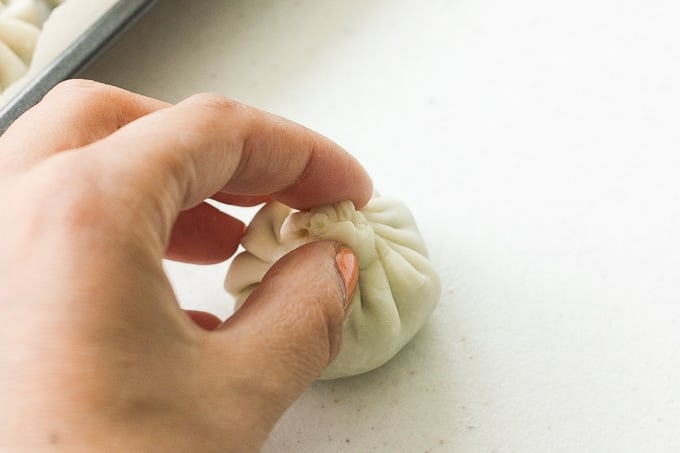
Soo this just happened. I made dim sum in my own home and scored some major wifey points. And I didn't make just any dim sum, I am talking juicy, flavourful chicken and shrimp dumplings filled with garlic chives, ginger, garlic, and a hint of sesame oil and soy sauce. My mouth drools just writing about it.
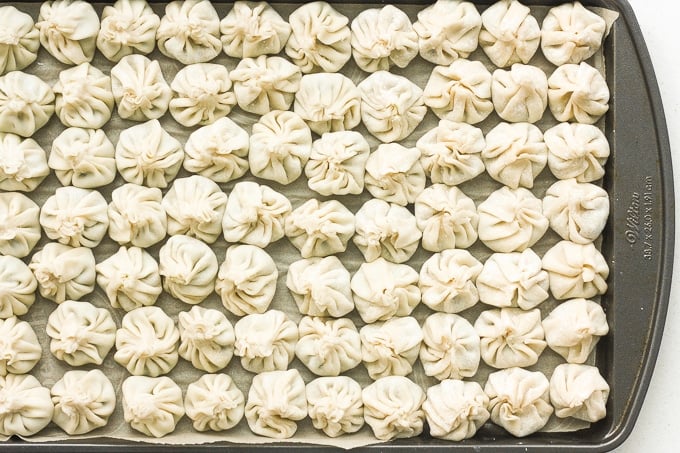
Dumplings are so easy to make. The mixture is easy and the cooking process is easy. What is time-consuming is the folding. It takes me at least an hour to fold this many dumplings. I make a big batch so that I can freeze them and use as desired.
Save for a super easy weeknight dinner? Check! ✓
However, if you just don't have the patience to fold 80 dumplings, simply get a family member to help you or just cut the recipe in half.
How to Cook Dumplings
There are three main ways to cook these dumplings: pan-fried, steamed and boiled.
- Pan-Fry: In a large skillet, heat vegetable oil over medium heat. Add dumplings and cook 2-3 minutes until bottom is crisp and golden. Add water (enough to cover the dumplings halfway up), cover, and steam the dumplings for about 5 minutes until the liquid is absorbed.
- Steam: In a pot, bring water to boil . Place dumplings in steamer on top and steam for 15 to 20 minutes until tender.
- Boil: Fill a large pot with ⅔ water and bring to a boil. Add dumplings and cook until they float and continue to cook for 2-3 minutes.
Slow Cooker Moroccan Lamb Stew

5 words. Slow cooker Moroccan lamb stew. Juicy pieces of lamb slow-cooked to tender, melt-in-your-mouth perfection, combined with a handful of spices, potatoes and chickpeas.
Just take a minute to take that all in.
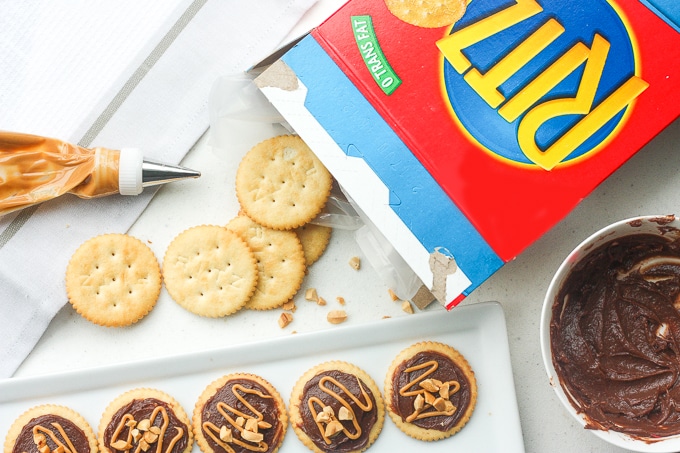
Four Quick and Easy RITZ Cracker Recipes

Thank you RITZ Crackers for sponsoring this post. Be sure to check out RITZ Crackers, the delicious cracker for all your entertaining needs, at an Albertsons Companies store near you.
It is finally starting to feel like spring around here. Days are getting longer, birds are chirping, sun is shining... and to top it off, I am finally back home for good after completing a 6-month work contract in a town 2 hours away. Meaning, I can see my hubby all week long (not just on weekends) and I can start hosting some get-togethers at our place. And what takes the stress out of planning and hosting the perfect party? Four quick and easy RITZ Crackers recipes.
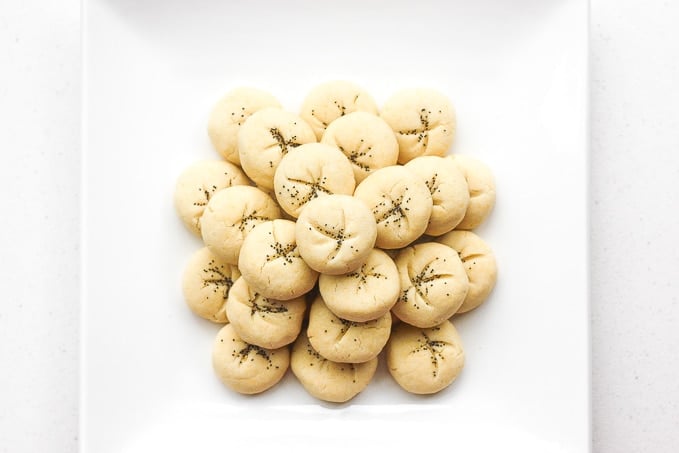
Persian Rice Cookies with Poppy Seeds (Nan-e Berenji)
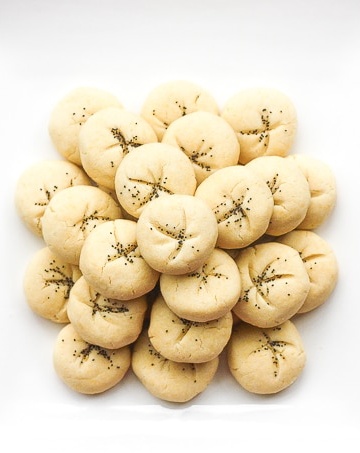
Nan-e Berenji, or Persian rice cookies with poppy seeds, are one of the most traditional cookies in the Persian culture. I always looked forward to eating these cookies, along with some of my other favourite baked goodies, every Persian New Year (Norouz). So with Persian New Year approaching next week, I think it's about time I whip up a batch of these in my own home.
Persian Chickpea Cookies with Pistachio (Nan-e Nokhodchi)
Persian new year (Norouz) is fast approaching. One of the biggest Norouz traditions is baking delicious sweets. The cardamom, rose water, and nutty aromas that are filling my kitchen right now is basically my idea of heaven. Over the next few weeks I will be in a baking frenzy and will essentially be running what will look like an Iranian bakery, right out of my kitchen. First up on the menu: nan-e nokhodchi aka. Persian chickpea cookies with pistachio.
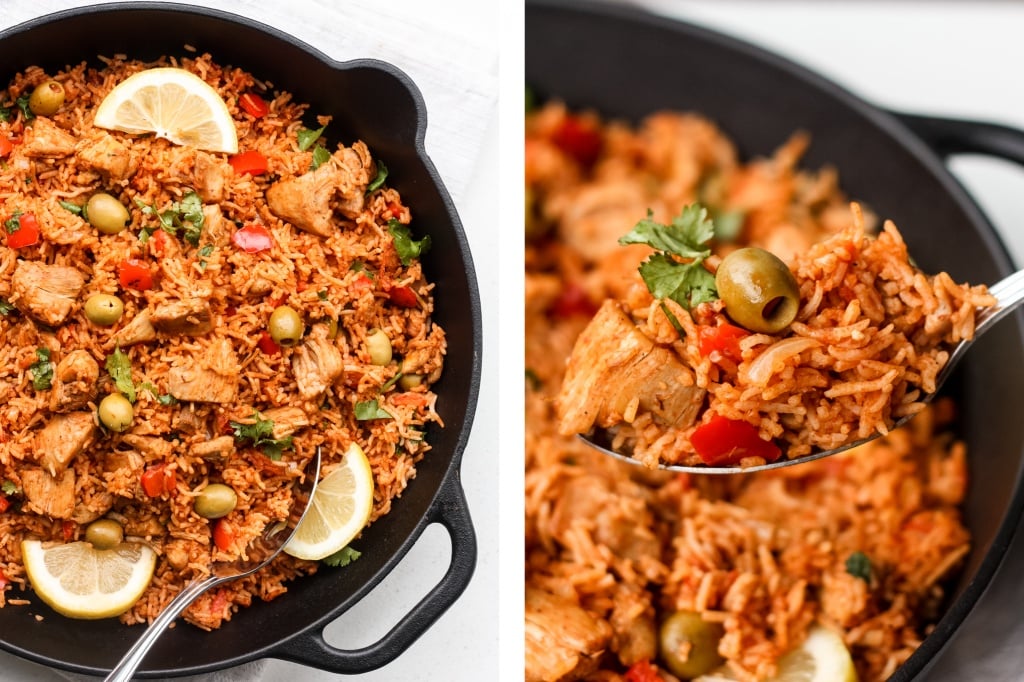
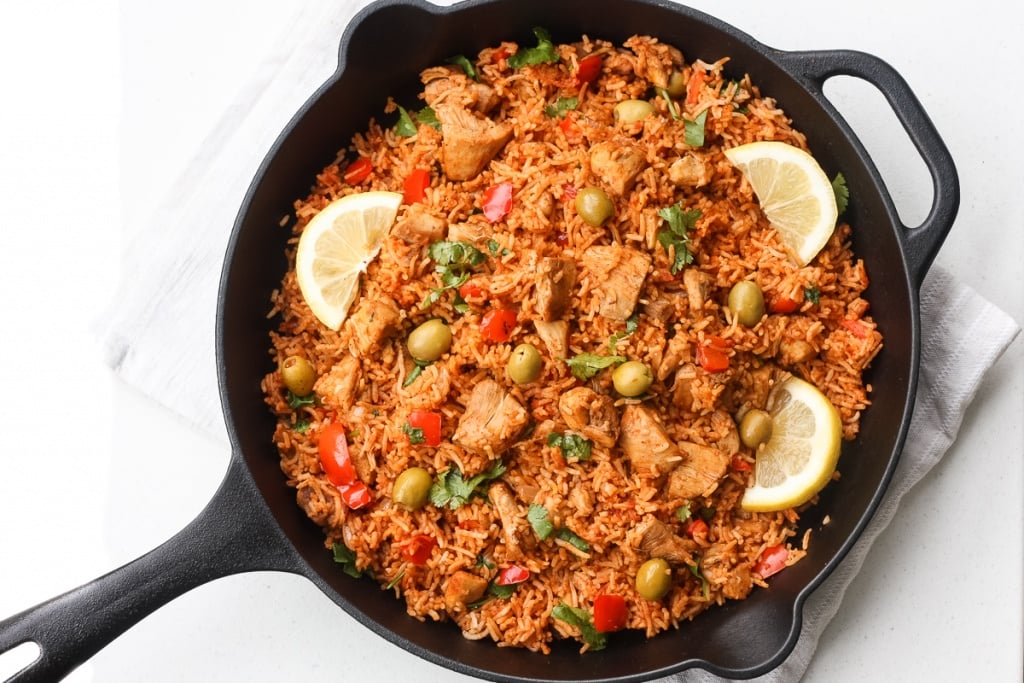
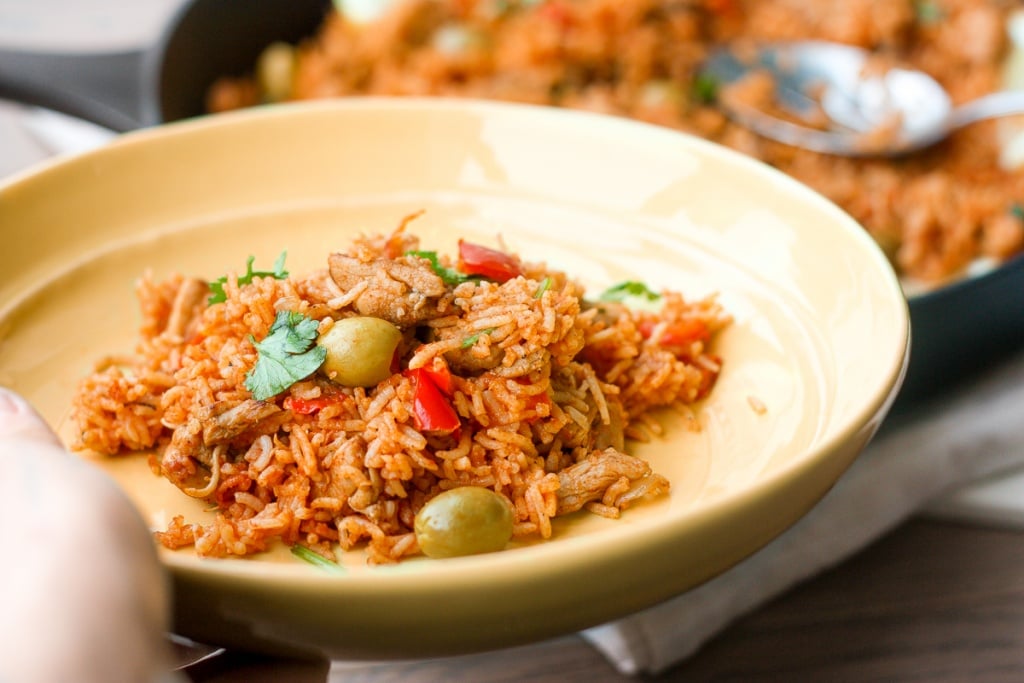
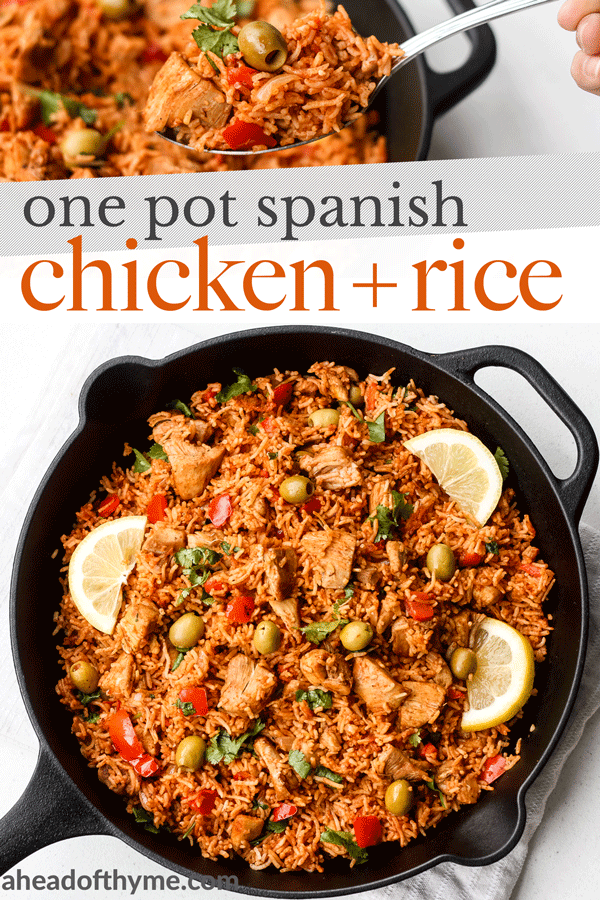
One Pot Spanish Chicken and Rice

If you know anything about me, you know that I am a sucker for quick and easy weeknight meals. As a full-time working woman, these type of meals are a life-saver. But luckily, quick and easy does not have to mean bland and boring. One pot Spanish chicken and rice is packed with flavour, real ingredients and is full of vibrant colours that will make your heart sing.
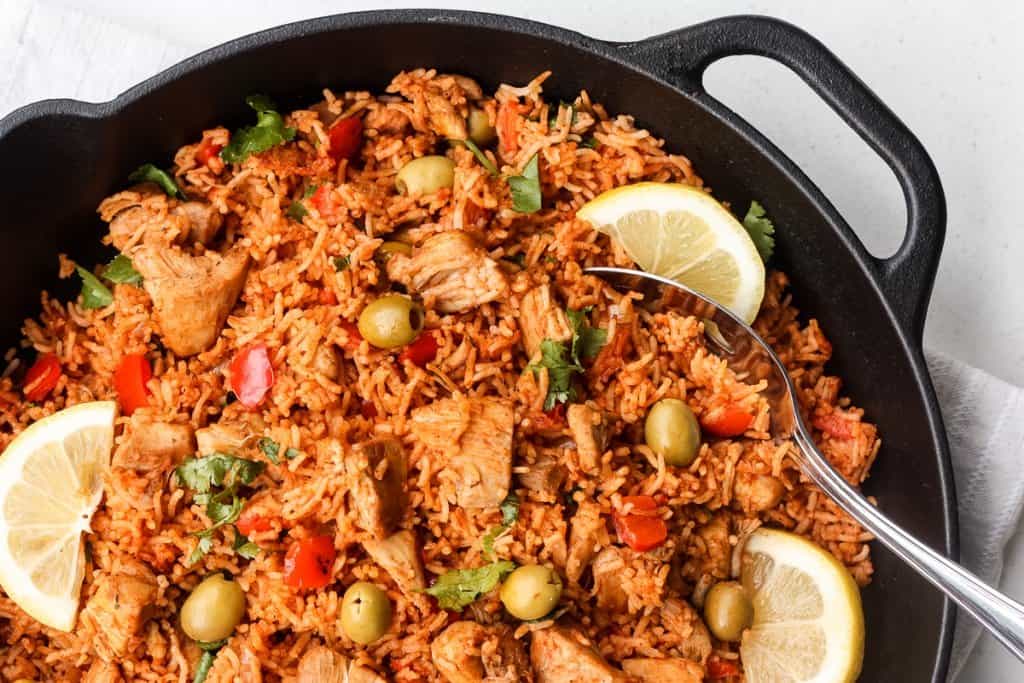
Spanish chicken and rice is quick because it only takes about 30 minutes to cook. It's easy because everything cooks in one single pot or skillet. That's right... this is a no fuss, no clean up dinner. From cutting board to pot to plate.
Ingredients in Spanish Chicken and Rice
To make the perfect weeknight meal, you will need to gather the following ingredients:
- olive oil
- chicken thighs - boneless and skinless, cut into 1-2 inch pieces
- rice - long grain white rice
- vegetables - onion, garlic, red bell pepper
- tomato sauce
- chicken stock
- seasoning - paprika, saffron, salt and pepper
- green olives - stuffed with pimento
- cilantro
- lemon wedges - optional for serving
How to Make One Pot Spanish Chicken and Rice
Essentially, you cook your ingredients, one by one, in a skillet. Then, once all your ingredients have been added and tossed together in the skillet, you simply cover and let it cook on its own for 25 minutes. You don't have to monitor a thing. You don't even have to use this time to prepare side dishes because this dish, my friend, is an all-round wholesome and balanced meal. It's got your protein, it's got your grains, its got your veggies.
Let me break down the easy steps for you.
- Start cooking the chicken. Heat oil in a large non-stick skillet. Add chicken and season with salt and pepper. Cook for about 5-6 minutes until chicken begins to slightly brown.
- Add vegetables. Add onion, red pepper and garlic and cook for a few minutes until start to soften.
- Add rice. Stir in rice and cook for a couple minutes.
- Add seasoning. Mix in the paprika and cook for one minute. Add chicken stock and tomato sauce and bring to a boil. Turn down the heat, add the saffron, cover and cook for 25 minutes until rice is fully cooked.
- Serve. Add salt and pepper to taste. Toss in olives and cilantro, and serve with a lemon wedge.
So basically while you wait for your chicken and rice to cook, the only thing that will be happening in your home is you sitting down, kicking your feet up while your mouth starts salivating from the amazing aromas that will be filling up your kitchen. Trust me on this one. So good.
Spanish Rice with Chorizo
You can also change things up and add some chorizo sausage to this dish. To do so, add 4 ounces of skinned and sliced chorizo to the pan once the chicken has been cooking for 2-3 minutes. Then cook the two together for another 2-3 minutes and follow the rest of the steps as set out in the recipe.
More Rice Recipes
- One Pot Rice Pilaf with Carrots
- 10-Minute Vegetarian Fried Rice
- Easy Coconut Rice
- 10-Minute Seafood Fried Rice
- Teriyaki Grilled Salmon Rice Bowl
Tried this recipe?
I'd love to hear what you think! Leave a comment and rating below to share your feedback. Your reviews help others discover this recipe and help me keep creating more free recipes for you. Snap a photo and tag me on social media @aheadofthyme too.
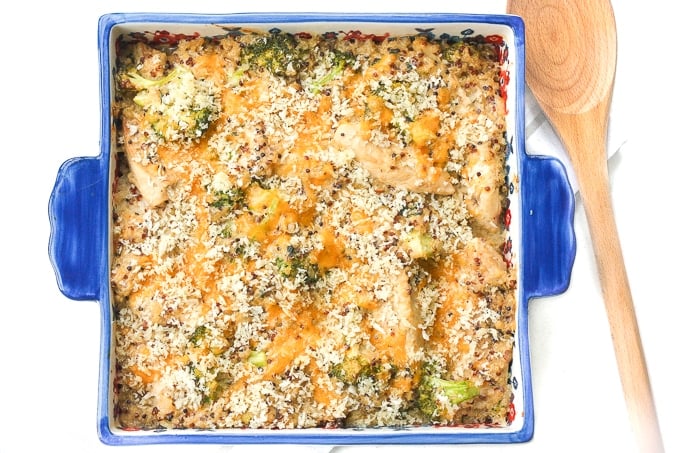
Creamy Chicken, Broccoli and Quinoa Casserole
You guessed it... another easy chicken weeknight meal. That's what happens when you buy a pack of chicken breasts from Costco. And right now, when it is so cold outside and literally on the verge of snow, nothing sounds more prefect that a bowl of creamy comfort food. So what happens when you have lots of chicken and craving comfort food? Creamy chicken, broccoli and quinoa casserole. Or in other words, the best casserole ever.
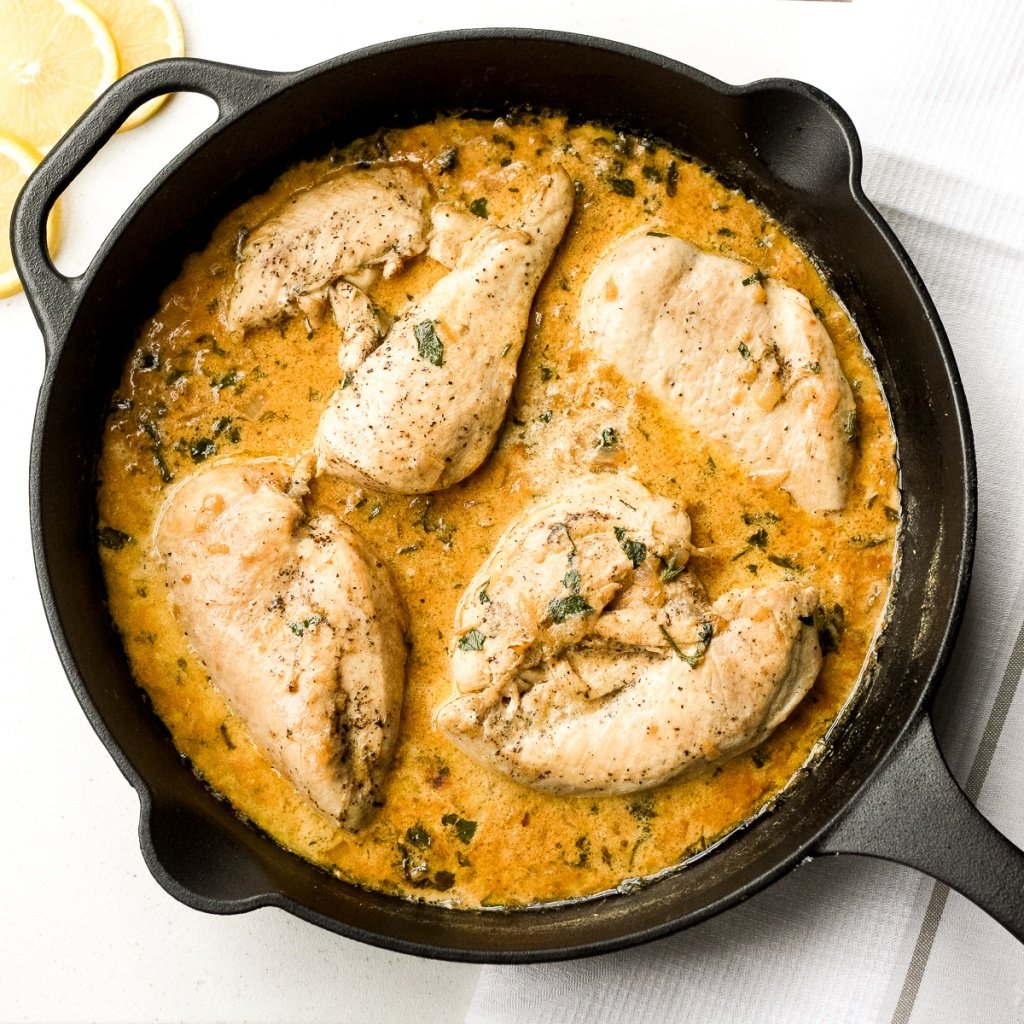
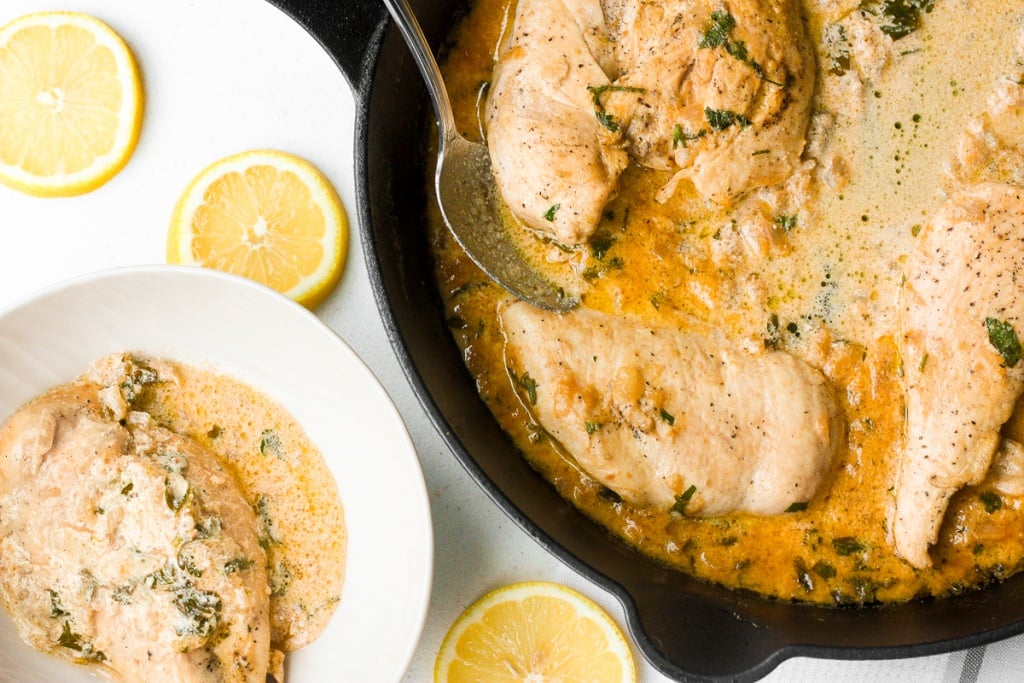
Skillet Chicken with Lemon Garlic Sauce

Winner winner chicken dinner. Delicious, creamy skillet chicken with lemon garlic sauce is a one-skillet meal that is ready in just 30 minutes. It's garicky, saucy, creamy, and packed with so much flavour. Yup, that sounds like a winner to me. It is the perfect weeknight meal. The only downside: there will be no leftovers.
What makes this chicken turn out perfect every time? Well, there are many reasons:
- the flavour is incredible - this tender chicken is coated in to-die-for, lemon garlic sauce. This sauce is goes with everything. I pour it over vegetables and other side dishes. Just picture this: rice soaked in lemon garlic sauce... umm YUM. I usually double the sauce so that I have extra for that very reason!
- the technique is on point -- first you pan-fry the chicken, then make the sauce, combine the two, and place the skillet into the oven. This technique yields irresistible, juicy and perfect skillet chicken... every. single. time.
- cooking in a cast-iron skillet -- this makes all the difference because you can easily just take your skillet off the stove and pop it in the oven.

Ingredients in Skillet Chicken with Lemon Garlic Sauce
- chicken breasts - boneless and skinless, sliced horizontally because more surface area = more flavour.
- salt and pepper
- olive oil
- shallot - finely diced.
- chicken broth - for extra flavour.
- light cream - you can't have creamy sauce without some cream. This can also be substituted with half and half cream.
- butter
- garlic - lots of garlic please! Four heaping cloves to be exact.
- red pepper powder - this gives the sauce a little spicy kick. If you can't handle the heat, leave it out.
- lemon juice
- Italian parsley

How to Make the Perfect Skillet Chicken with Lemon Garlic Sauce
- Precook the chicken. Season chicken with salt and pepper. Heat oil in a large cast-iron skillet over medium heat. Add chicken and cook for 3-4 minutes on each side until golden. Remove chicken and set aside.
- Cook the rest of the ingredients. Add the shallots to the skillet. Sauté until soft and translucent. Stir in the chicken broth, cream, butter, garlic and red pepper powder. Bring sauce to a simmer, and simmer for 12-15 minutes until sauce thickens.
- Add chicken. Remove skillet from the stovetop. Stir in the lemon juice and Italian parsley. Add in chicken and toss to coat with sauce.
- Bake. Transfer skillet to a preheated 400 F oven and cook for 6-8 minutes until chicken is done. Remove from oven and let cool for 5 minutes before serving.
Tips for Making Skillet Chicken
- Use a cast-iron skillet. A cast-iron skillet is necessary to make this chicken because you can easily transfer it directly from the stovetop to the oven.

Pecan Pie in a Mug
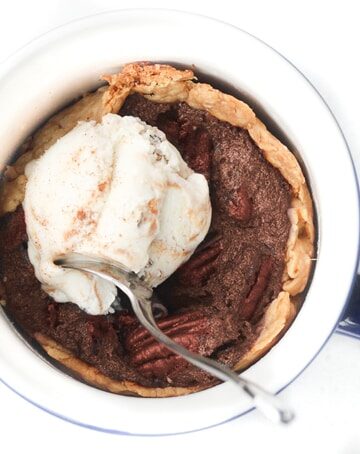
I love the holidays for many reasons but especially because of the pie. And anyone who knows me knows that I have had a relationship with pecan pie my entire life. The sad truth, is that I basically only eat it if I am a dinner party because when it is just my hubby and I at home, a whole pie just seems too big for us to finish. Well, not anymore. Ever since I got my hands on Corningware Meal Mugs, my prayers have basically been answered. I have been using these mugs to create small single serving dishes and yes, one of those dishes is pecan pie in a mug.

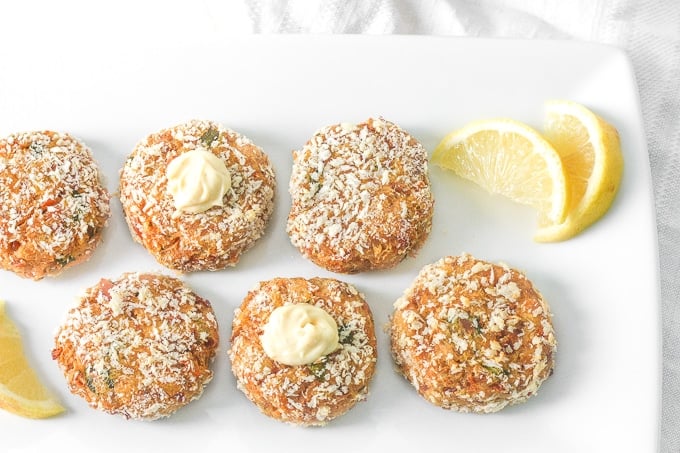
Baked Tuna “Crab” Cakes
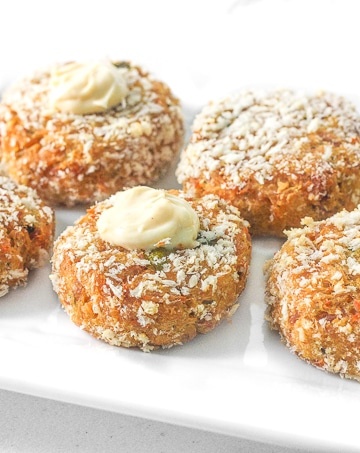
It’s lunch prep time again and I am bored with my usual go-to salads. I decided to change it up this week and make some baked tuna “crab” cakes. The reason I put “crab” in quotations is because these are 100% tuna cakes that taste just as good as crab cakes and are sooo much cheaper! Plus, with Raincoast Trading canned tuna, you have the option of using different flavours! I would normally make this with their no salt Albacore Tuna (that is right, they have a no salt option for low sodium diets!). But today I tried my recipe using their smoked Albacore Tuna. Best decision ever! The smoked flavour takes these tuna cakes to a whole ‘nother level!!
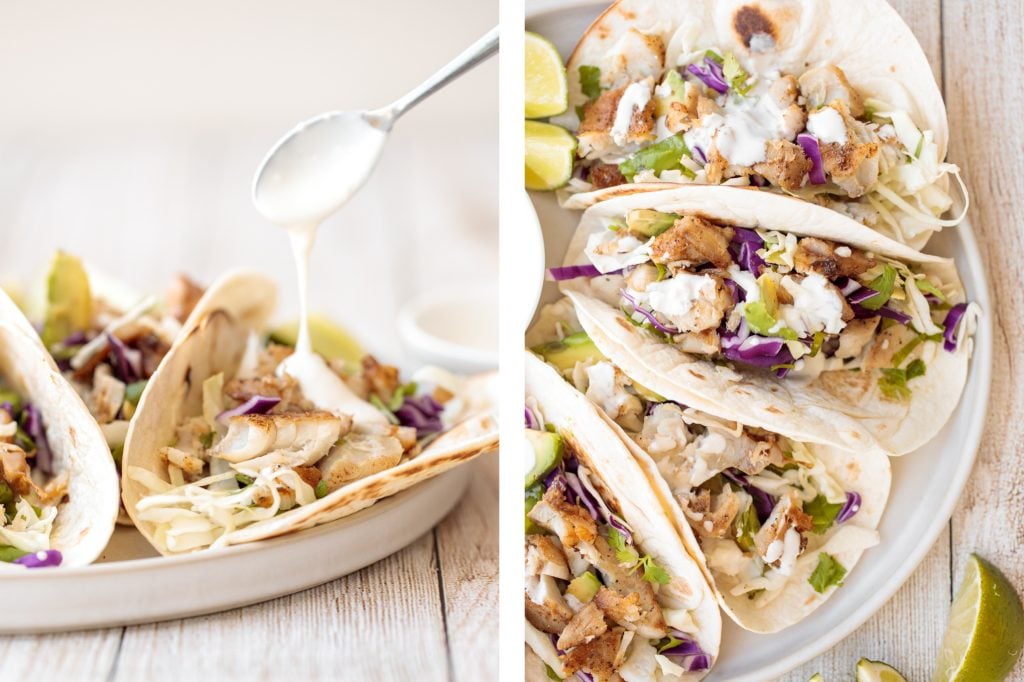
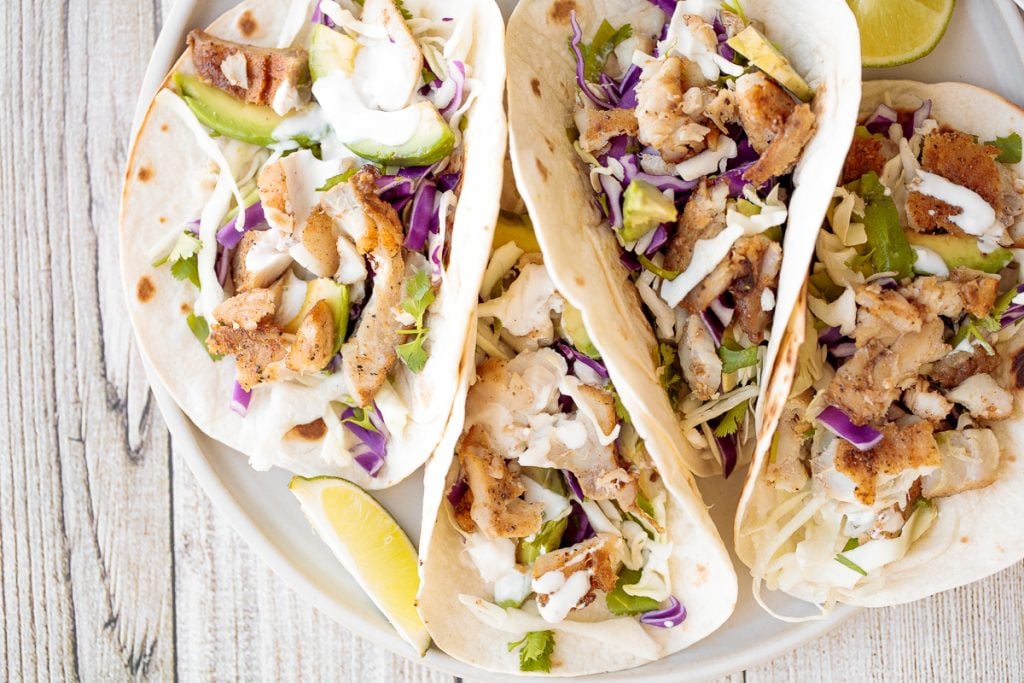
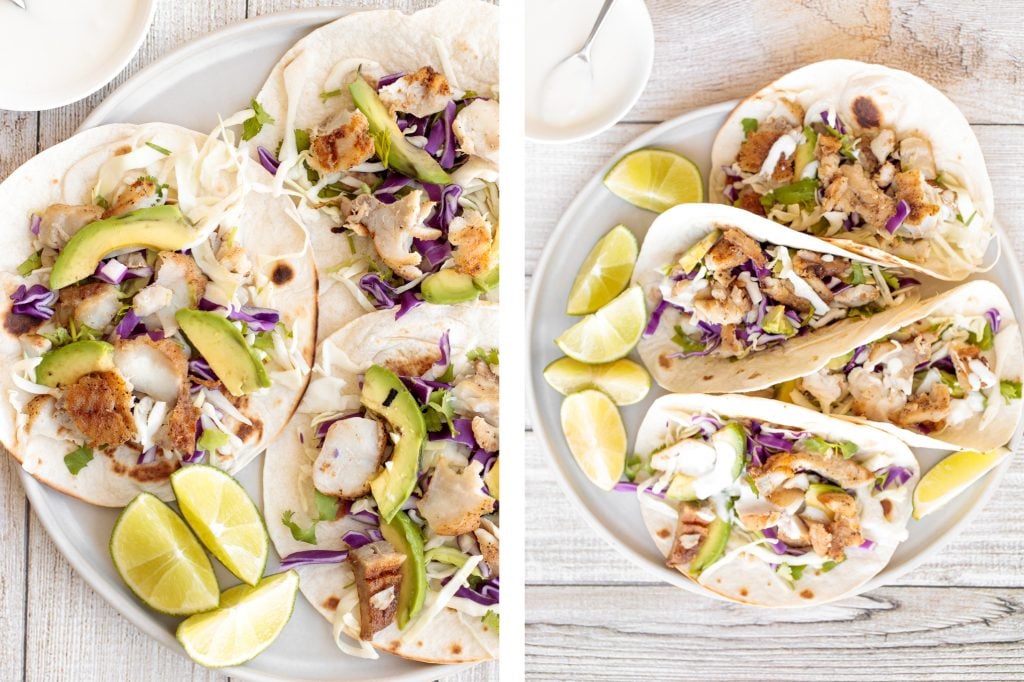
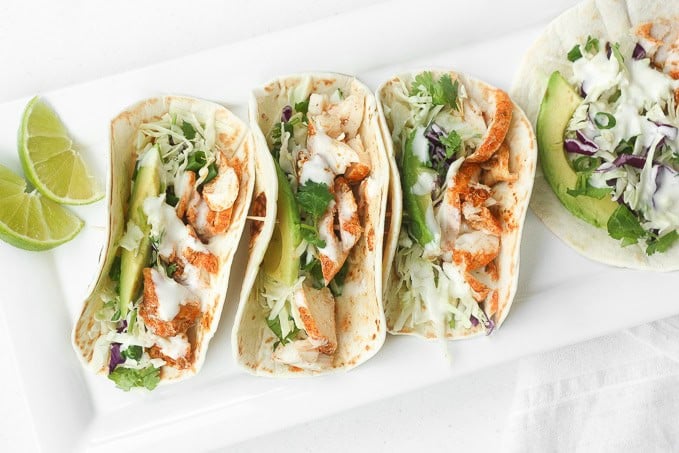
Fish Tacos with Lime Crema
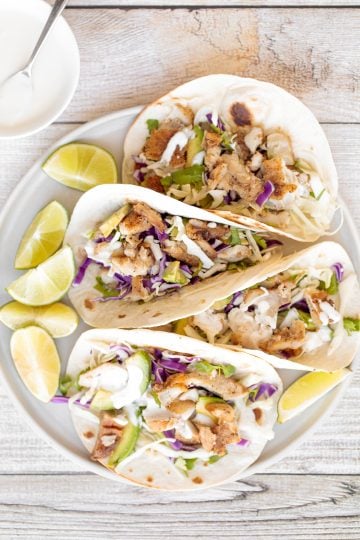
Tacos are one of my favourite Mexican dishes, and my favourite taco of all time is the fish taco. There is something incredible that happens when cabbage, sour cream, lime and cilantro come together with seasoned, tender and flaky white fish filets that creates a mouthful of tangy and exquisite flavour. Everyone needs to experience these flavourful and easy fish tacos with lime crema and cabbage slaw. You won't regret it.
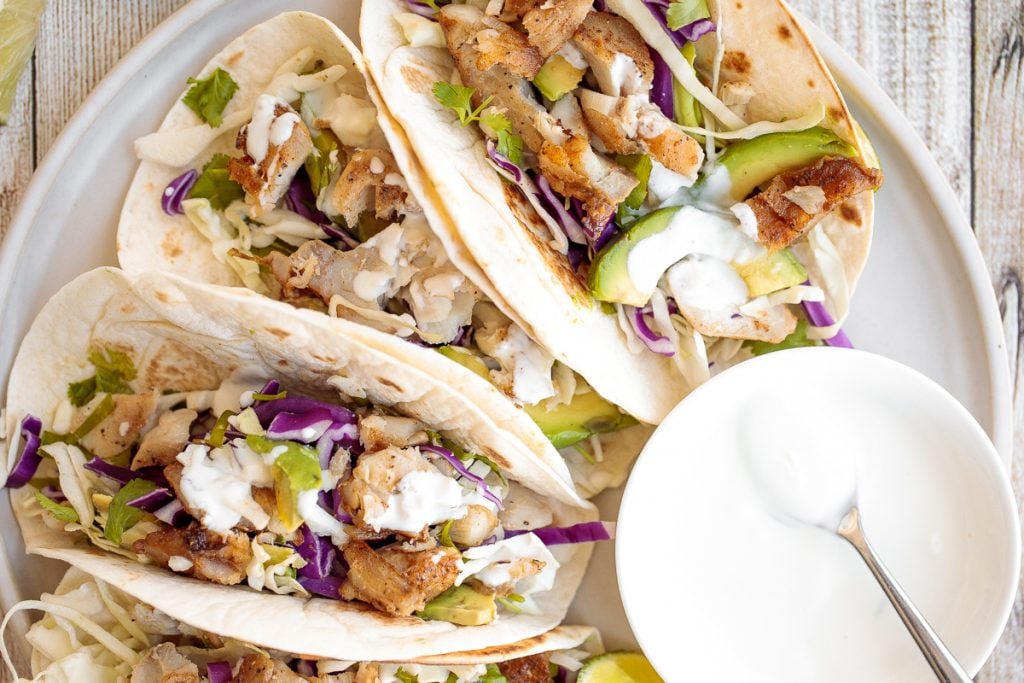
This fresh, delicious, and baked (not fried) version of fish tacos is my go-to summer recipe. They are perfect for lunch, dinner, as a snack, on game day... basically for any time of day or any occasion. They are my go-to not only because they taste amazing but also because they take only 25 minutes to come together. Yup, 25 minutes, and that includes time for marinating the fish. So so easy!
Ingredients in Fish Tacos with Lime Crema
This recipe is quite versatile and you can use ingredients that you have on hand that are consistent with the flavour profile in this recipe.
- white fish - any white flaky fish will do, such as cod, snapper, halibut, tilapia, or sole. I used cod filets but you can use any white fish. You want a filet that is thick enough to hold its shape and won't fall apart easily. You could also make this with shrimp.
- marinade for the fish - made with a combination of oil, lime juice, cumin, paprika, coriander, red pepper powder, garlic powder, salt and pepper. The red pepper powder does add a little kick. Adjust it to your preferences. Less if you want the fish super mild, or more if you want them spicy.
- lime crema - made with a combination of sour cream, mayonnaise, lime juice, lime zest and salt.
- slaw - made with a combination of shredded cabbage, cilantro, green onions, and garlic. For the cabbage, you can use regular cabbage or purple cabbage. I used both.
- soft taco tortillas - either corn tortillas or wheat tortillas work. If you want to keep the dish gluten-free, then use corn tortillas.
- toppings - I topped these tacos with avocado. Feel free to use whatever toppings you prefer. Some of my other favourites include salsa, guacamole, mangos, and pineapple salsa.
How to Make the Best Fish Tacos with Lime Crema
There are three parts to this recipe: the fish, the slaw and the crema. One cannot exist without the other. Each part complements the other to a T.
- Marinate the fish: In a small bowl, combine vegetable oil, lime juice, cumin, paprika, coriander, red pepper powder, garlic powder, salt and pepper. Dip the fish into the bowl and flip it over to fully and evenly coat with the marinade. Place the fish onto a lined baking tray and let it marinate in the refrigerator for 15 minutes.
- Cook the fish: Preheat oven to 425°F. Bake for 9-10 minutes until the fish is flaky when tested with a fork. Transfer the fish into a plate and break into smaller pieces using a fork. (I also provide instructions for cooking the fish in a frying pan or on the grill in my tips section below).
- Make the lime crema: In a small bowl, whisk together the sour cream, mayonnaise, lime juice, lime zest, and salt.
- Make the slaw: In a large bowl, combine cabbage, cilantro, green onion, and garlic.
- Heat the tortillas. Heat the soft tortillas according to the package instructions, or heat in an ungreased skillet over medium heat for 30 seconds per side. You can also heat it directly on a gas burner for a few seconds to get char marks on the edges.
- Assemble the tacos: Divide the fish evenly into each taco, top each taco with ¼ cup of slaw and sliced avocados (optional). Pour 1 tablespoon of crema on top.
FAQ and Tips for Making the Best Fish Tacos
- Are these tacos spicy? The red pepper powder does add a little kick. Adjust it to your preferences. Less if you want the fish super mild, or more if you want them spicy.
- Can I use frozen fish? Using fresh fish yields the best results, as the seasoning sticks on nicely. You can use frozen fish but will need to increase the bake time to 15-20 minutes, depending on the thickness of fish. Check on it at 15 minutes to see if it is done.
- How do I pan-fry the fish instead? Lightly oil a large skillet and heat over medium heat. Cook the marinated fish for about 3-4 minutes per side until cooked through.
- Can I grill the fish instead? Absolutely. Just grill each side for about 3 minutes.
- Can I make this in the air fryer? Yes, place the marinated fish fillets into the air fryer and cook at 375 F for 15-18 minutes, depending on the size of the fish.
- Are these gluten-free? Yes, if you are using corn tortillas.

How to Serve Fish Tacos
You can serve these fish tacos on their own or with:
- a side of homemade Guacamole, Pico de Gallo Salsa, Mango Salsa, and/or sour cream for dipping.
- Shrimp Taco Salad
- Mexican Street Corn
- Creamy Mexican Corn Soup
- Chicken Enchiladas
More Taco Recipes
- Mexican Ground Beef Tacos
- Shrimp Tacos with Lime Crema Slaw
- Fish Stick Tacos
- Mexican Pulled Pork Tacos (Carnitas)
- Vegan Chickpea Tacos
- Korean Beef Steak Tacos
Tried this recipe?
I'd love to hear what you think! Leave a comment and rating below to share your feedback. Your reviews help others discover this recipe and help me keep creating more free recipes for you. Snap a photo and tag me on social media @aheadofthyme too.
This post was first published in August 2016. It has been completely updated in May 2020 with new photos, written content including helpful tips, and the recipe has been organized more clearly. Here is an original photograph for comparison.

Creamy Nutella Buttercream Frosting

It's my first year wedding anniversary! So in keeping with the theme, I am sharing a bit of a throwback recipe from my bridal shower last year. I was so lucky to have my talented sister organize the entire party, make me a delicious and stunning 3-layer, naked vanilla bean cake with Nutella buttercream frosting and photograph the entire event! Triple threat much? Check out her awesome photography work here: Leili Heidema Photography. The cake was such a big hit at the party that I just had to share her recipe and photos with all of you. Besides, anniversaries are all about reminiscing 🙂

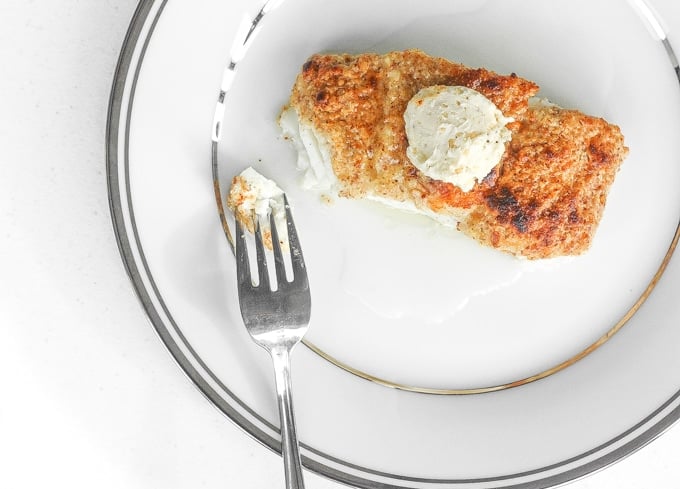
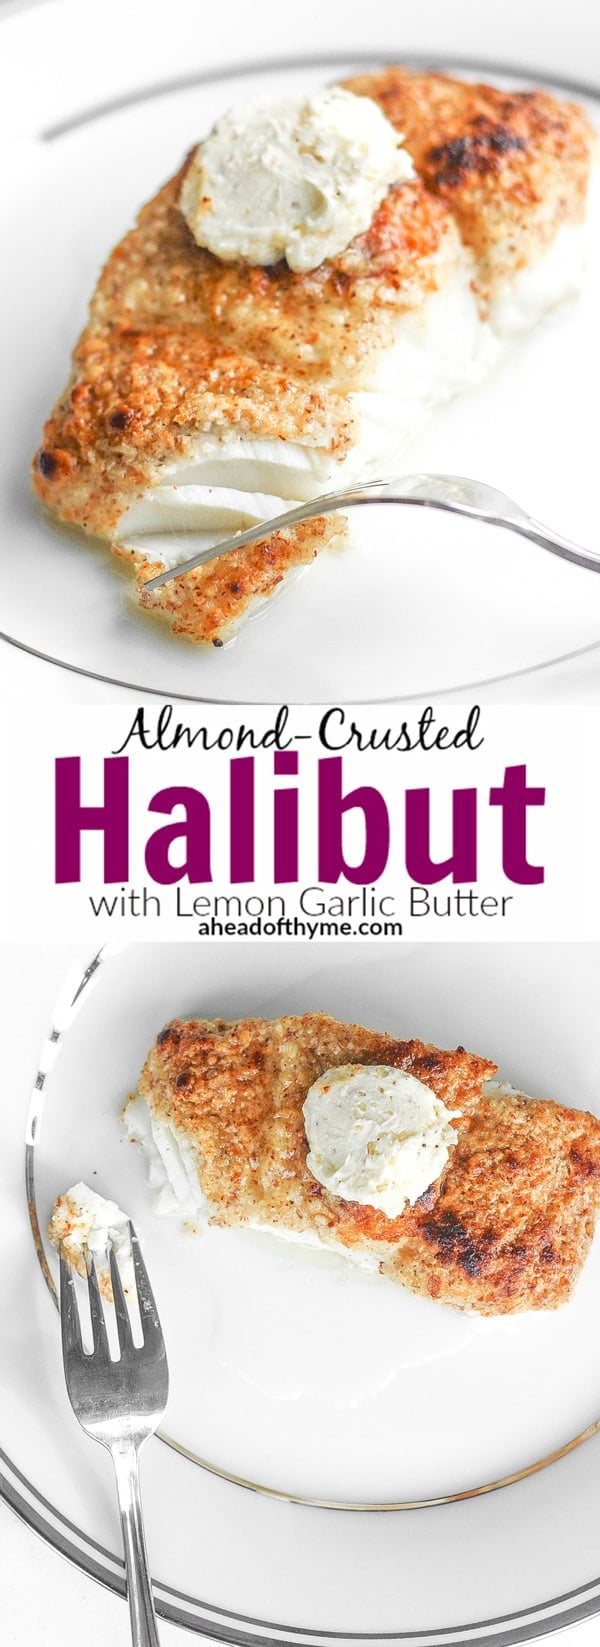
Almond-Crusted Halibut with Lemon Garlic Butter
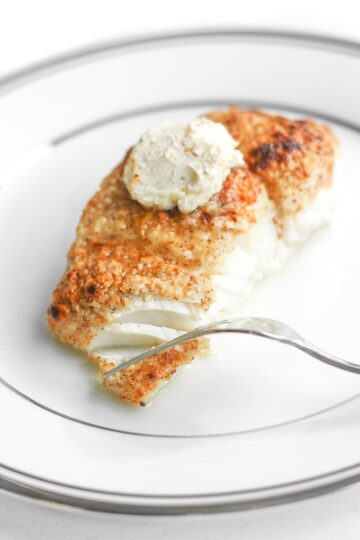
I love Spring. I love the light and airy recipes that come along with spring. I love the seasonal vegetables and the freshly-caught wild halibut that start appearing at my local grocery store. Today, I picked up a couple of those fresh halibut fillets to prepare an almond-crusted halibut with lemon garlic butter.
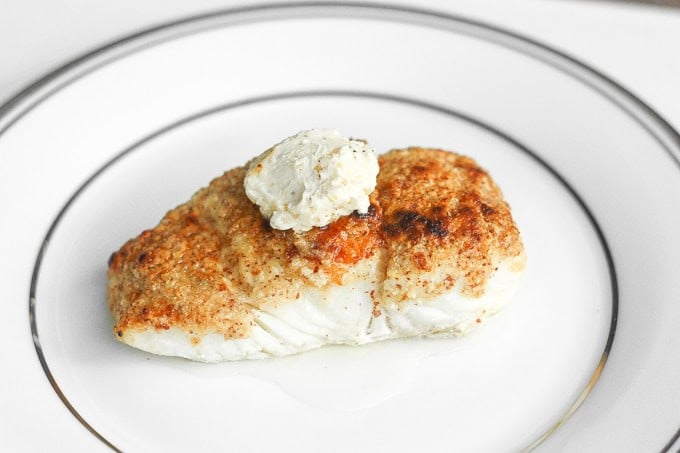
First things first. Don't be fooled by it's professional and aesthetic appearance. This fish is easy to make. Which is why I obviously chose to make it on a good old Wednesday. But in hindsight, I should have saved this to make on the weekend when I have guests over because it would literally blow them away. Plus, I would spend way less time in the kitchen. Halibut only takes a record-breaking 10 minutes to cook.

So the halibut takes 10 minutes to cook, but what about the prep? Well, the only prep involved is the making of the butter and the almond topping. These 2 ingredients are crucial to this recipe.
Lemon Garlic Butter
The lemon garlic butter brings so much flavour and life to the halibut. And guess what? It only takes about 5 minutes to make. I make it in the time that I am waiting for my oven to preheat. I suggest making an even larger batch of this stuff because this lemon garlic butter is versatile. It can be spread over all your favourite meats and/or served alongside them this entire summer barbecue season. Try it with steak, lamb chops, salmon or chicken breast.
So go ahead, double or triple this part of the recipe and store the extra butter in your fridge for another day.
Almond Topping
The almond topping is the icing on cake. It keeps the fish juicy and moist inside and seals in the delicious buttery, lemony and garlicky juices that are seeping out.
All this talk means one thing: almond-crusted halibut with lemon garlic butter will be appearing on my dinner table regularly this season.
How to Make the Best Almond-Crusted Halibut
The Secret to Making the Best Halibut
This part is so important that it gets a heading all on its own. The 10-minute cooking time is the secret to producing the best and flakiest halibut. Do not overcook. Halibut can dry out very quickly! It is only tasty when it is flaky and just cooked through. Once overcooked, you can kiss it good-bye because at that point it basically becomes inedible.
So head over to your local grocery store or fish market and pick up some halibut! Make this in your own home and be amazed with your skills. I served this alongside some quick and easy sauteed asparagus and creamy garlic mashed cauliflower.
Once cooked, it can last for up to 2 days in the fridge.

Tip: if you have an extra thick halibut filet, you may need to adjust the cooking time a few minutes longer.
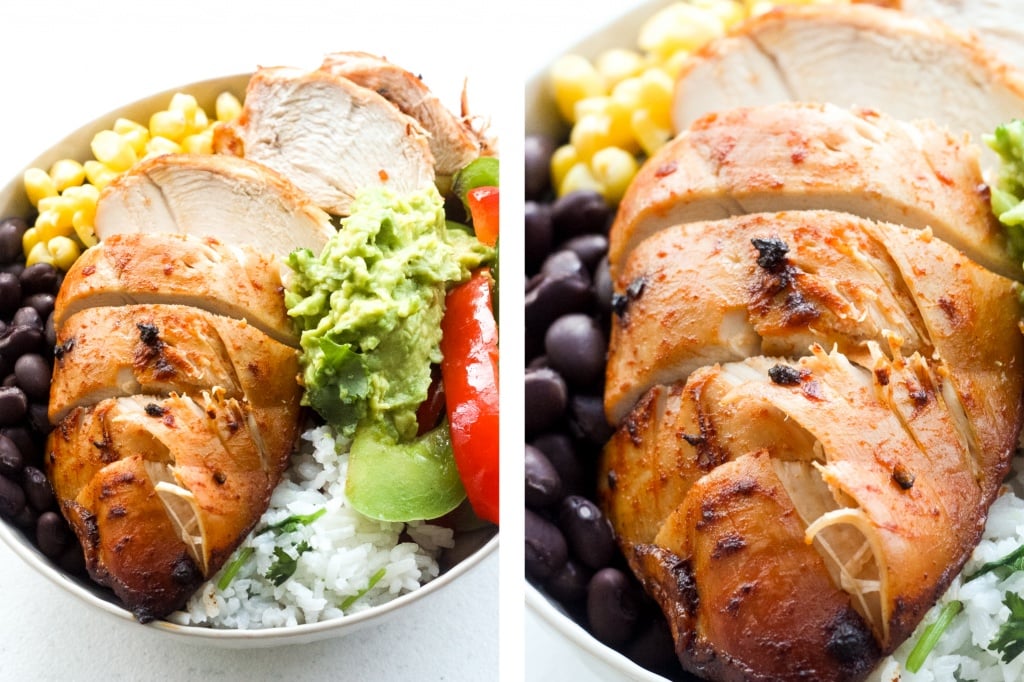
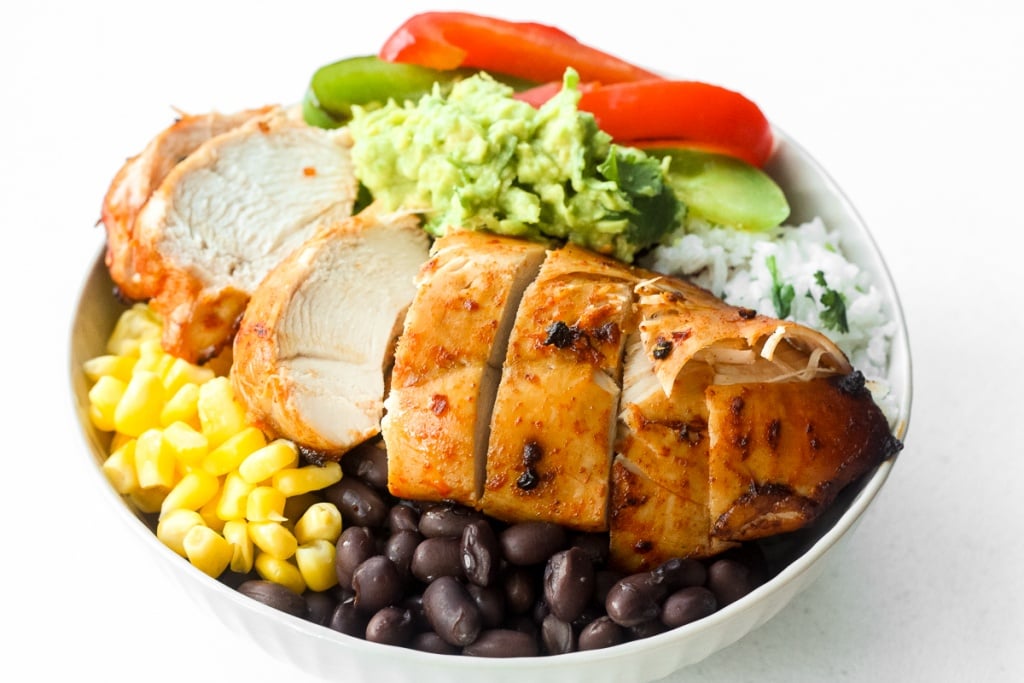
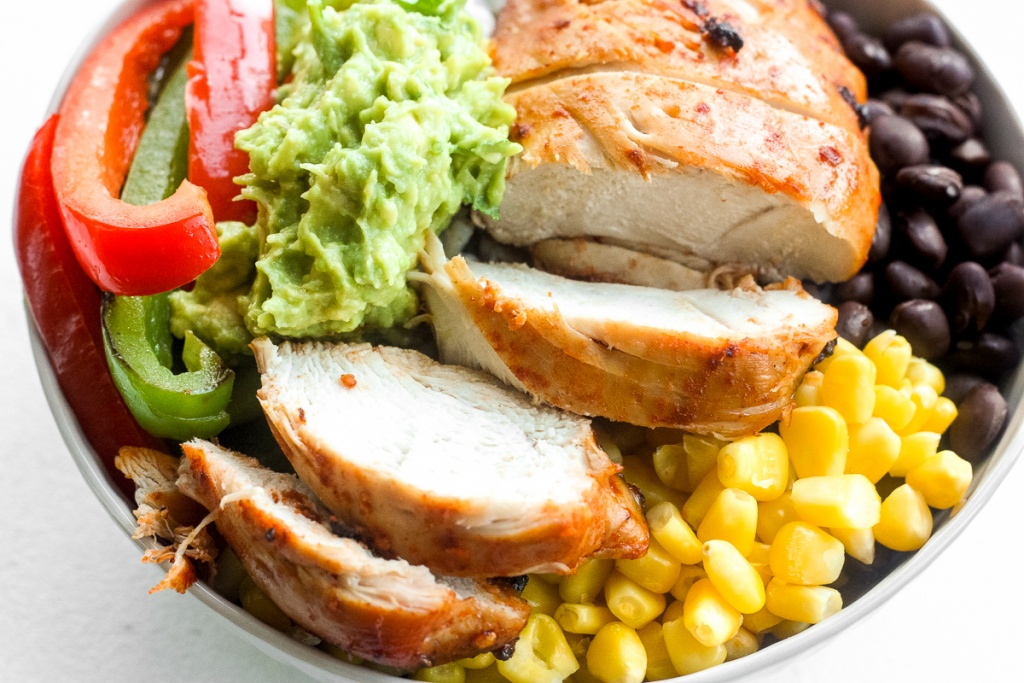
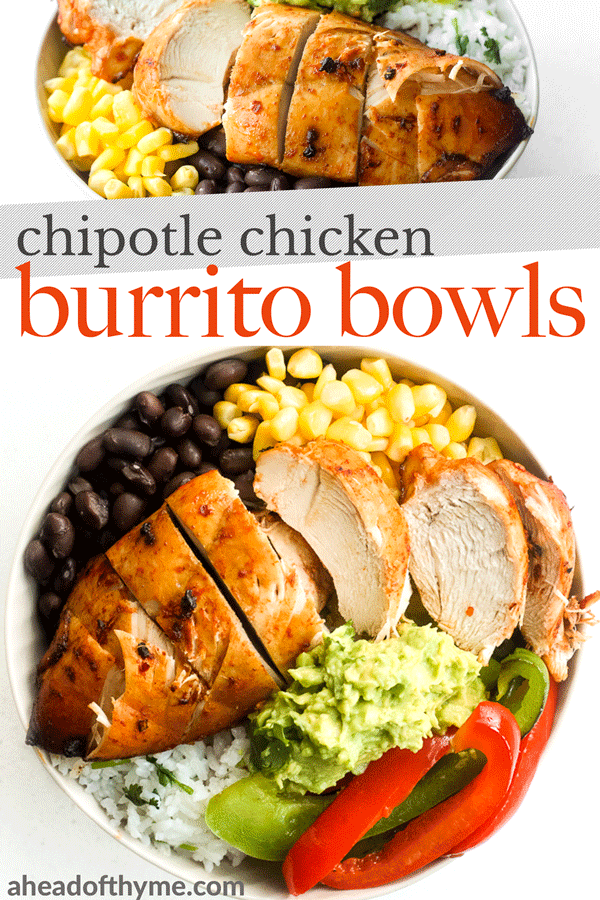
Chipotle Chicken Burrito Bowls with Lime Cilantro Rice
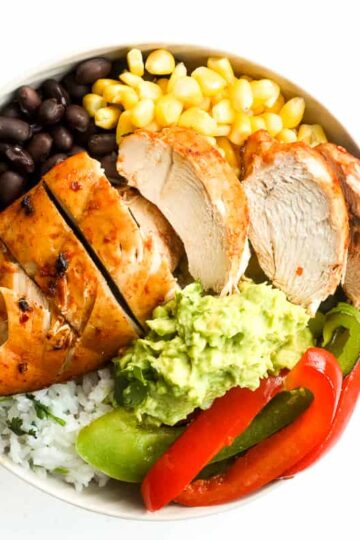
It's the first of May and that means one thing people... helloooo Cinco de Mayo week! For me, Cinco de Mayo is all about the food. So what better way to kick of the week than with chipotle chicken burrito bowls with cilantro rice? I'm talking oven-baked, tender, chipotle chicken breasts served over a bowl of lime cilantro rice, sautéed bell peppers, corn, black beans and a side of guacamole. These burrito bowls are healthy, low in fat and low in sugar. There really is no better way to kick off the week.
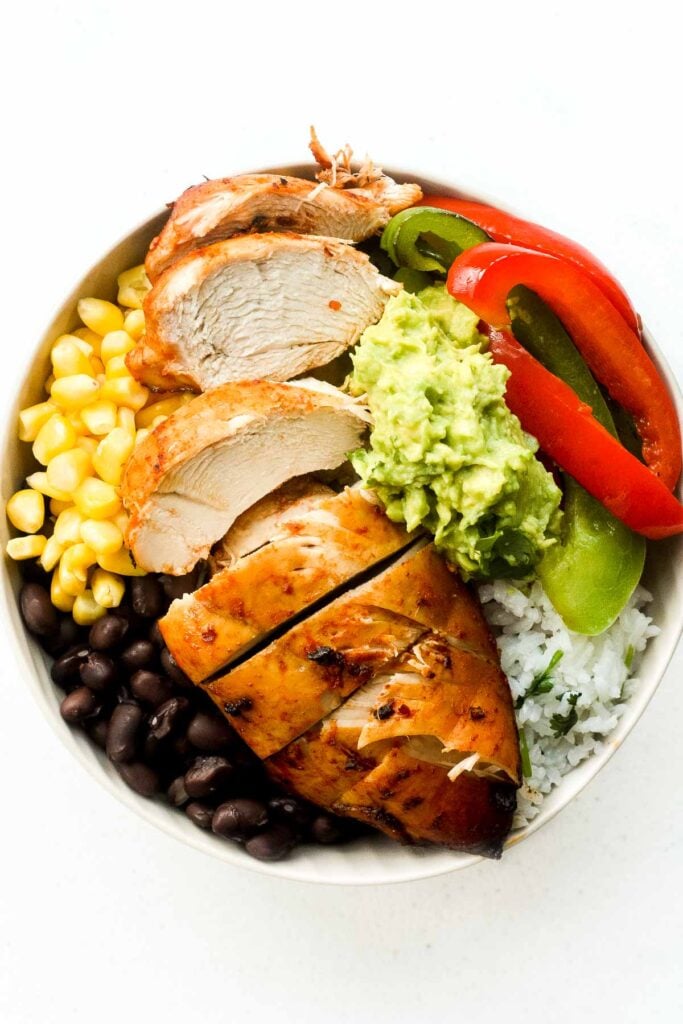
Ingredients in Chipotle Chicken Burrito Bowls
- chicken breasts - skinless and boneless
- seasoning for the chipotle chicken - olive oil, garlic, honey, ground cumin, chipotle chiles, and salt.
- long grain white rice
- flavour for the cilantro lime rice - lime juice, vegetable oil, salt, fresh cilantro
- vegetable oil
- bell peppers
- onion
- corn - I used frozen, but you can also substitute with fresh or canned.
- black beans - I used canned beans, but you can also cook dried black beans. Note that you will need to soak dry beans for at least 8 hours or overnight before cooking.
- guacamole - I used my homemade guacamole.
How to Make the Perfect Burrito Bowls
There are 3 key components in the perfect burrito bowls: chicken, rice and toppings. The secret to getting this meal prepared quickly, in 30 minutes, while nothing gets cold while you are waiting for the other ingredients to cook, is to coordinate the prep and cooking of every component, so that they all come together at the exact same time. Note that the 30 minute cook time does not take into account the the 2 hour time required to marinate the chicken. This has to be done in advance.
Here is what you need to do to make these burrito bowls:
- Make the chipotle chicken. In a blender, puree together the olive oil, garlic, honey, cumin, chipotle chiles and salt until smooth. Place chicken breasts in a ziplock bag and pour the marinade inside. Seal the bag and let marinate for 2 hours in the refrigerator. Then, bake chicken for 20-25 minutes in a preheated 450 F oven.
- Make the cilantro lime rice. In a medium sized pot, wash the rice thoroughly and drain. Stir in water, lime juice, vegetable oil and salt to the pot. Bring to a boil, and once the rice has absorbed the water, turn the heat down to low and cover. Simmer for 20 minutes until rice is soft. Mix in the cilantro and serve.
- Sauté the onions and bell peppers. Heat oil in a large frying pan. Sauté the onions and bell peppers for 3-4 minutes until slightly tender.
- Cook the corn. In a small pot, add the corn and water. Heat over medium high for 5 minutes. Once cooked, drain in a colander.
- Prepare black beans. Drain and wash the canned black beans. Heat over medium high for 5 minutes until warm.
- Make guacamole. see recipe link.
- Assemble the burrito bowls. Place an equal portion of rice into the bottom of each bowl. Decorate the border with corn, black beans, and sautéed onions and bell peppers. Slice the chicken and place it in the centre of each bowl. Top off with a scoop of guacamole.
More Mexican-Inspired Recipes
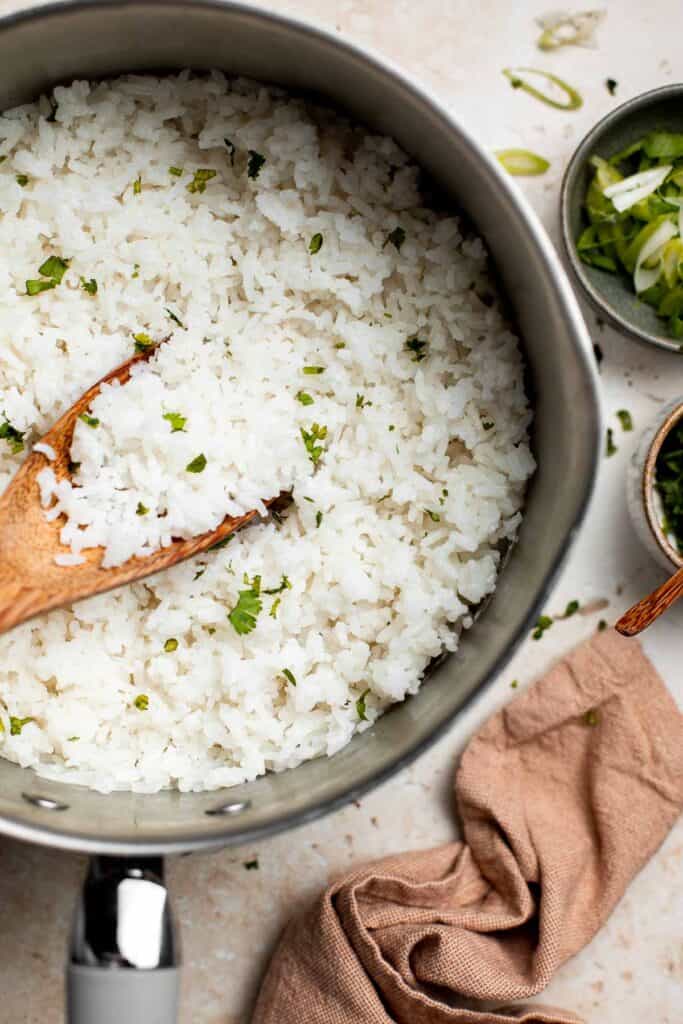
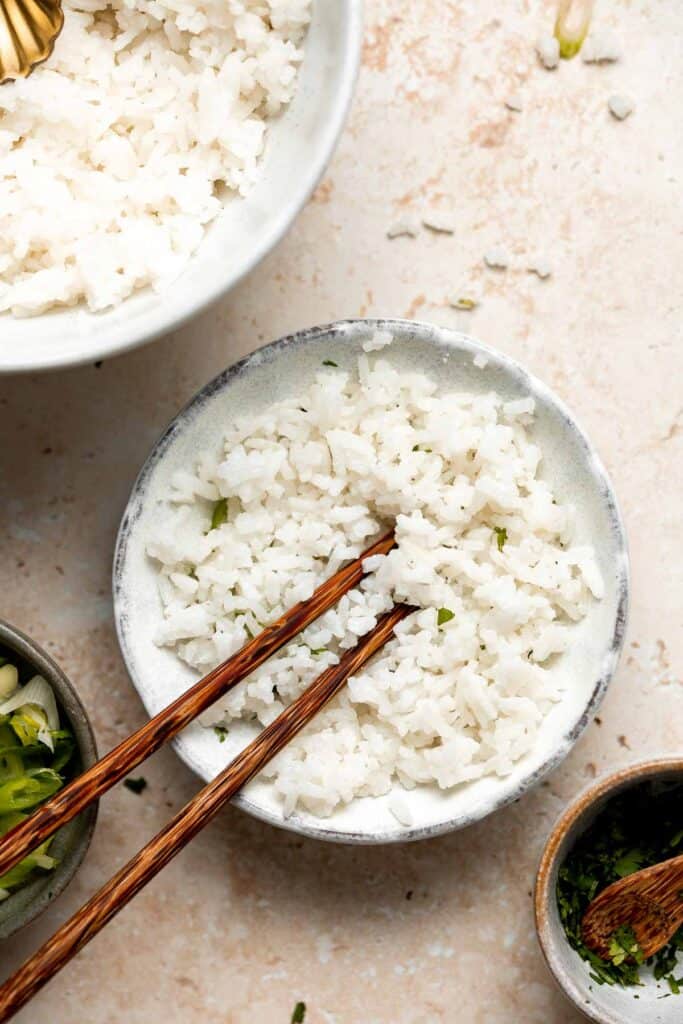
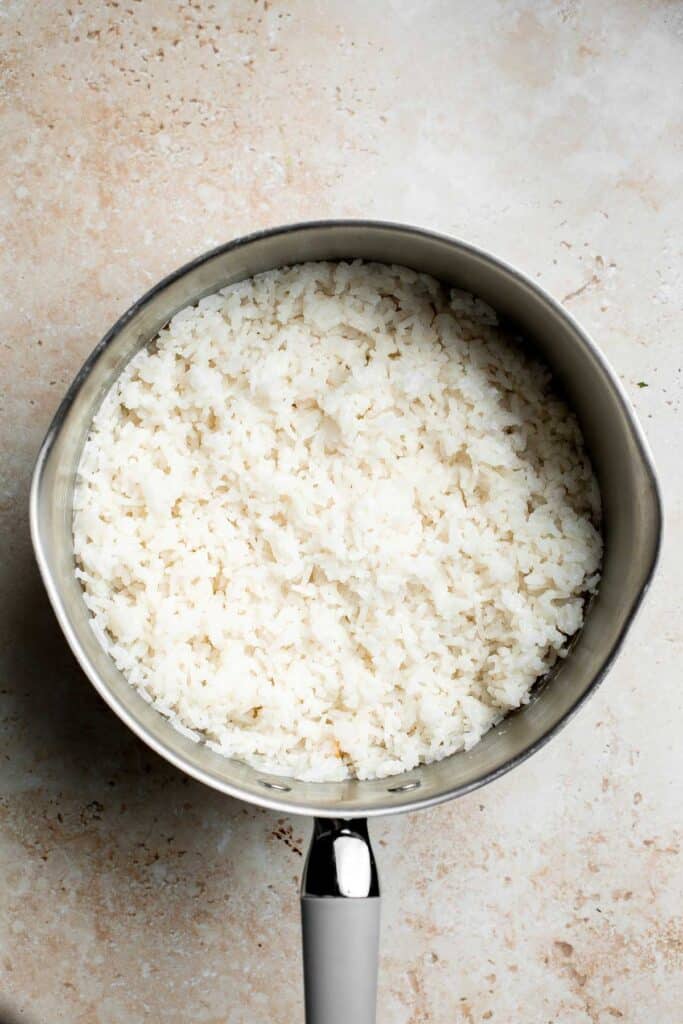
Easy Coconut Rice
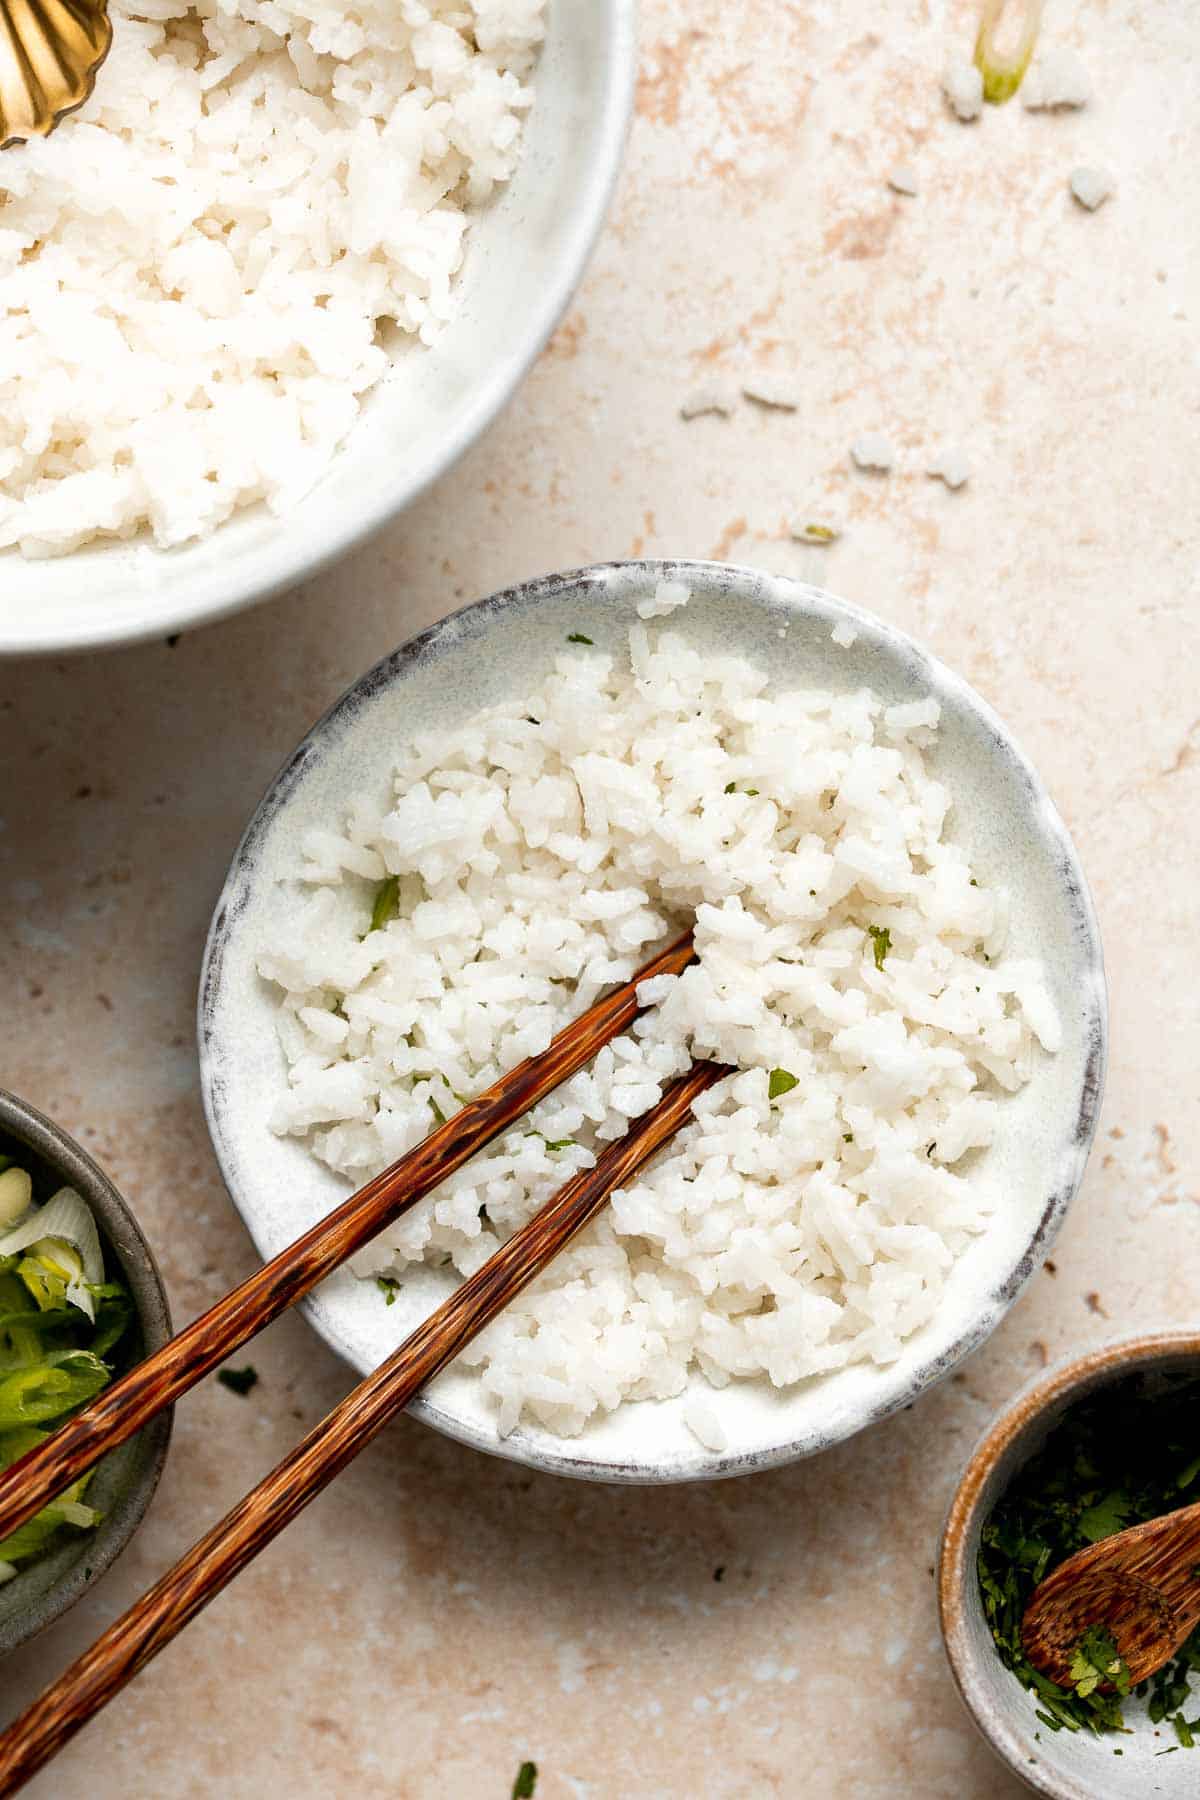
Easy coconut rice is light, fluffy, delicious, and flavorful. It's quick and easy to make restaurant quality coconut rice at home with just a handful of ingredients in under 30 minutes!
It's our go-to side dish that pairs well across so many different cuisines including Thai entrees, South Asian curries, tropical dishes, and more. This rich coconut milk rice is loaded with natural coconut flavors and is a favorite amongst our readers with over 52 five-star reviews!
Why You'll Love Coconut Rice
- It's a classic across many cuisines. Coconut flavours are the prevalent ingredient in almost every Thai, South Asian, or tropical entree. You rarely come across an entree that doesn't call for a can of coconut milk or cream. And almost every Thai dish (for example) is served with a bowl of long-grained Jasmine rice. But sometimes plain Jasmine rice is just not enough. Once you try easy coconut rice recipe, you will see how quickly it will turn into the option of choice.
- It is quick and easy to make. One of the best things about this recipe is that super simple and easy to make with just 5 pantry staple ingredients (one of which is water!) in under 30 minutes. So you will likely already have these ingredients at home.
- The best coconut flavor. This coconut rice has the best coconut flavor that you can taste in every bite, but it is not overpowering. So if you are like me and don't typically like strong coconut flavor (you know, the one found in coconut water or shredded coconut), then you will love this recipe. Coconut milk adds the right amount of subtle flavour and amazing creaminess.
- It smells so good. If you aren't already excited about this dish, wait until you start to smell that amazing, aromatic coconut scent emanating from your pot of rice! You will want to scoop out a spoonful of this stuff and try it right there, uncooked and all. Trust me on this one - I've been there.
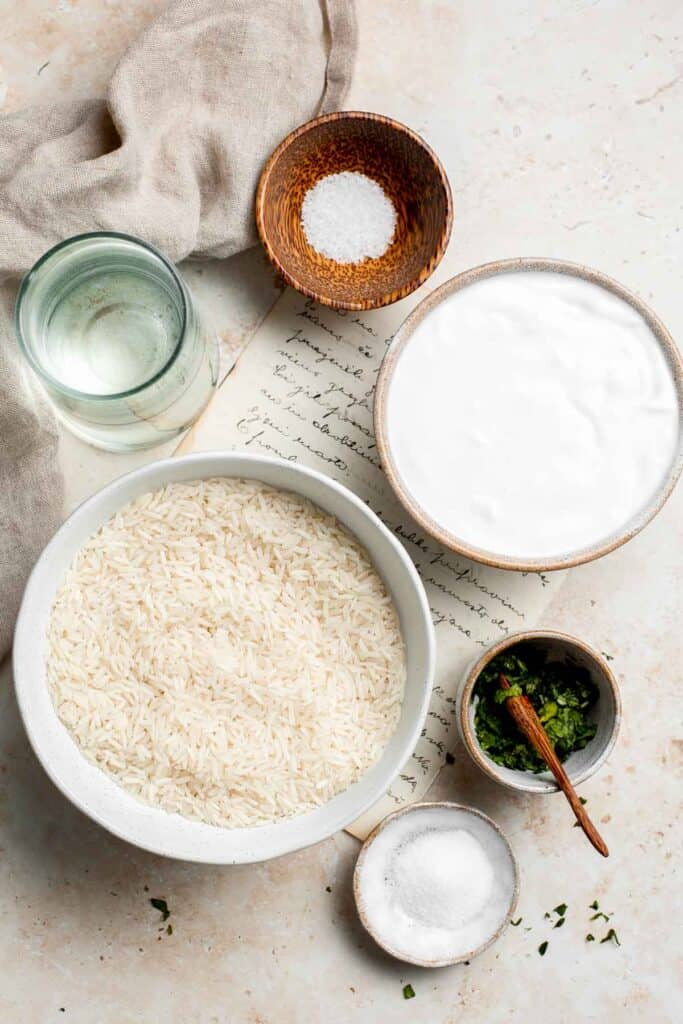
Ingredient Notes
To make easy coconut rice, you will need the following ingredients (full measurements in recipe card below):
- jasmine rice - jasmine rice is the most traditional rice to use in coconut rice and adds the best flavor. You can easily substitute it with other types of white rice that you have on hand especially long grain rice such as Basmati rice. Note that the texture could be slightly different, but the taste will be on point.
- coconut milk - I used one can of full-fat coconut milk. You can substitute it with a can of light coconut milk instead, but note the rice will not be as rich (but still delicious!).
- sugar - a pinch of sugar helps to balance out the flavor of the coconut milk. You can add more or less to taste.
- salt
You will also need measuring cups and spoons and a medium saucepan.
How to Customize
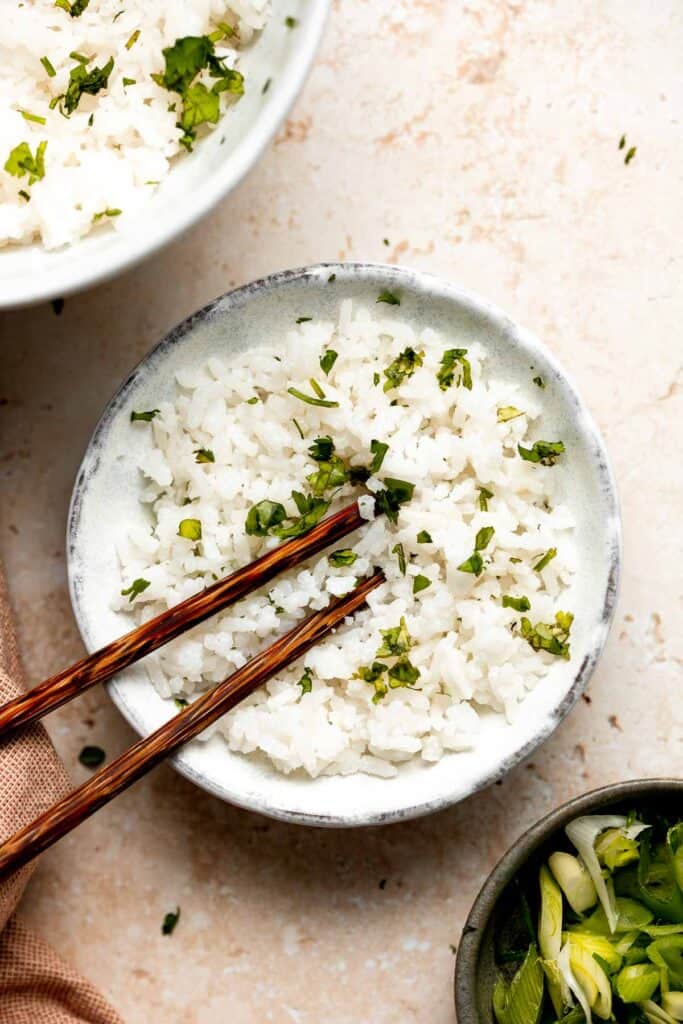
You can also add some toppings or garnishes to the rice once it has been cooked or toss them in. Some of my favorites to add are:
- chopped fresh cilantro
- diced pineapple
- diced mango
- sliced bell peppers (sauté them first)
- diced avocado
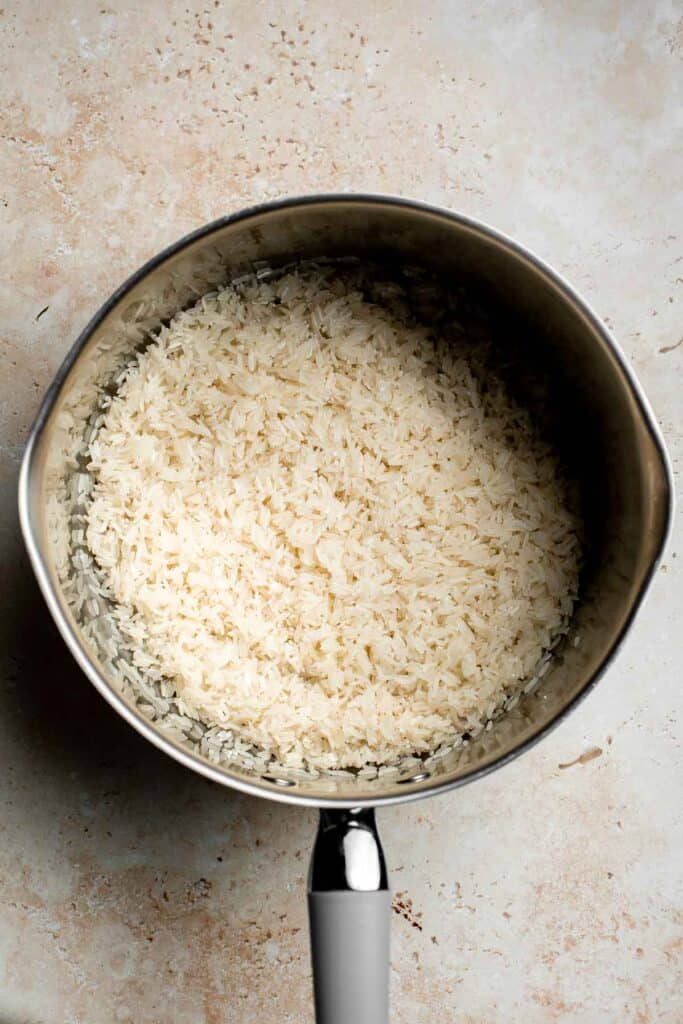
How to Cook Coconut Rice
Cooking coconut milk rice is really not any different from cooking any other rice side dish (such as Steamed Rice). The only difference is the addition of coconut milk and a pinch of sugar.
- Rinse the rice. Rinse the rice in several changes of cold water until the water runs clear. Drain any excess water in a large fine-mesh sieve and place the rice into the cooking pot.
- Add ingredients. Add coconut milk, water, salt, and sugar.
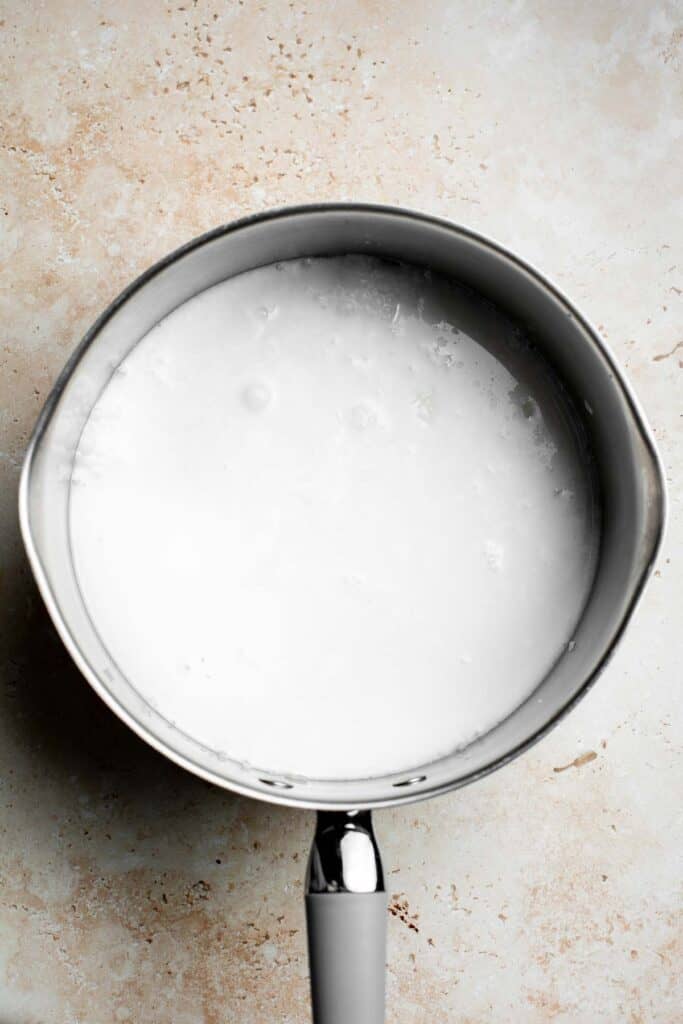
- Boil. Bring the mixture to a boil over high heat.
- Turn down heat and cover. Once it starts to boil, turn the heat down to low and cook covered for 20 minutes.
- Uncover. Uncover and continue to cook for 5 minutes.
- Serve. Fluff and serve with some chopped cilantro on top (optional).
How to Make Coconut Rice in the Rice Cooker
If making this recipe in the rice cooker, you will need to use ½ cup less water. Rinse the rice as directed in the recipe. Then, add all of the ingredients into the rice cooker and give them a quick stir. Set the rice cooker to cook on the white rice setting. Once done, keep the rice cooker sealed and let the rice steam for another 5-10 minutes. Then, open the lid, fluff it with a fork, and serve.
How to Serve Coconut Rice
Easy coconut rice is the perfect rice dish to compliment a variety of different cuisines such as Thai, South Asian, Caribbean, and Hawaiian (or any tropical cuisine). But just because it can be paired so well with these cuisines, do not be fooled! This side dish can be paired with any type of cuisine at all that needs a little coconut flair.
Serve it hot and pour a curry on top (or any meat or vegetable dish) and enjoy!
What does Coconut Rice pair well with?
- Thai Turkey Meatballs in Coconut Curry
- Indian Butter Chicken
- Teriyaki Chicken Skewers with Pineapple
- Thai Coconut Red Curry with Shrimp
- Instant Pot Beef Curry
- Garlic Shrimp Stir Fry
- Thai Basil Chicken
- Lemongrass Chicken
- One Pot Lentils
- Coconut Curry Salmon

FAQ and Recipe Tips
- Do you need to rinse the rice? Rinsing the rice cleans removes the starch so that the rice does not stick together and be gummy, it also removes any debris and some of the chemicals used in milling the rice (such as arsenic). But it's a personal preference, if you are looking for a stickier rice like sushi rice or risotto, then you may want to skip the rinsing to keep the starch.
- Can I just add coconut milk (no water)? Unfortunately no, the rice needs some water to help it absorb the coconut milk as it is too thick.
- How to store: Allow the coconut rice to cool to room temperature first, then transfer to an airtight container and store in the refrigerator for 4 to 5 days.
- How to freeze: Once the rice has cooled to room temperature, transfer it to an airtight container or freezer bag (squeezing out as much air as possible). You can freeze coconut rice for up to 3 months. When ready to eat, allow the rice to thaw overnight in the refrigerator before reheating.
- How to reheat: You can reheat the rice on the stove over medium heat, stirring until warmed through. You may need to add a splash of water. You can also reheat it in the microwave for about 1 minute until warmed through.
More Rice Recipes
- 30 Best Rice Recipes
- Steamed Rice
- Cilantro Lime Rice
- No Wine Parmesan Risotto
- One Pot Spanish Chicken and Rice
- Vegetarian Fried Rice
Tried this recipe?
I'd love to hear what you think! Leave a comment and rating below to share your feedback. Your reviews help others discover this recipe and help me keep creating more free recipes for you. Snap a photo and tag me on social media @aheadofthyme too.

Roasted Lemon Garlic Shrimp and Asparagus
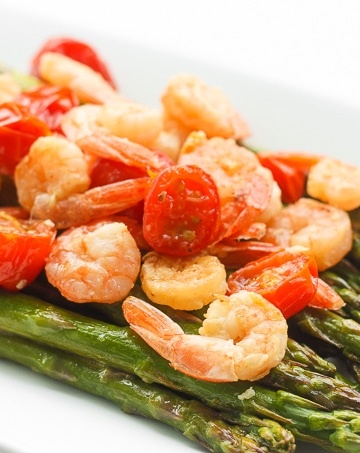
So you may have guessed that I recently bought a lot of asparagus and have been coming up with different ways to make it: creamless cream of asparagus soup, quick and easy sautéed asparagus... you get the gist. But my large bag of asparagus from Costco has dwindled down to its last, bunch-size batch. I looked in my fridge for some inspiration and noticed the near-expiration shrimp that I needed to make. So, this light and vibrant, roasted lemon garlic shrimp and asparagus was created.
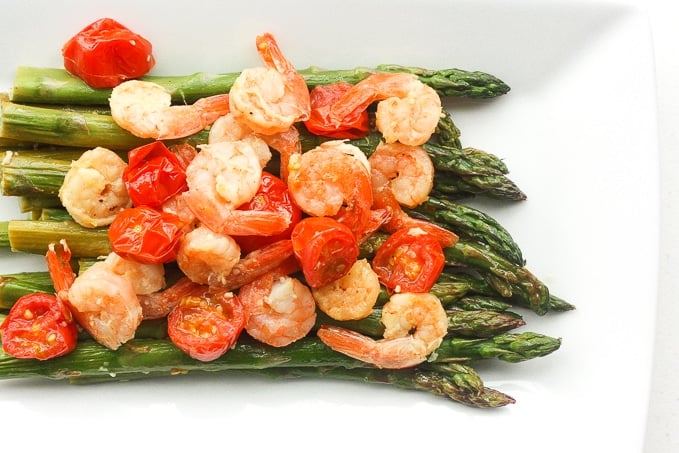
My moto this spring is to stop eating like it's still winter! It is time to lighten up my diet and bring on the spring dishes! And this dish is perfect for the spring and upcoming summer season because it's pretty much on the top of the list for lightening up a diet. It is low-carb, low-fat, dairy-free, gluten-free, paleo and basically every other healthy word comes to mind. [Read more...]
Quinoa, Cauliflower and Chickpea Vegetarian Meatballs with Tahini Sauce
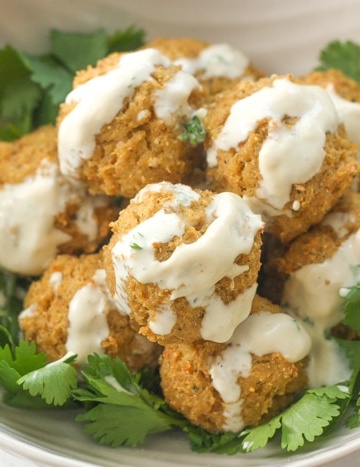
Looking for a new recipe for Meatless Monday? Look no further, today I am sharing delicious quinoa, cauliflower and chickpea vegetarian meatballs with tahini sauce. I have to admit that I cannot say that without my mouth watering a little bit...
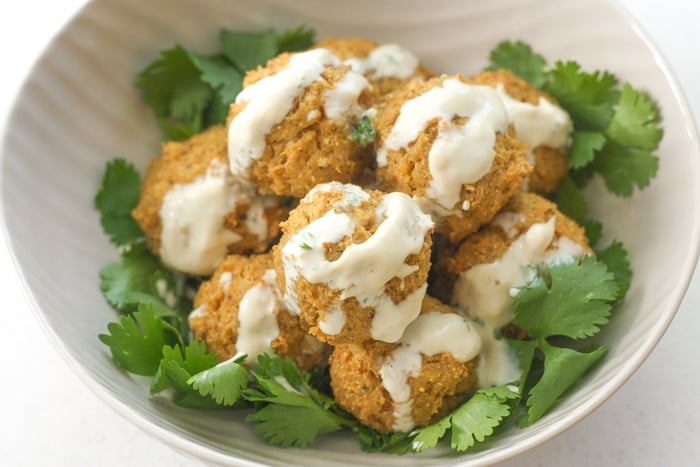
From what appears to be a long list of ingredients, this recipe is quite simple and requires only a few main ingredients along with an assortment of spices and herbs. You will need: cooked quinoa, cauliflower, canned chickpeas, breadcrumbs, eggs and a handful of spices and herbs. You will first need to cook the cauliflower. But keep in mind that this recipe calls for cooked quinoa and if you don't have any cooked on hand, no need to panic. I have laid out the basic steps on how to easily make quinoa, below.
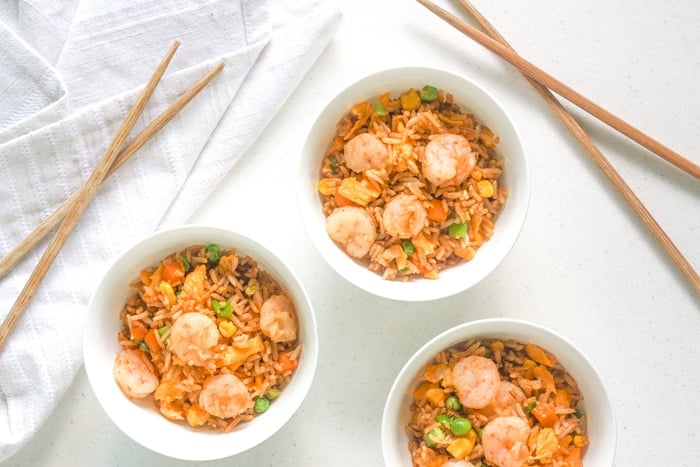
Chinese Fried Rice with Shrimp
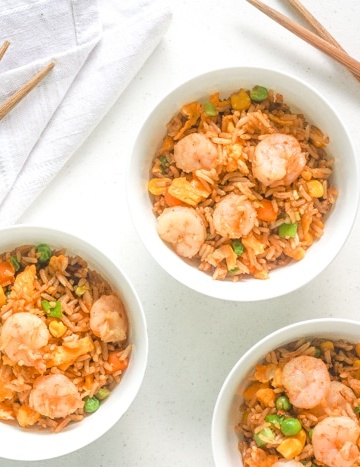
There are a few dishes that we make in our home that fall under my husband's department and Chinese fried rice with shrimp is one of them. If he even sees me making it, he will take over. My theory is that because it turns out so good, I think he wants the credit for it. And I gladly allow him to take over because that means I get to stretch my legs out and relax!
Baked Crispy Chicken Strips
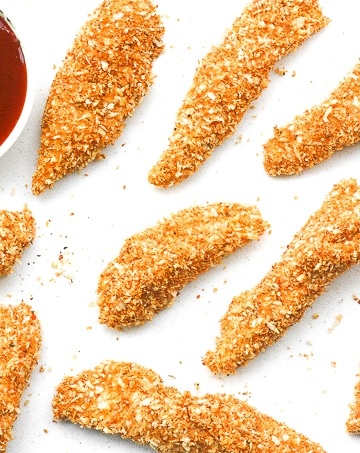
As a teenager, my favourite thing to order off of any menu was the classic chicken tenders and fries. It didn't matter which restaurant I was at, I wanted to try those juicy strips. My friends would make so much fun of me, as they could always guess what my order would be. Now fast forward 15 years later, and here I am making my very own baked crispy chicken strips.
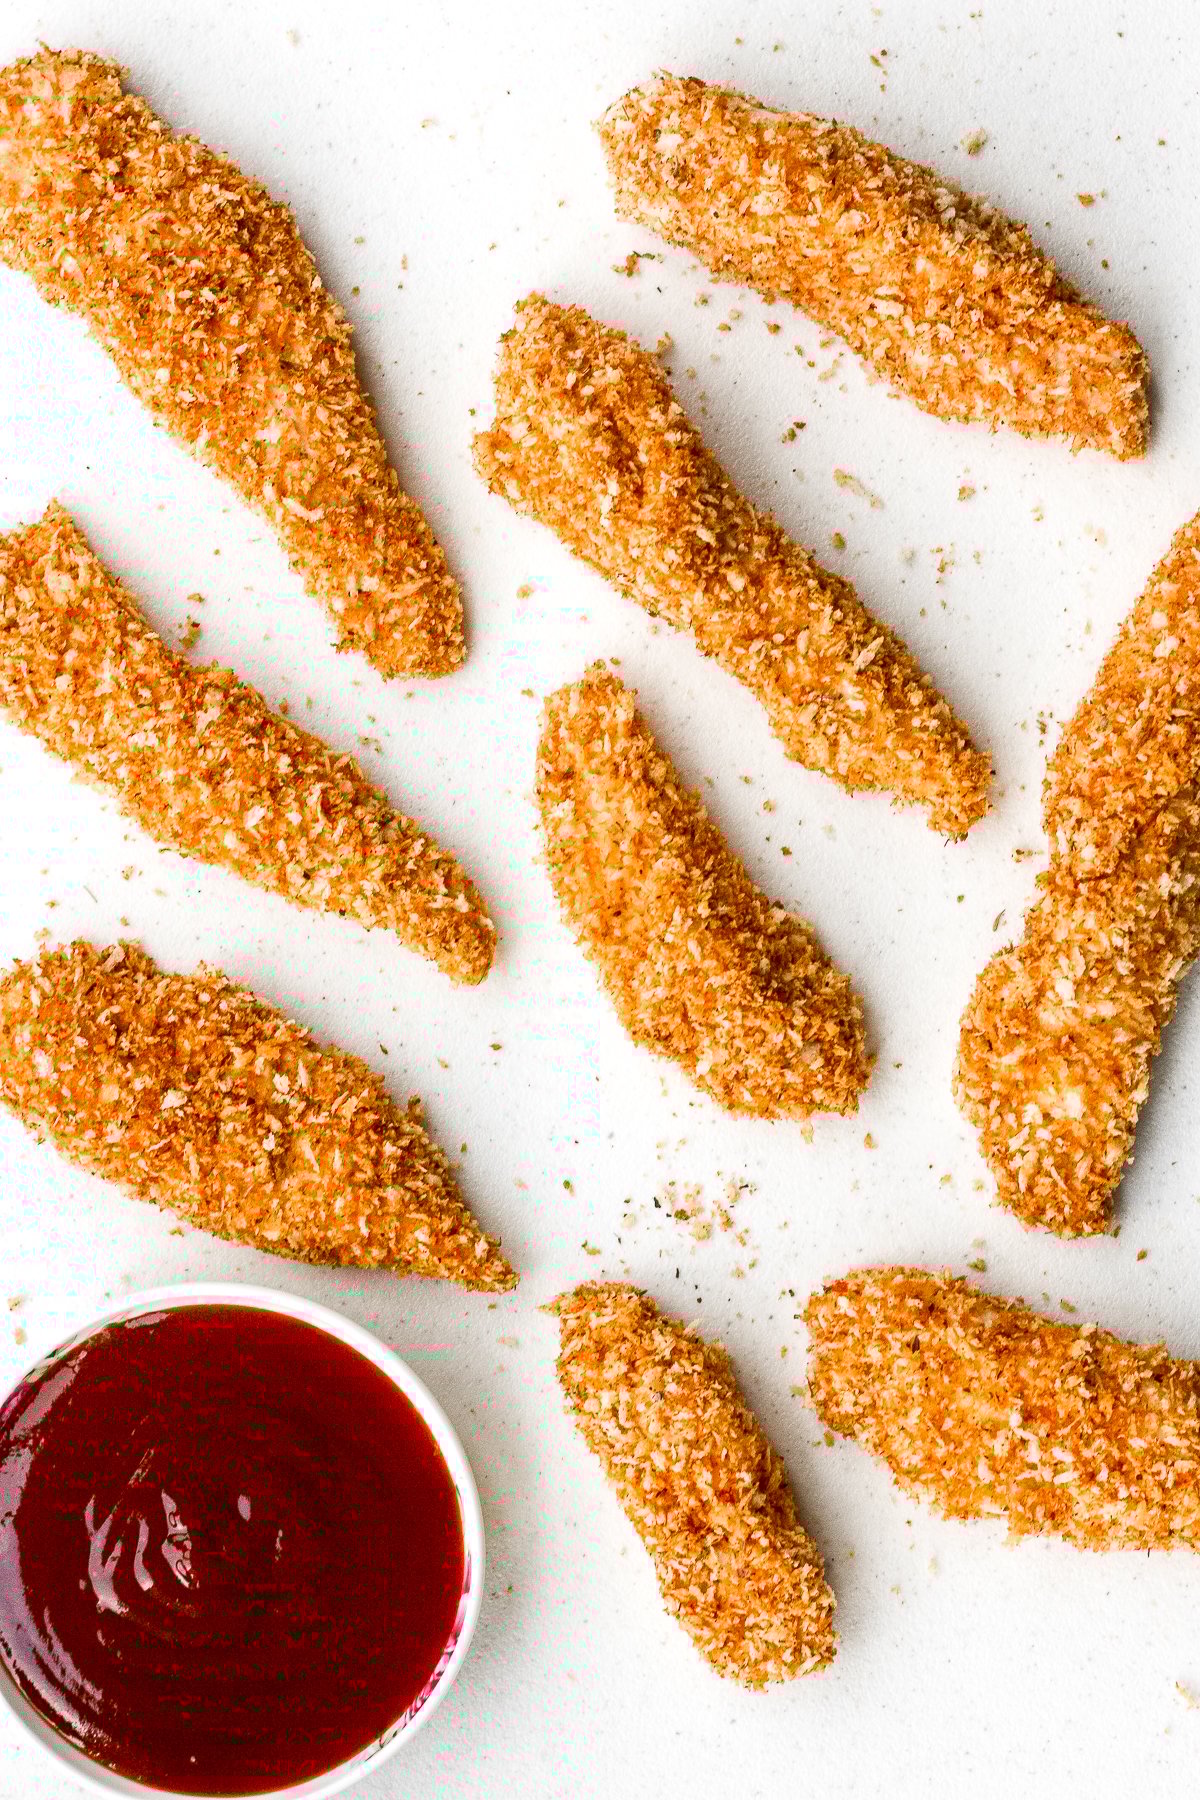
It is just so much more rewarding making homemade versions of your favourite recipes. And to top it off, making them healthier. Now that feeling is in a category of its own! Since the majority of restaurant-ordered chicken strips are deep fried, the fact that this version is baked makes it a zillion times healthier for you.
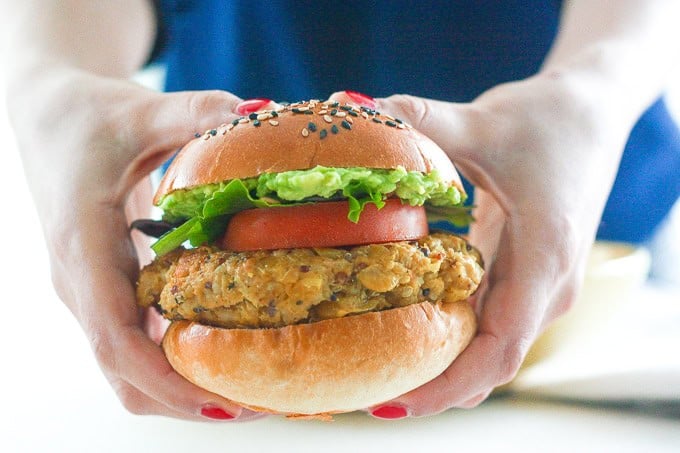
Homemade Veggie Burger with Lima Beans

So...remember those Easy Lima Beans that I cooked up last week? Well, I made a big batch and I had lots of leftovers. I decided to do something creative with what was left. So what did I decide to do? Homemade veggie burger with lima beans. Let me pause a minute while you take that in.