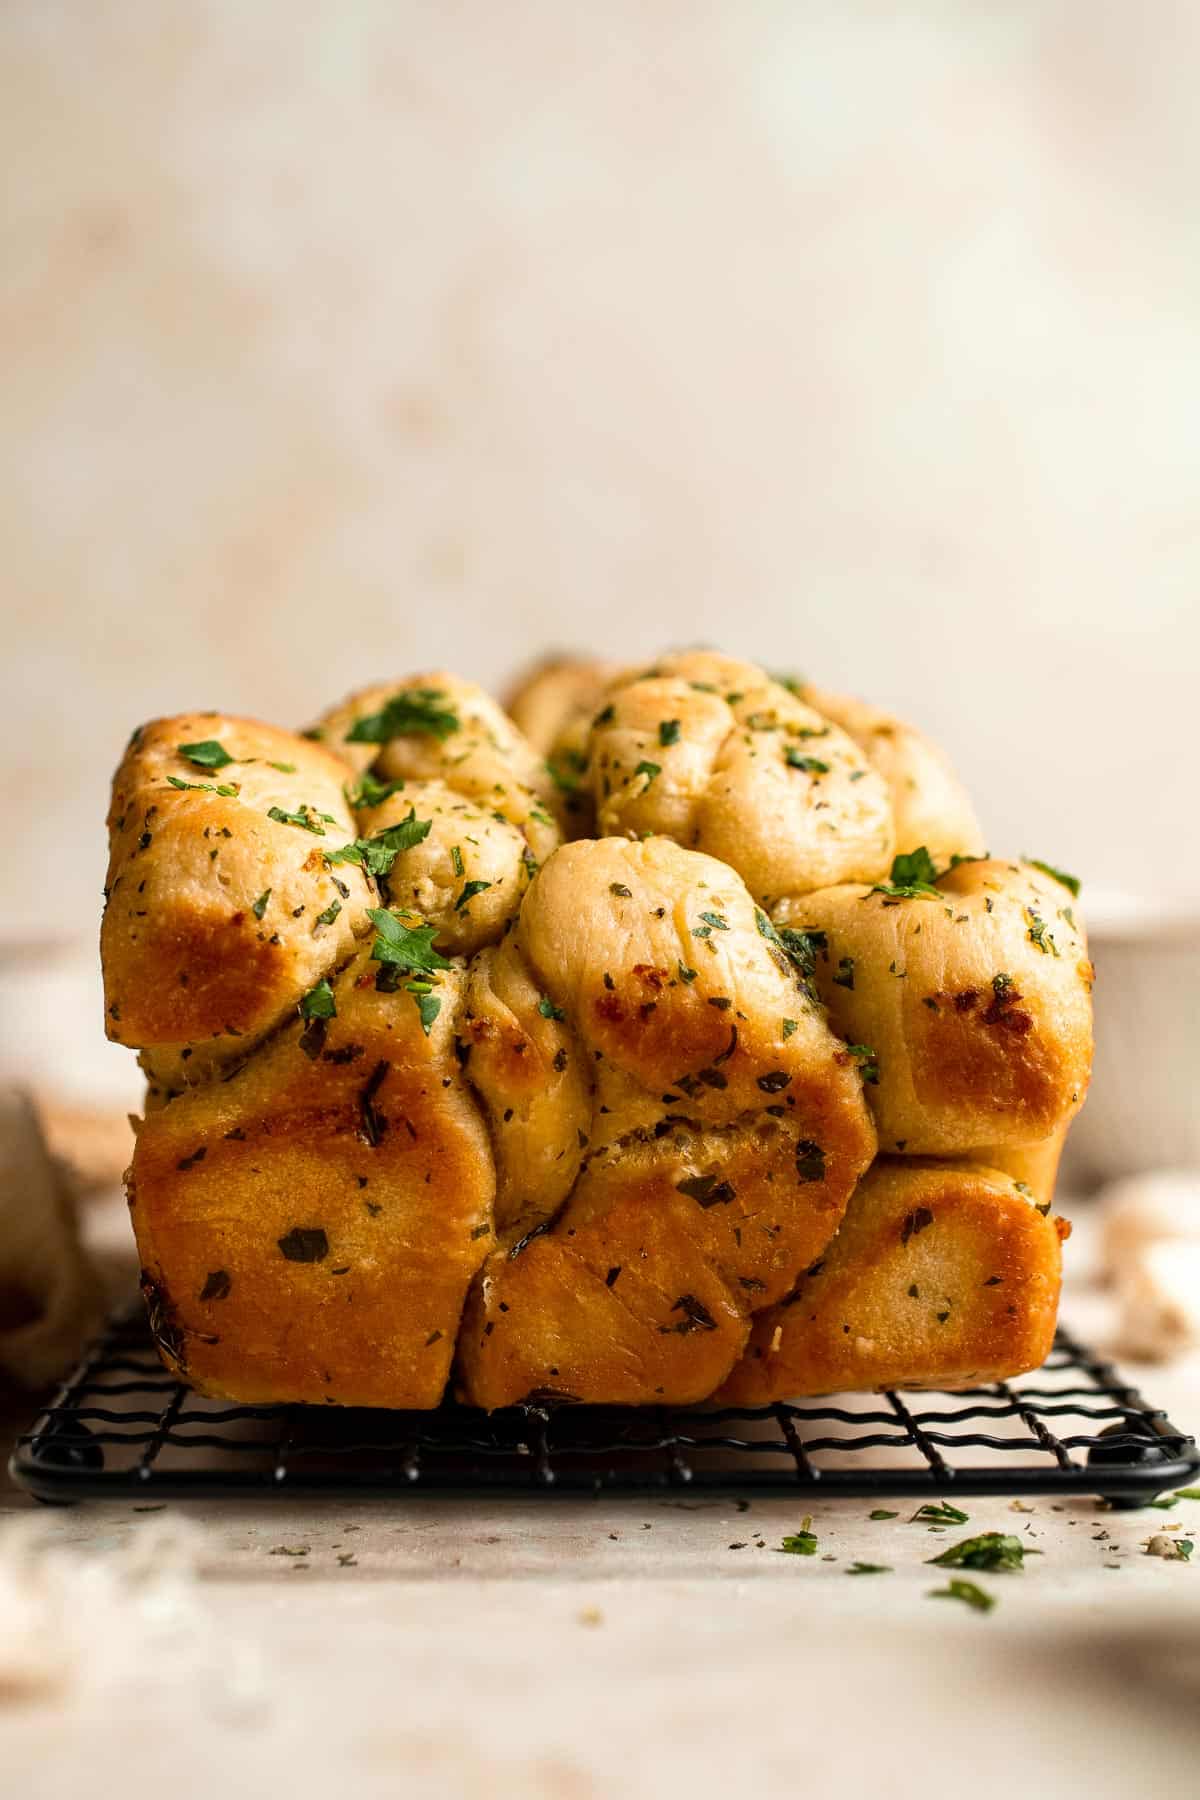
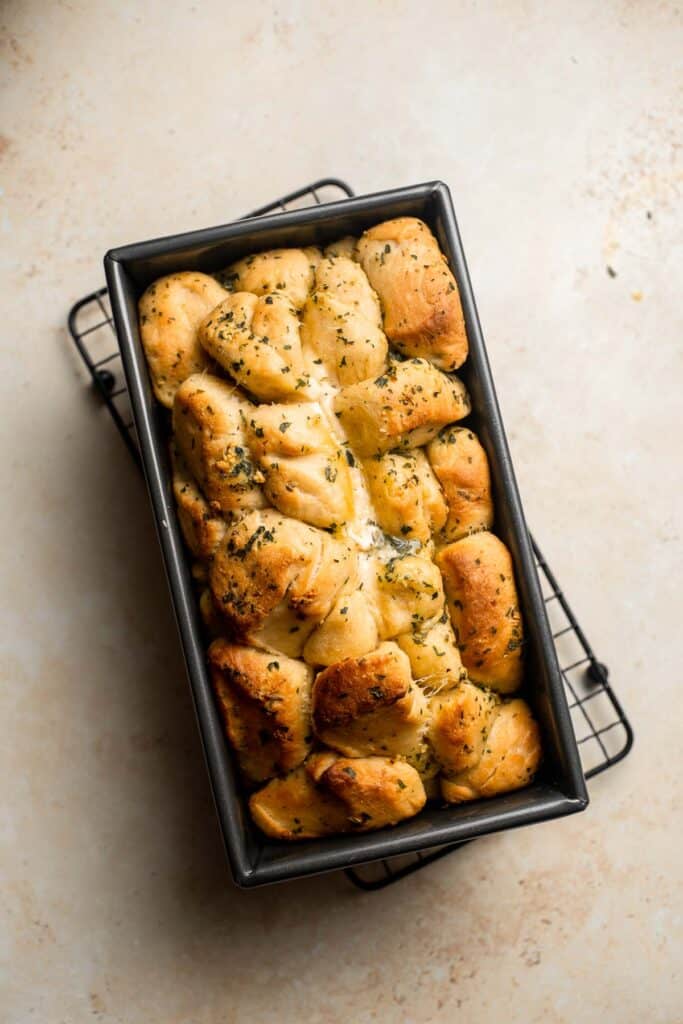
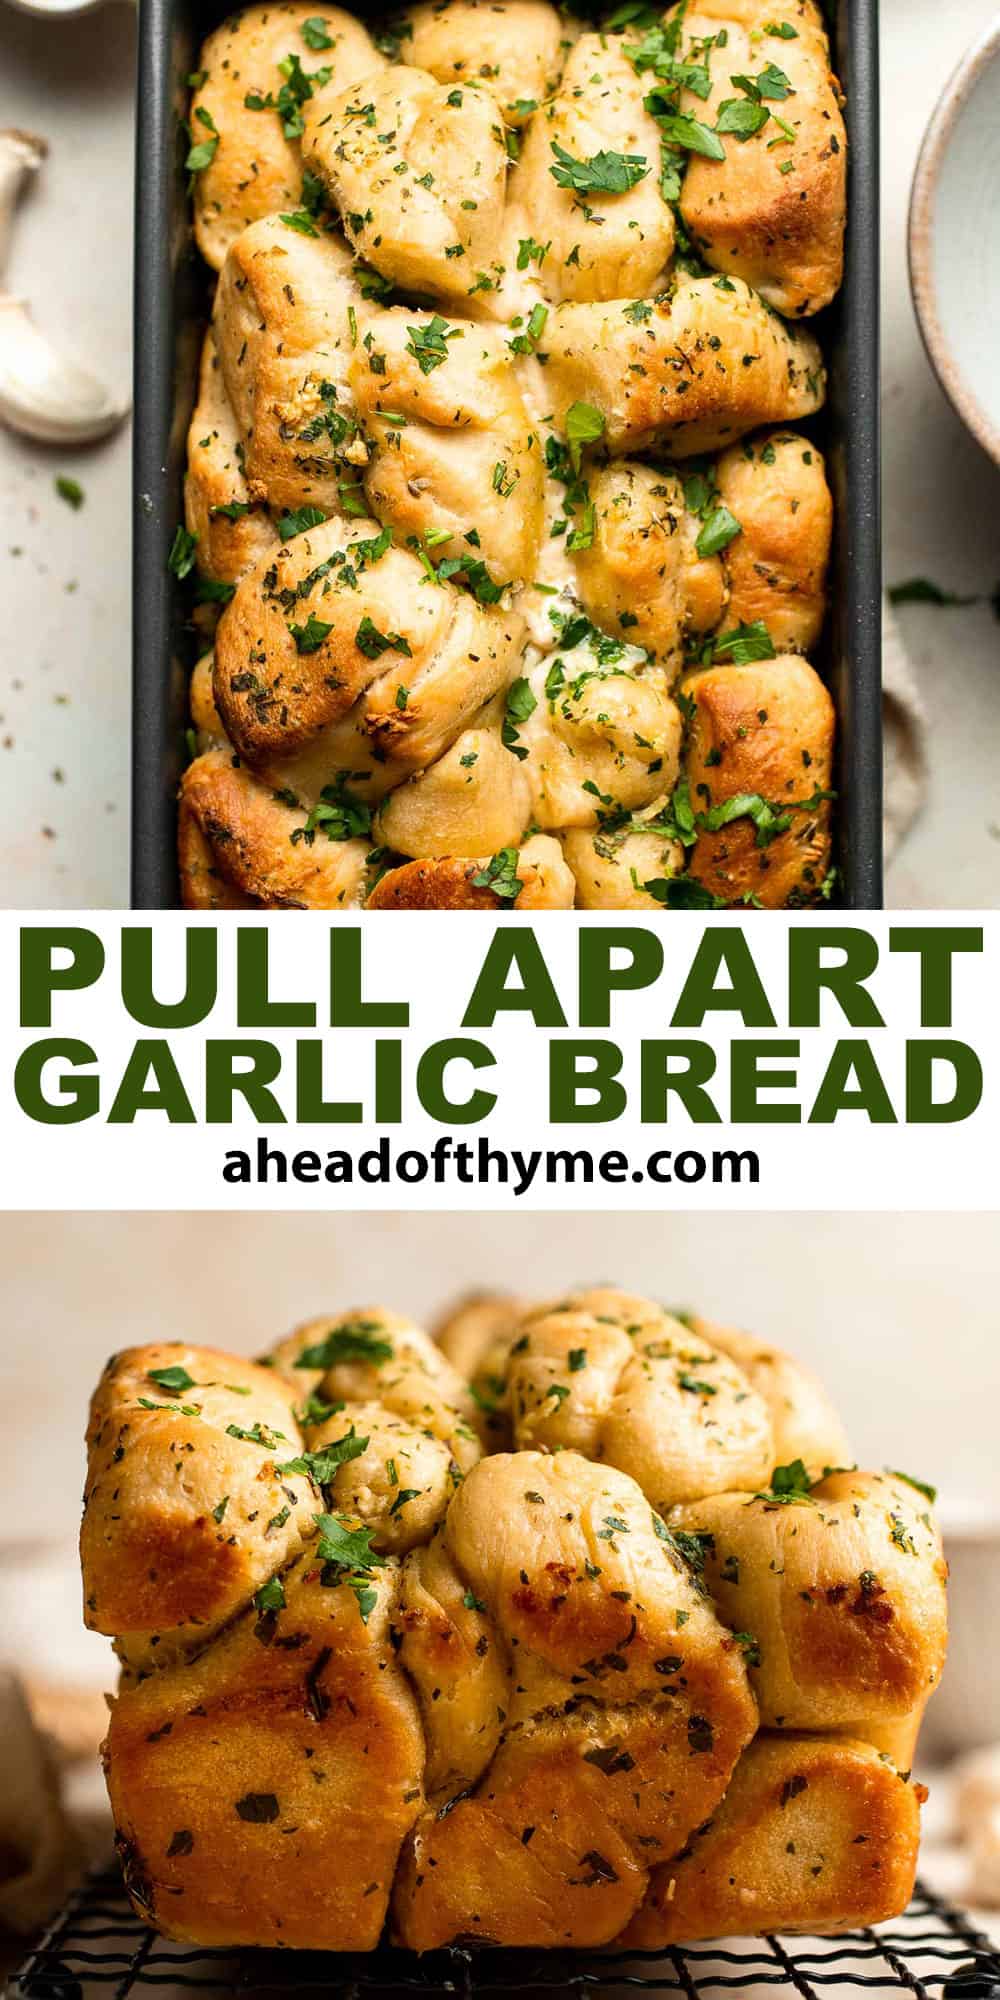
Ditch the foil-wrapped packages of garlic bread from the store and elevate your next meal with this homemade Pull Apart Garlic Bread. It's fluffy, buttery, flavourful, melts in your mouth, and tears easily for optimal sharing. The homemade dough is rolled and sliced into individual bites, tossed in homemade garlic butter, and baked until tender and fluffy.
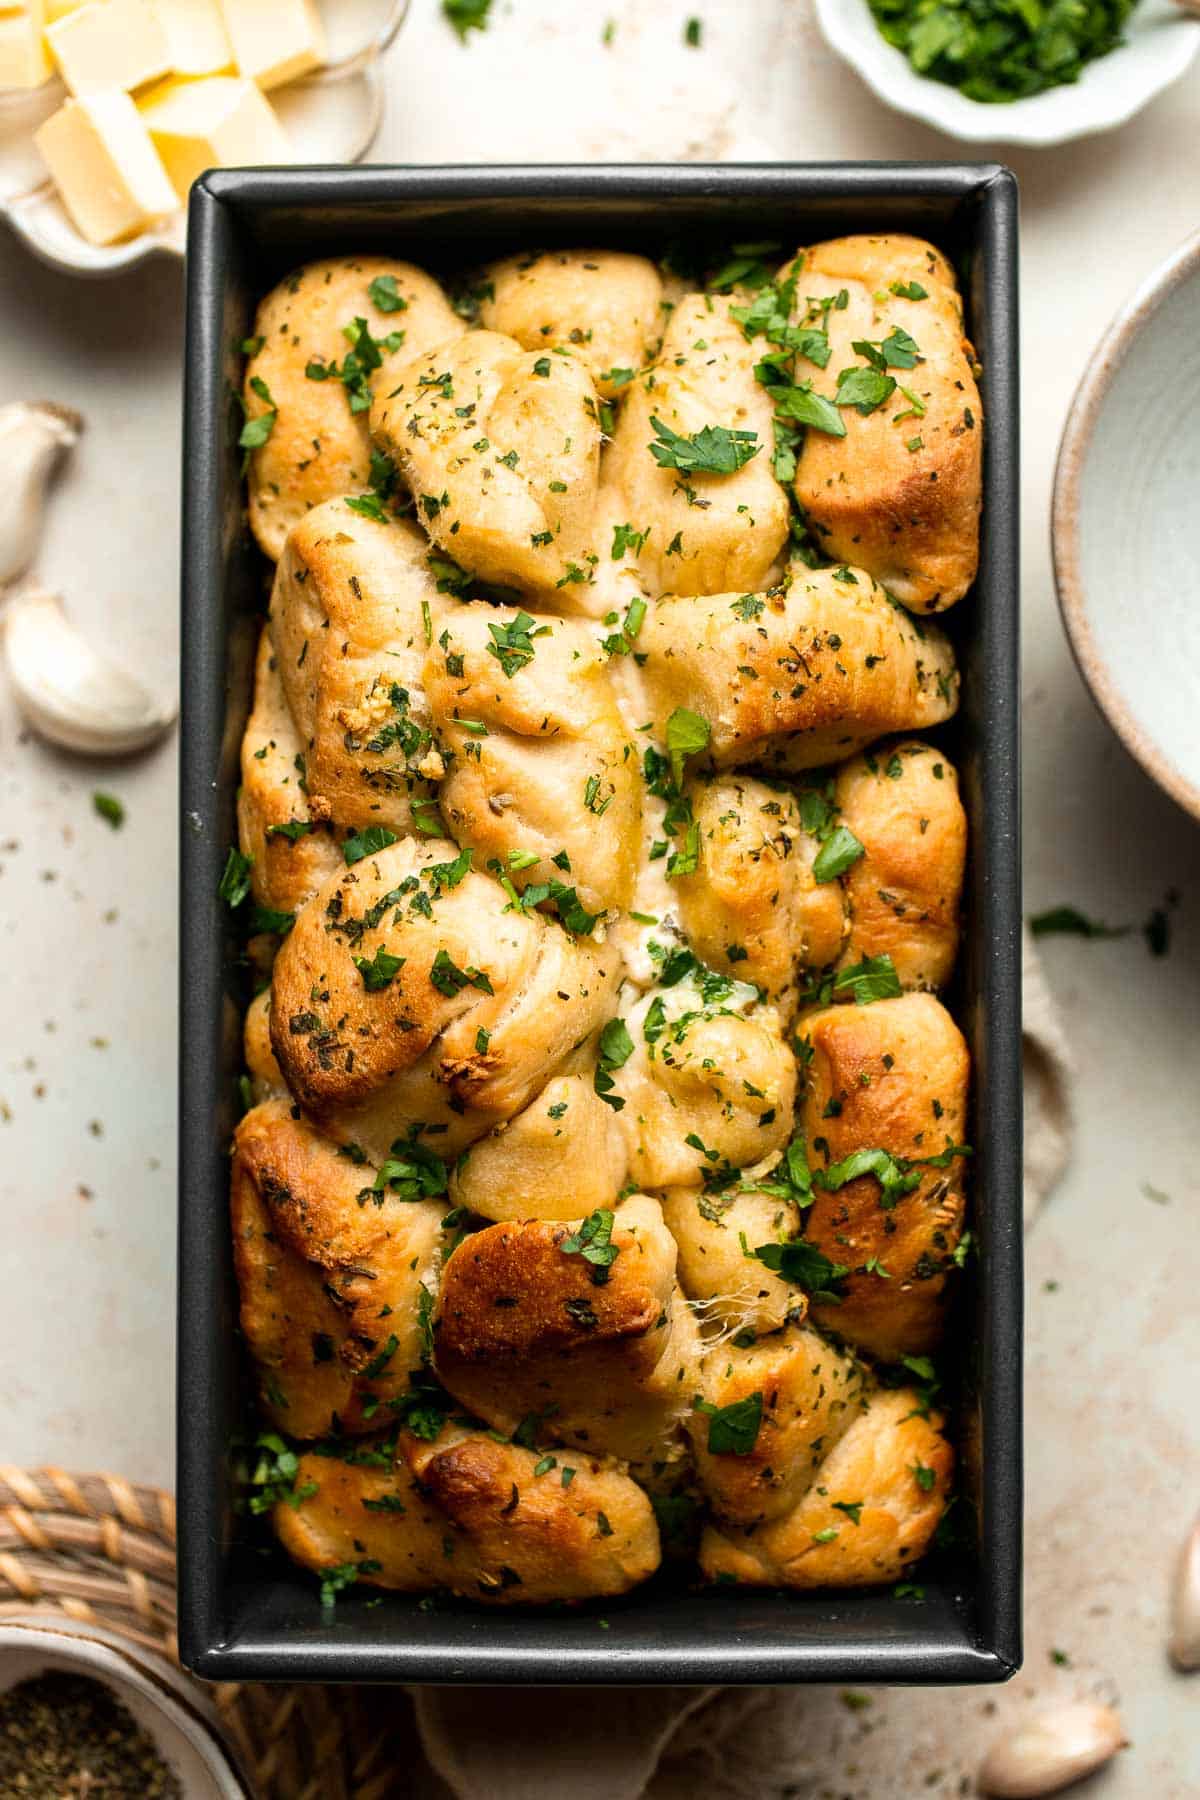
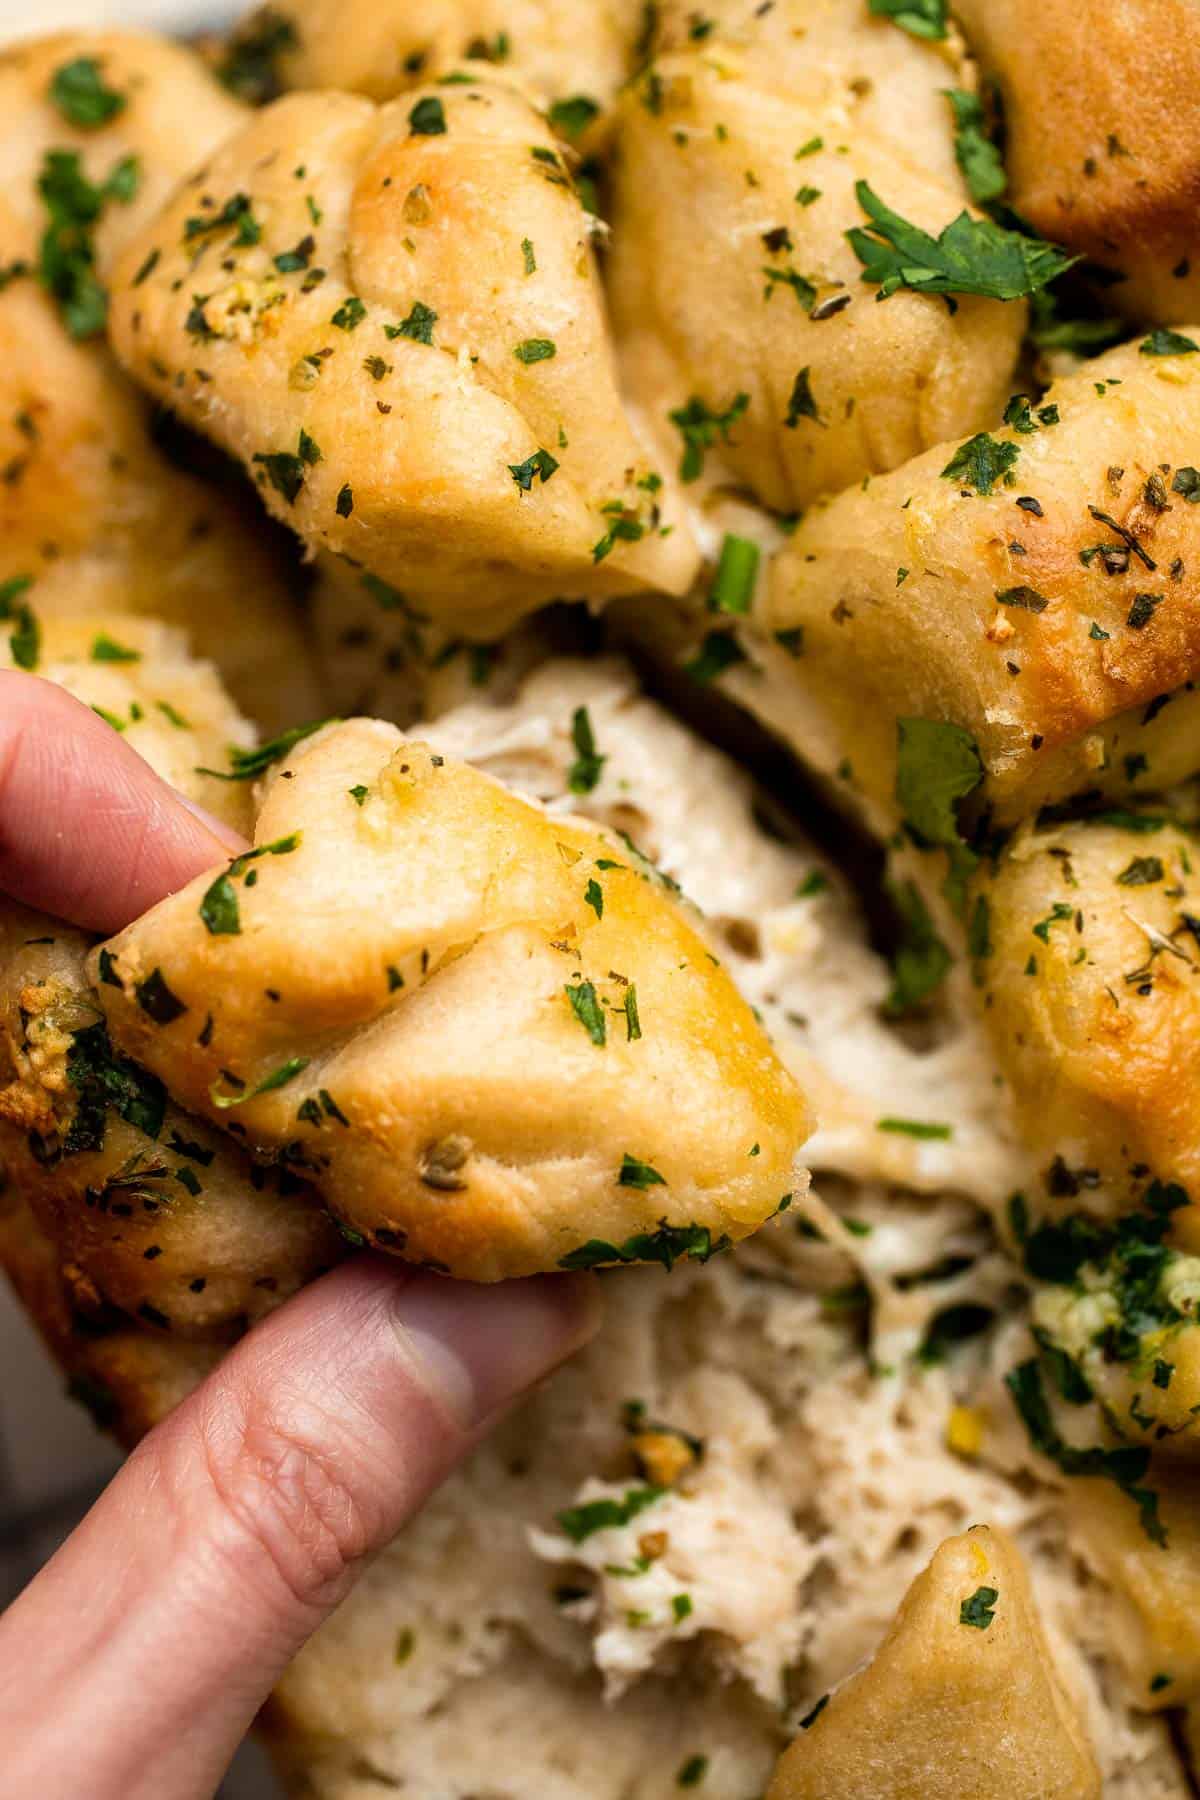
There is just something about garlic bread that brings a whole new level of comfort to your dinner table. But freshly made, warm, right from the oven garlic bread? Well, that is the best. Not to mention the amazing aromas that float around your kitchen as it bakes in the oven. As the little dough bites bake in the oven, they take on a golden brown crust fused with flavor from the garlic butter. It's the most snackable, grabbable version of garlic bread ever. You won't be able to stop grabbing little bites of warm bread and dipping them in Marinara Sauce or homemade Pizza Dip!
So, whether you are serving up this pull apart garlic bread on a busy weeknight, or making them for your guests on Thanksgiving, keep this recipe handy for years and years to come!
Why You'll Love This Pull Apart Garlic Bread Recipe
- Completely homemade. Unlike store-bought versions that include preservatives and additives and taste like it, this is the best garlic bread! It's made entirely from scratch, using simple ingredients you probably already have on hand.
- Easy to make. What I also love about these rolls is that they are actually quite simple to make. You would think that making pull apart bread would take a lot of effort, but surprisingly it doesn't. To get the garlic bread to pull apart, you just need to cut up the dough into small pieces, layer them in a loaf pan, and bake.
- The garlic butter topping. Typically, when you make garlic bread, you would slather on some butter and top with garlic and herbs. However, the secret to getting the tastiest topping is to infuse the flavours into the butter. So we cook the garlic and herbs with the butter for a few minutes and boy does it make a difference.
- Flavor in every bite. So since the little pieces of dough are tossed in our homemade garlic herb butter, you'll be able to taste the buttery, garlicky flavor in every single bite! So flavorful and delicious!
- Perfect for sharing. This homemade pull-apart garlic bread is truly made for sharing. Serve it as an easy appetizer during the holiday season, or offer it as a side dish with this Easy Meat Lasagna or Spaghetti and Meatballs!
Ingredient Notes
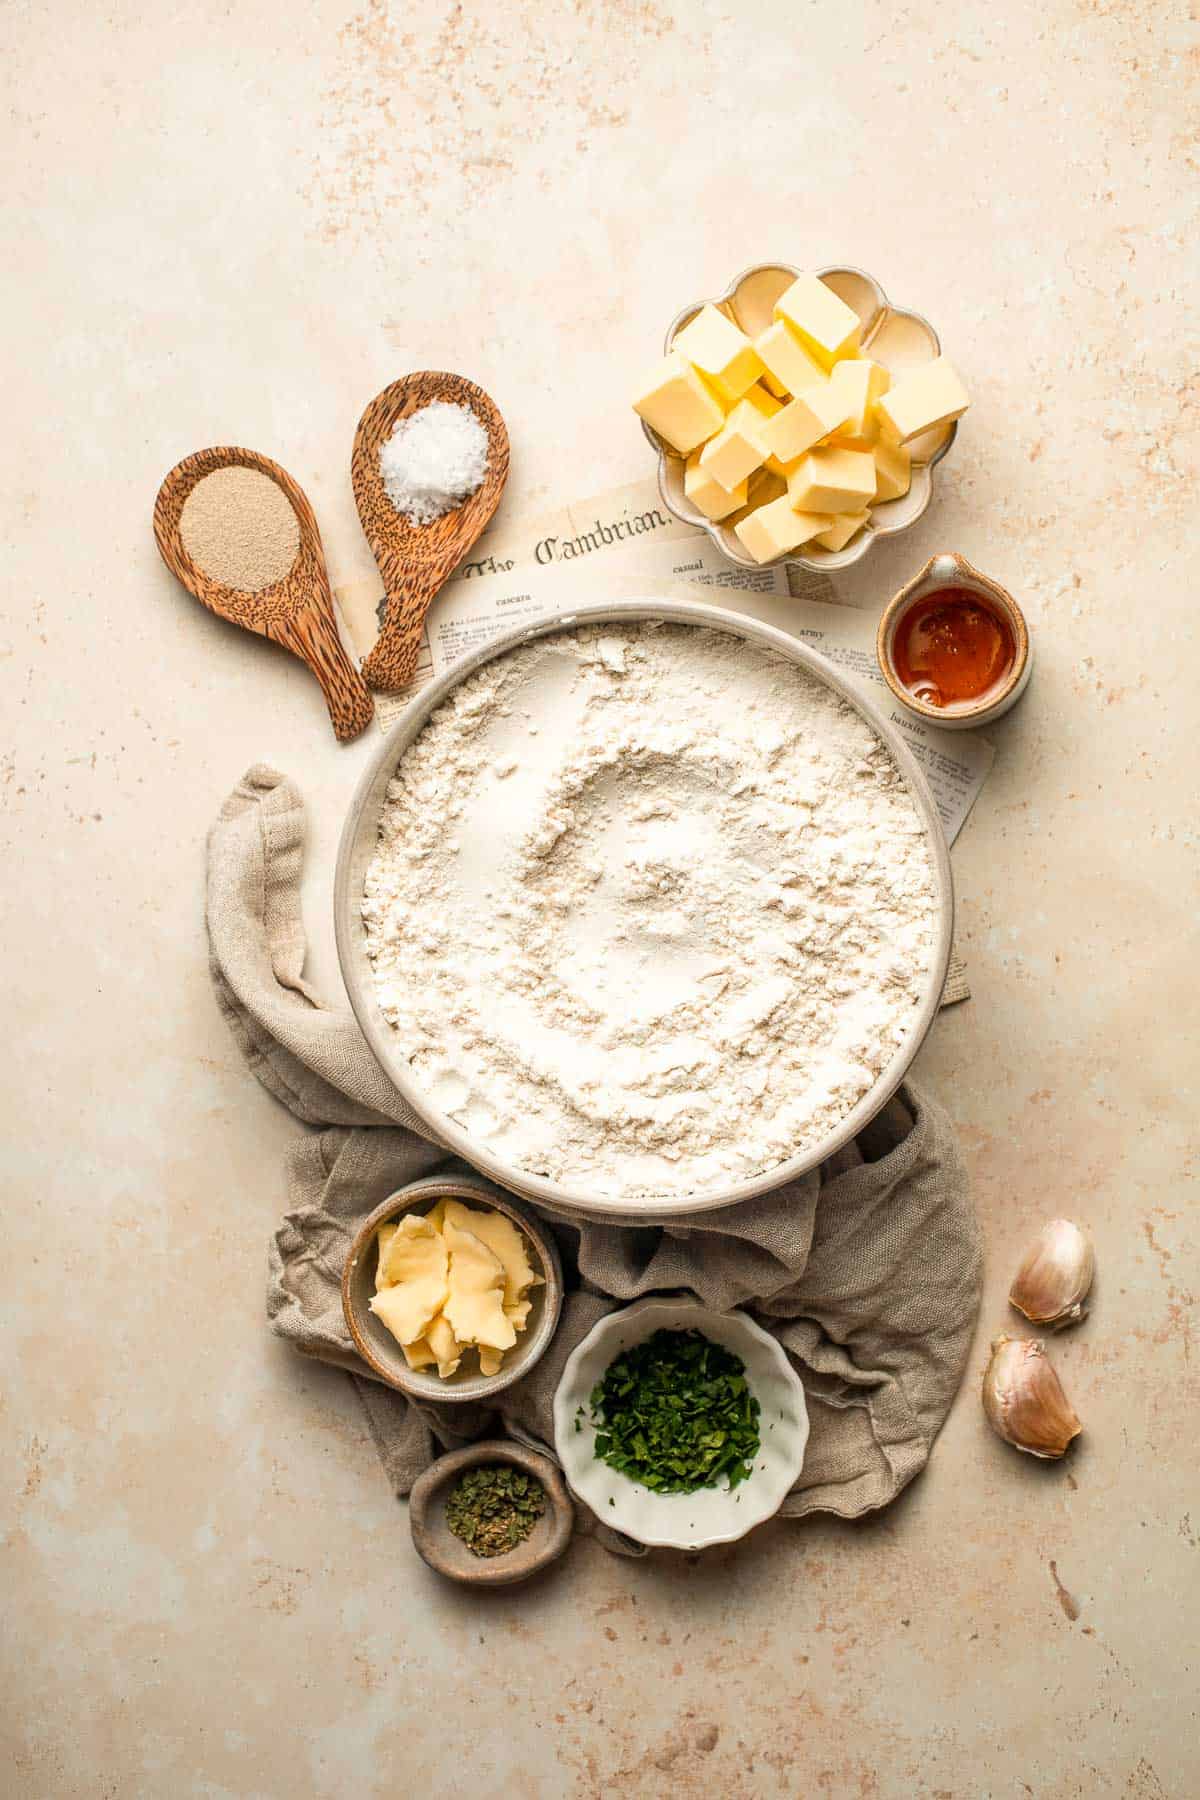
To make this delicious pull apart garlic bread, you will need the following ingredients (full measurements in recipe card below):
- water - this will hydrate the dough and make it very flexible.
- active dry yeast - this yeast will begin working right away, making it easy to serve this garlic bread in under 2 hours. Instant yeast is a good substitute.
- honey - honey will feed the hungry yeast and add a mild sweetness to the bread.
- all-purpose flour - you can make deliciously tender homemade bread with all purpose flour. If you have it handy, feel free to substitute bread flour instead. You can also substitute 1.5 cups of the flour with whole wheat flour, if desired.
- butter - a little softened butter will add a soft texture and buttery flavor to the dough. You also need butter for the garlic butter topping.
- salt - always salt your bread dough to bring out its full flavor.
- garlic - use finely grated or minced garlic. Garlic powder can work in a pinch, but it won't have the same depth of flavor.
- fresh parsley - a little finely chopped parsley sprinkled on top will add a pop of color and a refreshing flavor. Some chives or thinly sliced green onions would work great, too.
- Italiano seasoning - the mixture of dried herbs will soften in the butter and release their flavors.
You will also need measuring cups and spoons, a large mixing bowl or stand mixer, saucepan, dishcloth, a knife, and a loaf pan.
How to Make the Best Pull Apart Garlic Bread
First, make the dough.
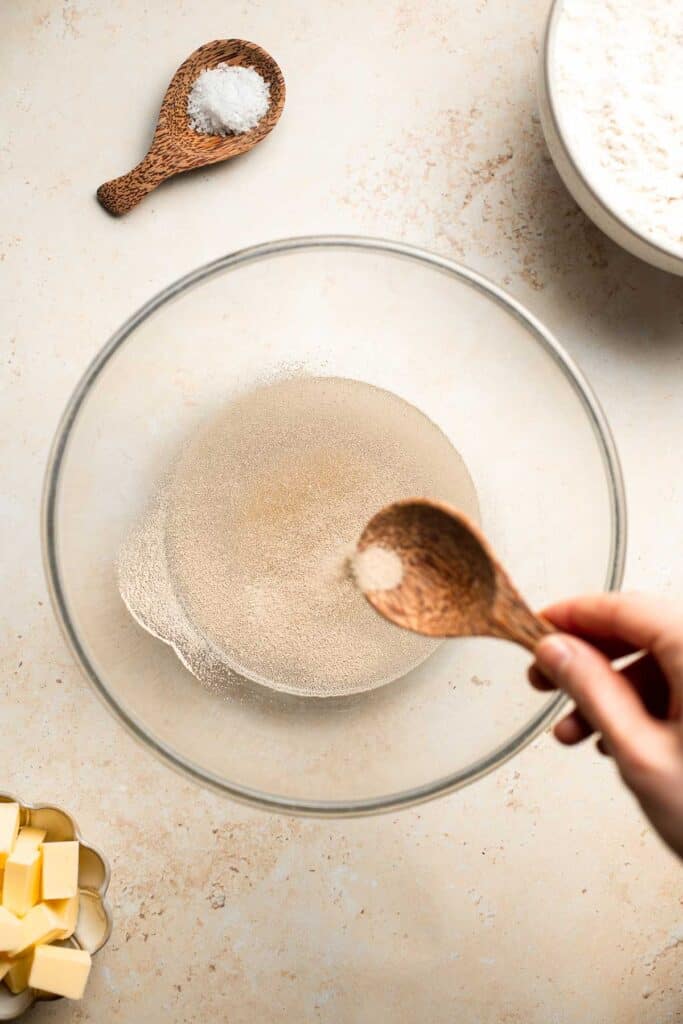
- Activate yeast. In a large mixing bowl, stir together ½ cup warm water, yeast, and honey. Let rest 5-10 minutes until foamy.
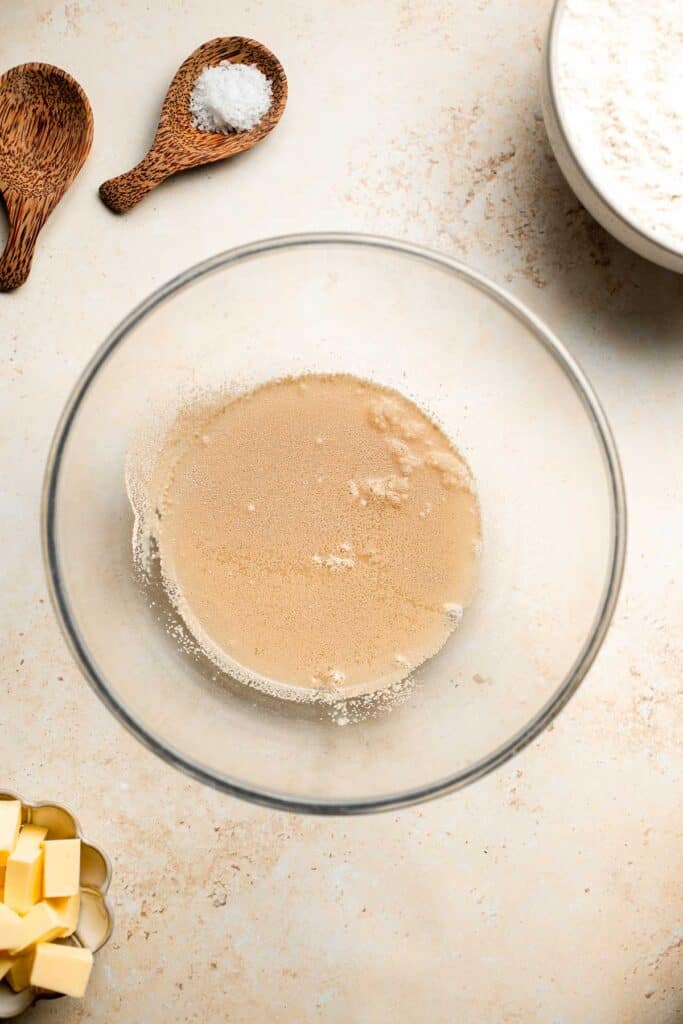
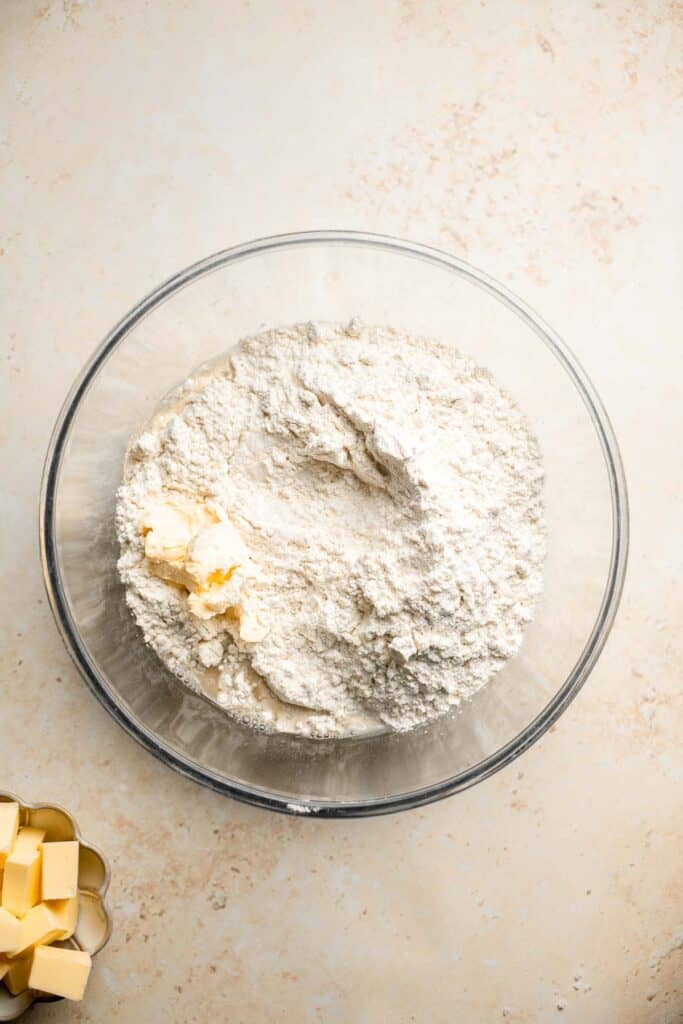
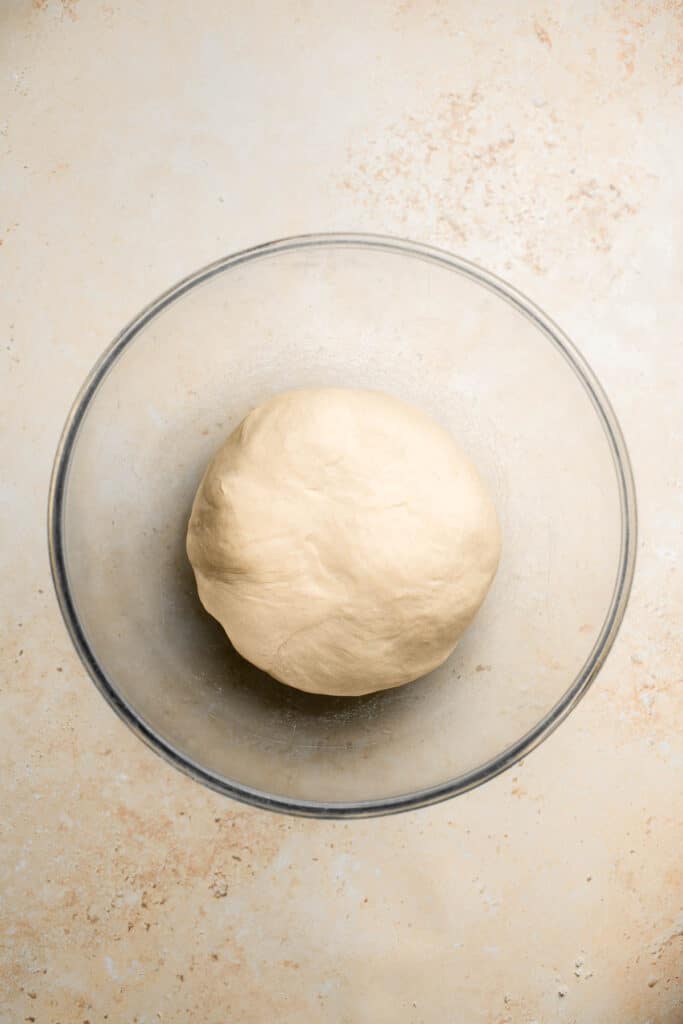
- Add remaining ingredients. Add in flour, butter, and salt, and mix until combined. Gradually add in the remaining ½ cup water, stirring between each addition until completely combined, and until the dough comes together into a ball. The dough will be soft but slightly sticky. If it is too sticky, you can add a little more flour.
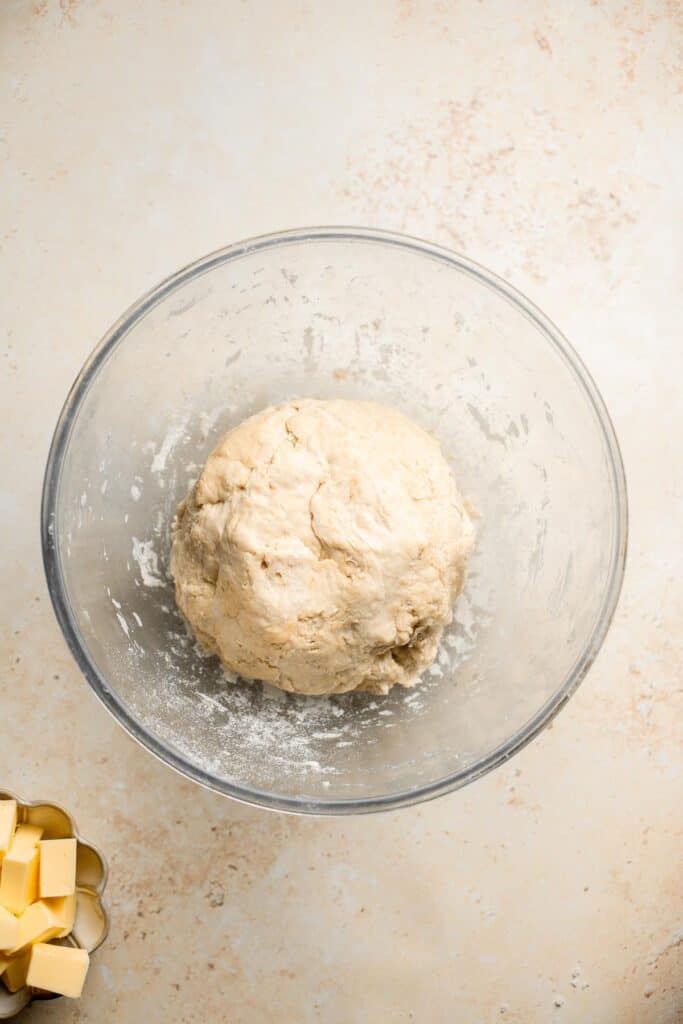
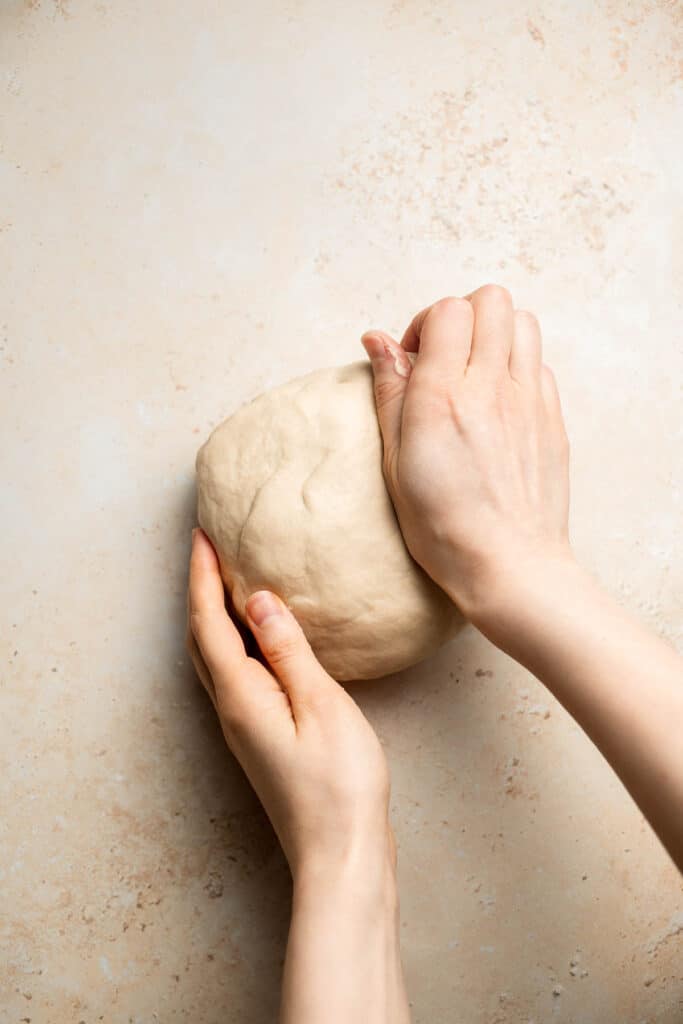
- Knead. Knead for 7-10 minutes (by hand or in a stand mixer) until the dough is smooth and elastic. You can test the dough for readiness by pressing into the dough with your thumb. If it bounces back, then it is ready.
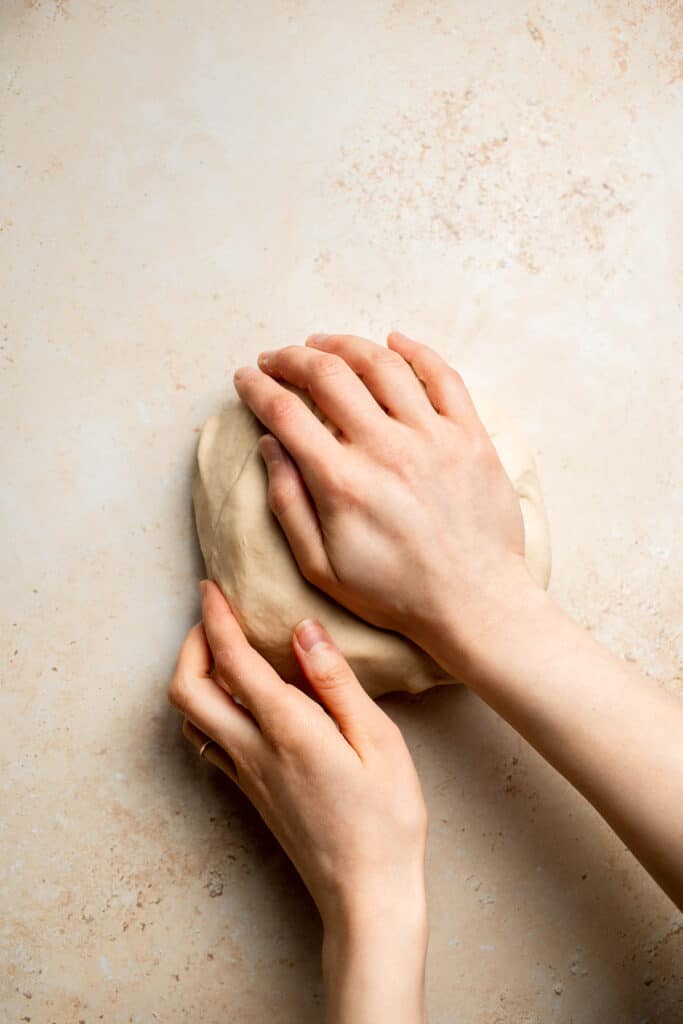
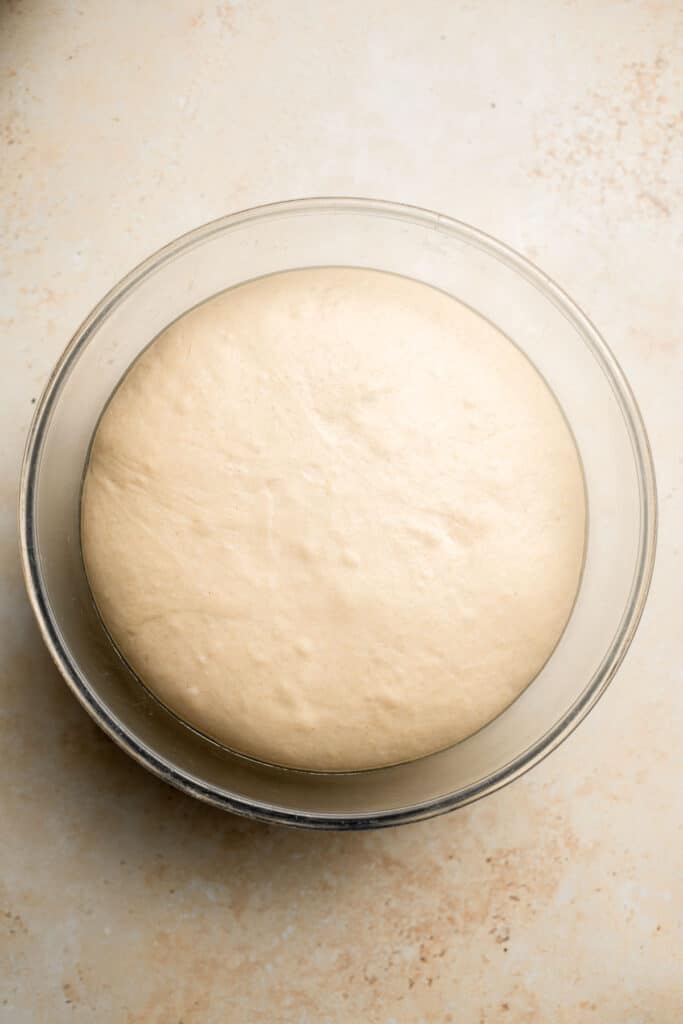
- Rest. Cover the bowl with a dish cloth, and let dough rest at room temperature until doubled in size, about one hour.
Next, make the garlic butter.
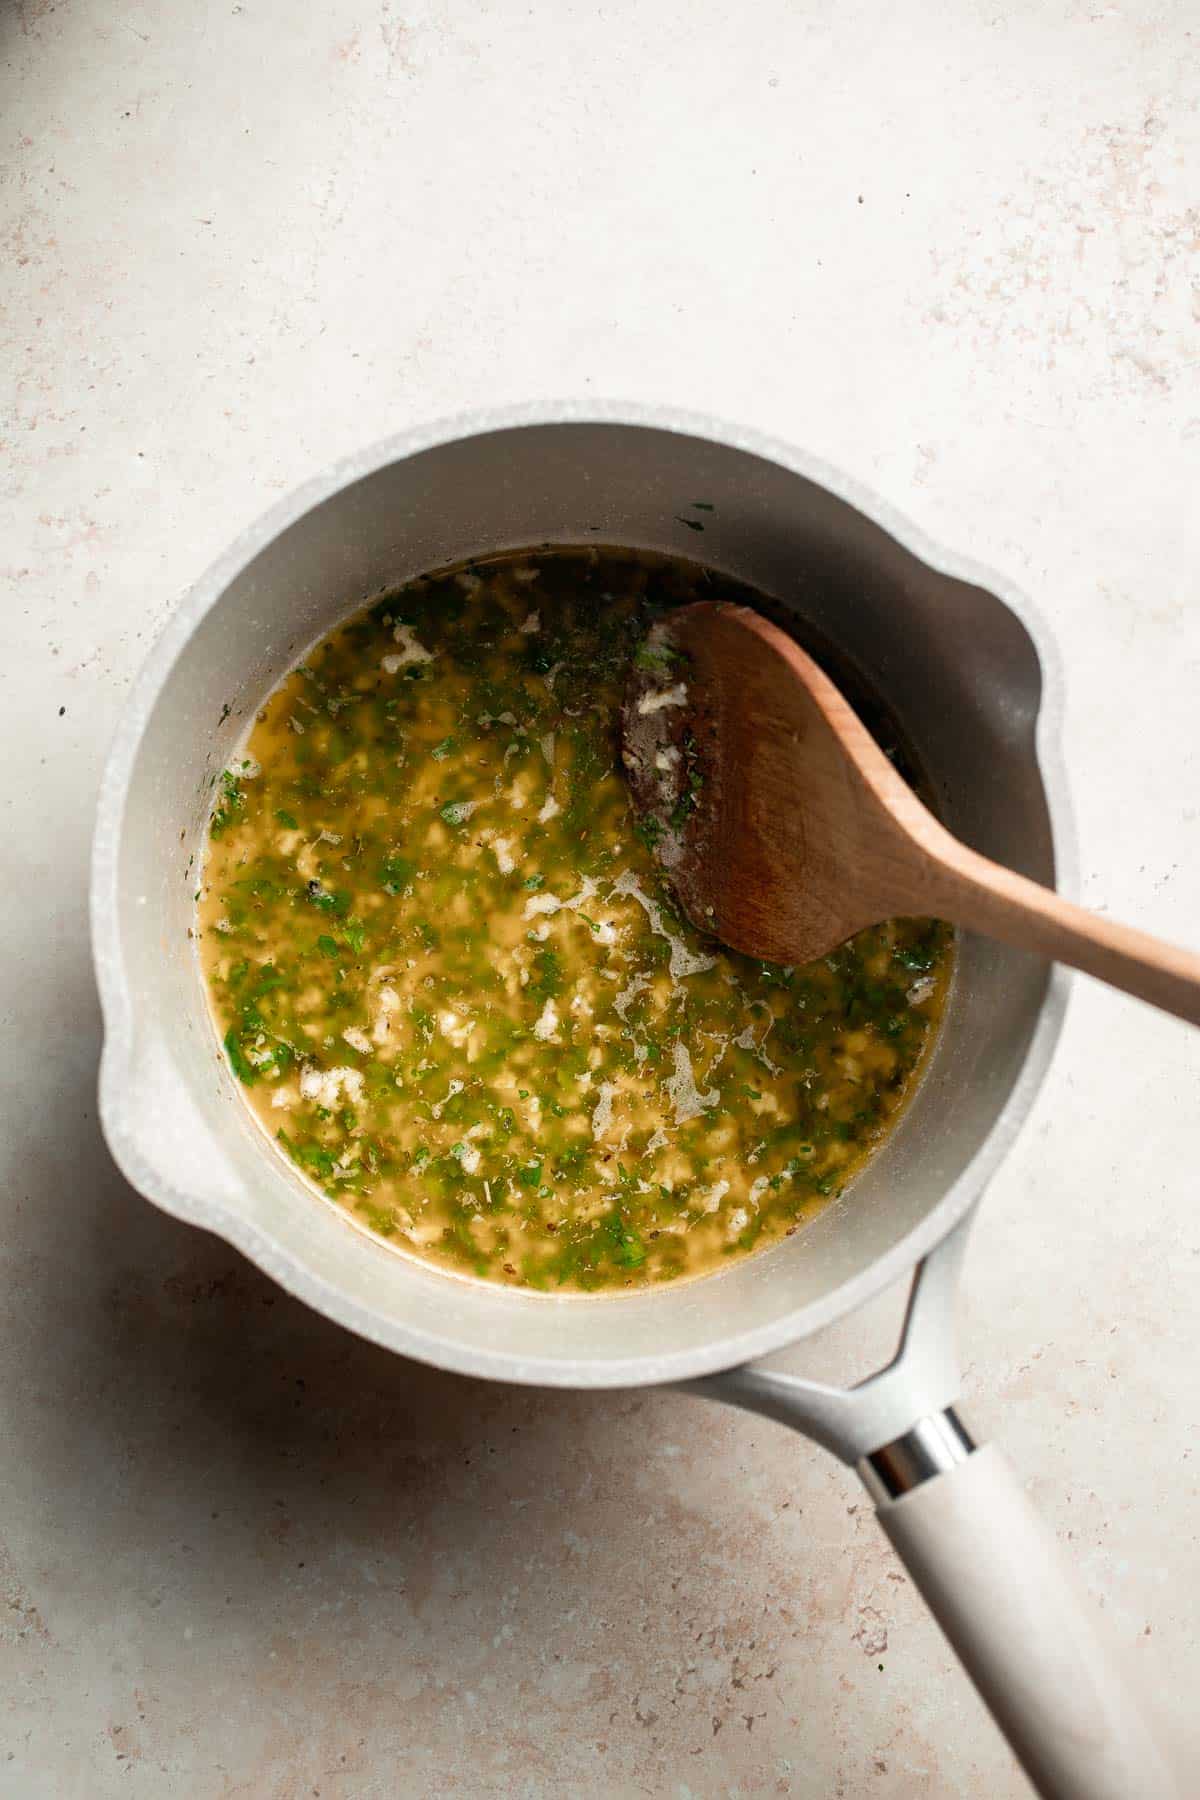
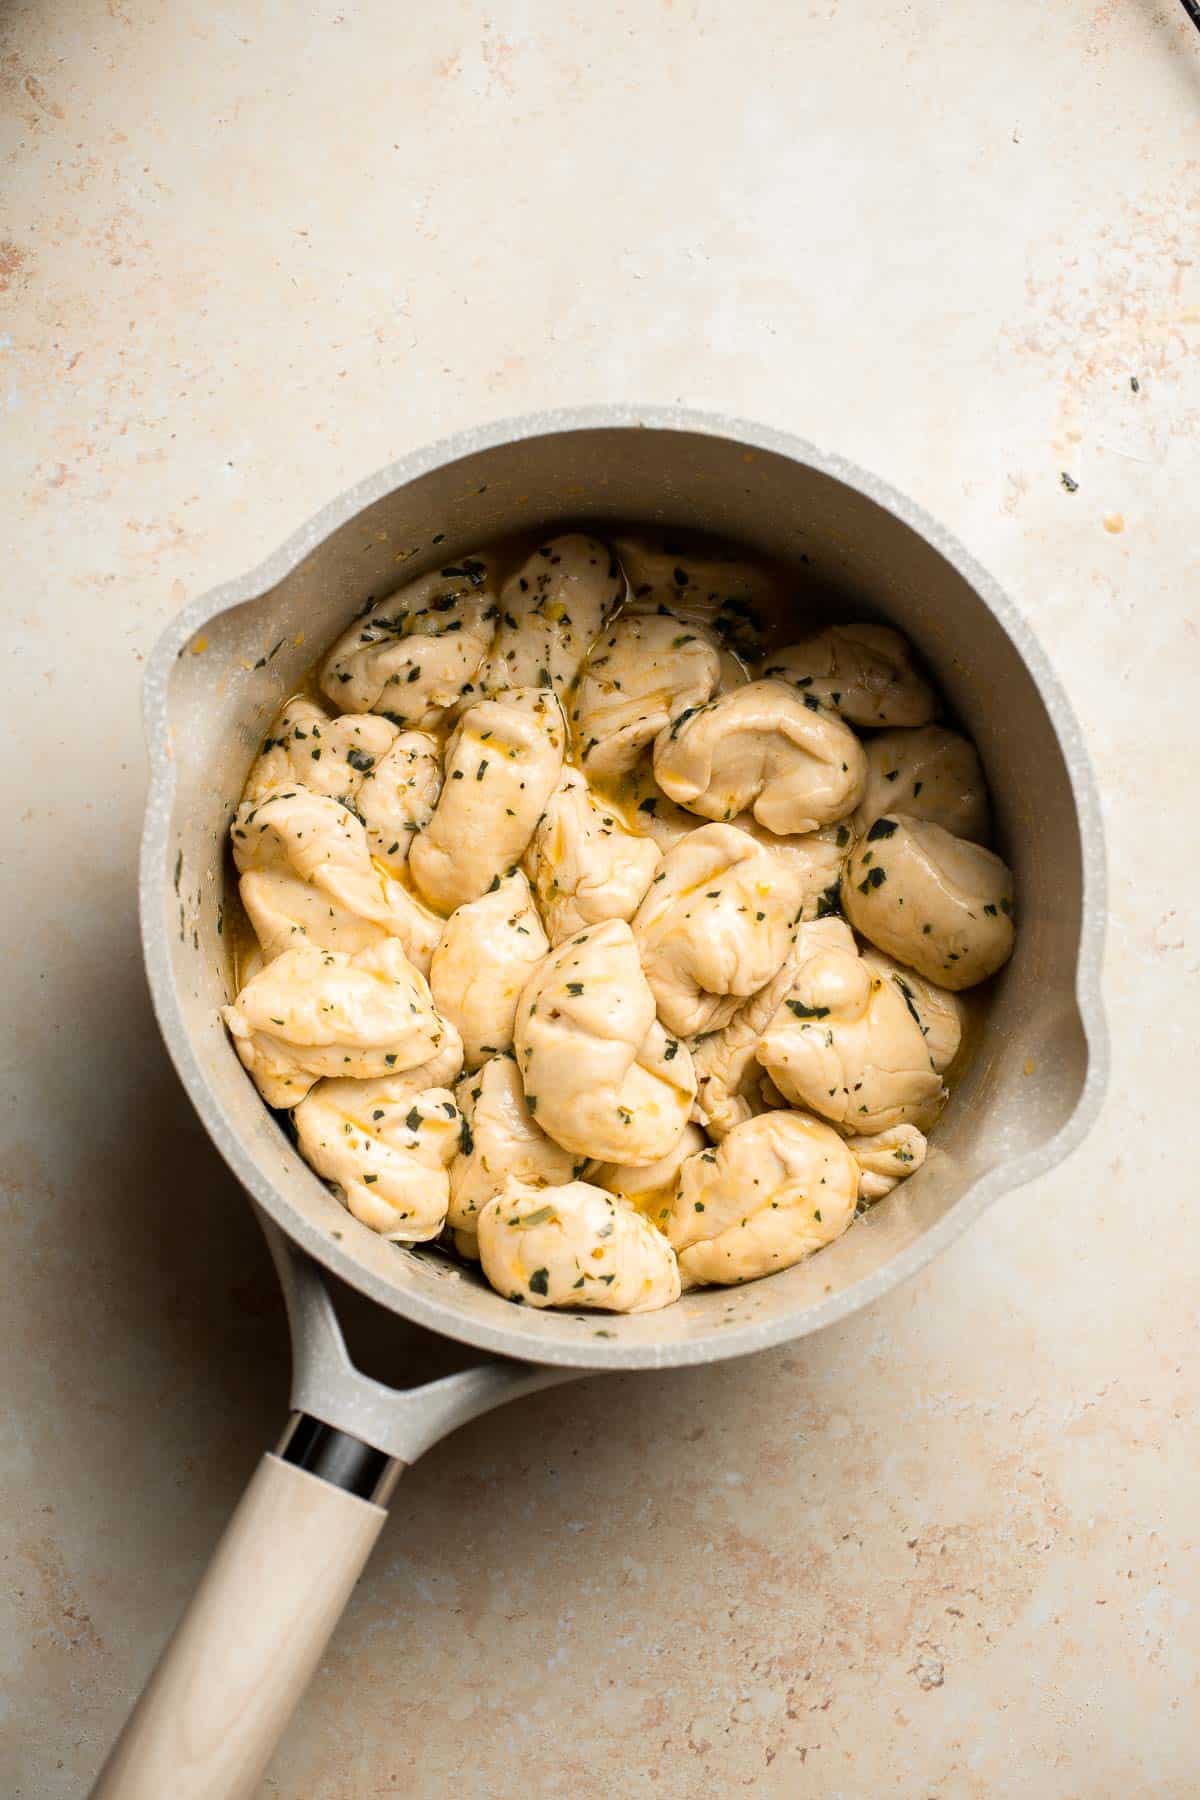
In a small saucepan, melt butter over low heat. Once just melted, add garlic, parsley, and Italian seasoning. Stir to combine and continue to cook over low heat for 2 minutes, to allow the flavours to infuse into the butter. Remove from heat.
Finally, let's shape and bake.
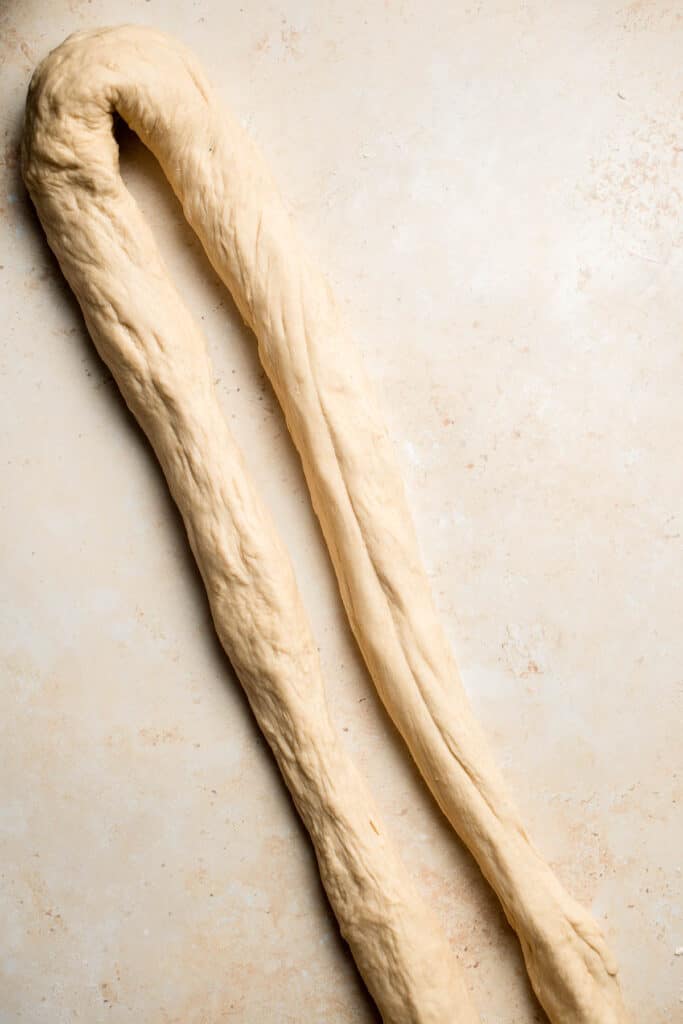
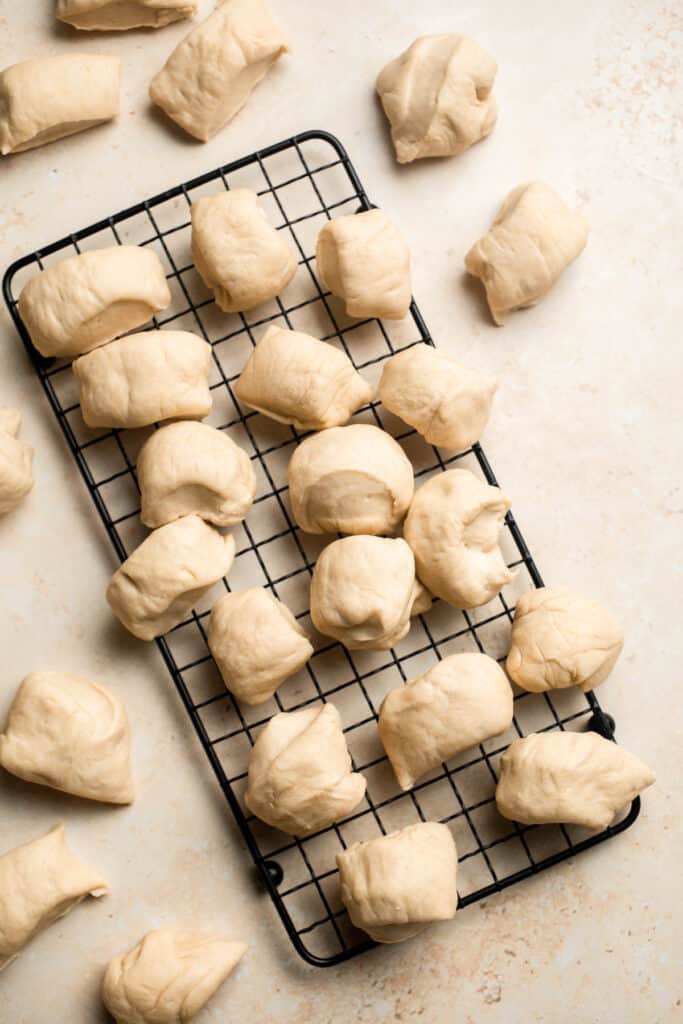
- Shape. Once the dough is ready, shape it into a long tube, 1-inch in diameter. Then, cut into small 1-inch pieces.
- Toss. Place the pieces into the saucepan with the garlic butter and toss to fully coat.
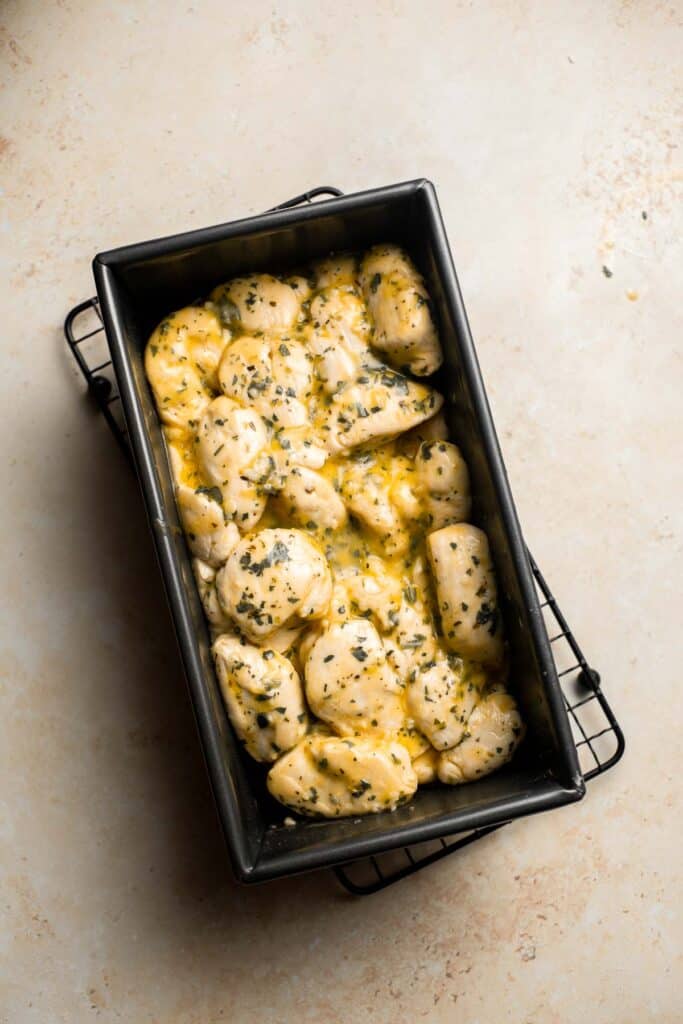
- Bake. Transfer the coated pieces into a 8 x 4 inch loaf pan and bake in a 375 F preheated oven for 20-25 minutes or until golden brown. Garnish with additional fresh parsley on top (optional).
Recipe Variations
- Make cheesy pull-apart garlic bread. Sprinkle shredded or grated parmesan cheese between the bites as you're assembling the dough bites. They'll melt into a savory crust that tastes amazing!
- Use storebought pizza dough. In a hurry? Use store-bought pizza dough to speed up the process.
- Make mini bites. Instead of baking a large, delicious loaf, add 4-5 of the little bites to a prepared muffin tin. They're a fun alternative to dinner rolls and way more exciting than serving a slice of regular garlic bread. Just be sure to reduce the baking time!
- Change the shape. This recipe is especially great for any upcoming holiday dinners or special events. You can even arrange the dough bites in a bundt pan for a fun wreath shape. Serve the bread with a bowl of Pizza Dip in the middle for easy dipping!
How to Serve
This Pull Apart Garlic Bread is fancy enough to be served as an appetizer at your next dinner party or as a side dish to serve with lasagna, spaghetti, and so much more. Some of our favorite entrees to serve this garlicky bread with are:
For more recipe inspiration, see our 60+ Easy Dinner Ideas.
Recipe Tips and Tricks
- Don't rush the dough. Dough rises at different speeds depending on the temperature of your kitchen and the ingredients. Give it time to fully double before punching it down and shaping the dough bites for the best texture in the end.
- Keep the butter melted. To coat the dough bites in butter, it might be fully melted. I recommend preparing the butter right at the end of the first rise so it will be ready when you need it. Be careful not to overcook the garlic or accidentally burn the butter.
- Knead the dough properly. The most important thing is to fully activate the gluten. When the dough is properly kneaded, it won't seem loose, sticky, or shaggy anymore. Instead, it will have a smooth, elastic texture with a little bounce. Feel free to make the dough in the bowl of a stand mixer with a dough hook attachment if that's easier.
Storing and Freezing Instructions
How to Store
Allow the bread to cool to room temperature, then store it in plastic wrap or an airtight container at room temperature for 2-3 days. It can also be refrigerated for longer, but the bread may begin to dry out.
How to Reheat
The best way to reheat this garlic bread is to warm it in the oven. Place it in the oven or countertop toaster oven at 350 for 5-6 minutes, or in the air fryer for 3-4 minutes. You can also reheat individual sections for about 15 seconds in the microwave just to warm them up.
How to Freeze
You can freeze leftover bread by wrapping it well with plastic wrap and aluminum foil, but you probably won't have enough leftovers to bother with this! The bread tends to get eaten quickly.
FAQ
There are many different recipes for pull apart garlic bread out there, including quite a few that start with a loaf of bread from the store. This easy version is completely from scratch, including the bread. It's a simple slightly enriched dough with a tender texture, which is perfect for this purpose. I like to cut it into small pieces, then toss them in melted garlic butter seasoned with a little Italian seasoning. Assemble them in the pan, similar to Monkey Bread, then let them rise and bake! Your whole family will love sneaking little bites from the loaf!
This recipe is ready from start to finish in just under 2 hours, including making the dough, two rises, shaping, and baking. That's pretty quick for homemade bread!
You'd need to make a few substitutions for this option, starting with the butter. Look for a vegan butter to keep that rich, buttery flavor. Replace the honey with white sugar or a little agave syrup. The rest of the ingredients are naturally plant-based.
More Bread Recipes with Garlic
- 50 Best Bread Recipes
- Cheesy Garlic Bread
- Garlic Breadsticks
- Garlic Knots
- Small Batch Garlic Naan Bread
- Cheesy Garlic Dinner Rolls
Tried this recipe?
I'd love to hear what you think! Leave a comment and rating below to share your feedback. Your reviews help others discover this recipe and help me keep creating more free recipes for you. Snap a photo and tag me on social media @aheadofthyme too.
Recipe

Pull Apart Garlic Bread
- Total Time: 1 hour 45 minutes
- Yield: 1 loaf 1x
- Diet: Vegetarian
Description
Ditch the foil-wrapped packages of garlic bread from the store and elevate your next meal with this homemade Pull Apart Garlic Bread. It's fluffy, buttery, flavourful, melts in your mouth, and tears easily for optimal sharing. The homemade dough is rolled and sliced into individual bites, tossed in homemade garlic butter, and baked until tender and fluffy.
Ingredients
- 1 cup warm water, divided
- 1 teaspoon active dry yeast
- 1 tablespoon honey
- 3 cups all-purpose flour
- 2 tablespoons unsalted butter, softened
- 1 teaspoon salt
For the garlic butter topping:
- 5 tablespoons butter
- 2 large cloves garlic, finely grated or minced
- 1 tablespoon fresh parsley, finely chopped
- 2 teaspoons Italian seasoning
Instructions
Make the dough:
- In a large mixing bowl, stir together ½ cup warm water, yeast, and honey. Let rest 5-10 minutes until foamy.
- Add in flour, butter, and salt, and mix until combined. Gradually add in the remaining ½ cup water, stirring between each addition until completely combined, and until the dough comes together into a ball. The dough will be soft but slightly sticky. If it is too sticky, you can add a little more flour.
- Knead for 7-10 minutes (by hand or in a stand mixer) until the dough is smooth and elastic. You can test the dough for readiness by pressing into the dough with your thumb. If it bounces back, then it is ready. Cover the bowl with a dish cloth, and let dough rest at room temperature until doubled in size, about one hour.
Make the garlic butter:
- Approximately 15 minutes before the dough is done rising, preheat oven to 375 F, and begin preparing the garlic butter topping.
- In a small saucepan, melt butter over low heat. Once just melted, add garlic, parsley, and Italian seasoning. Stir to combine and continue to cook over low heat for 2 minutes, to allow the flavours to infuse into the butter. Remove from heat.
Shape and bake:
- Once the dough is ready, shape it into a long tube, 1-inch in diameter. Then, cut into small 1-inch pieces. Place the pieces into the saucepan with the garlic butter and toss to fully coat.
- Transfer the coated pieces into a 8 x 4 inch loaf pan and bake for 20-25 minutes or until golden brown. Garnish with additional fresh parsley on top (optional).
Notes
How to store: Allow the bread to cool to room temperature, then store it in plastic wrap or an airtight container at room temperature for 2-3 days. It can also be refrigerated for longer, but the bread may begin to dry out.
How to reheat: The best way to reheat this garlic bread is to warm it in the oven. Place it in the oven or countertop toaster oven at 350 for 5-6 minutes, or in the air fryer for 3-4 minutes. You can also reheat individual sections for about 15 seconds in the microwave just to warm them up.
How to freeze: You can freeze leftover bread by wrapping it well with plastic wrap and aluminum foil, but you probably won't have enough leftovers to bother with this! The bread tends to get eaten quickly.
- Prep Time: 25 minutes
- Rise Time: 1 hour
- Cook Time: 20 minutes
- Category: Bread
- Method: Bake
- Cuisine: Italian


Nancy says
THAT THING IS SOOOOO GREAT!
I divided the recipe in two baking dishes, as I planned to take one half to a party and the other half to a brunch the day after.
I ate an entire half. Damned you, brunch! I kept all the garlic bread for me! MOUAHAHAHAHA!
So plan to make a small batch for you if you make this.
You'll not be able to "But I just wanna taste if it's good!". Nah.
The power of the garlic bread is way stronger than your will.