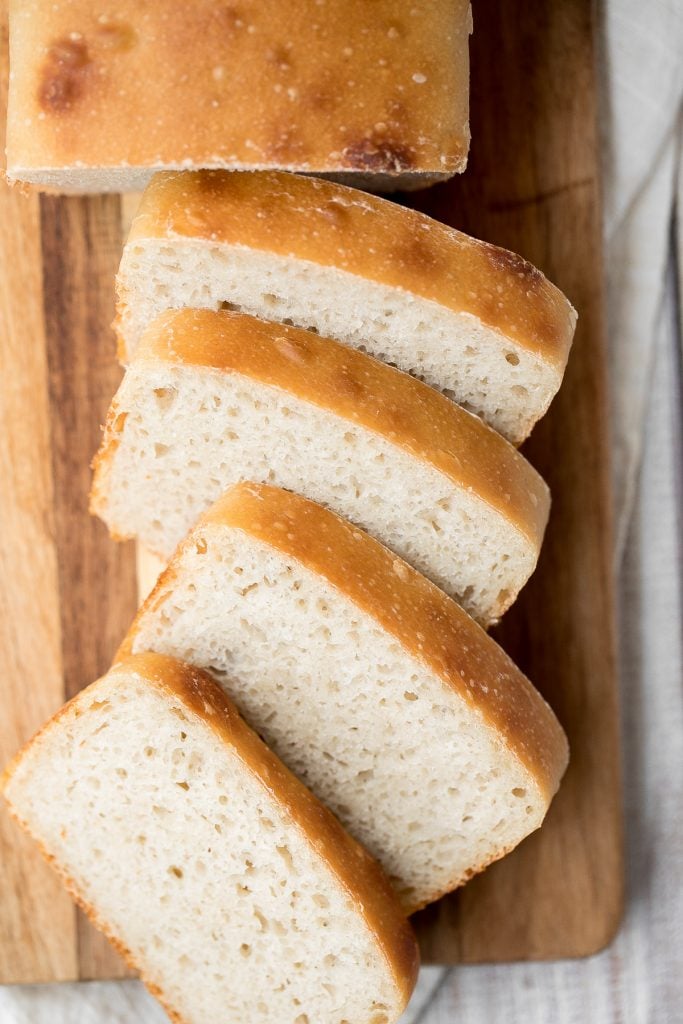
Sourdough sandwich bread is chewy with the perfect air holes inside, and has a crispy crust. It has a delicious signature sourdough taste. Like most sourdough bread, this bread takes just 10 minutes of actual prep work and no kneading. Although it does take longer for sourdough to rise versus traditional yeast, but it is easy to plan ahead and incorporate into your schedule.
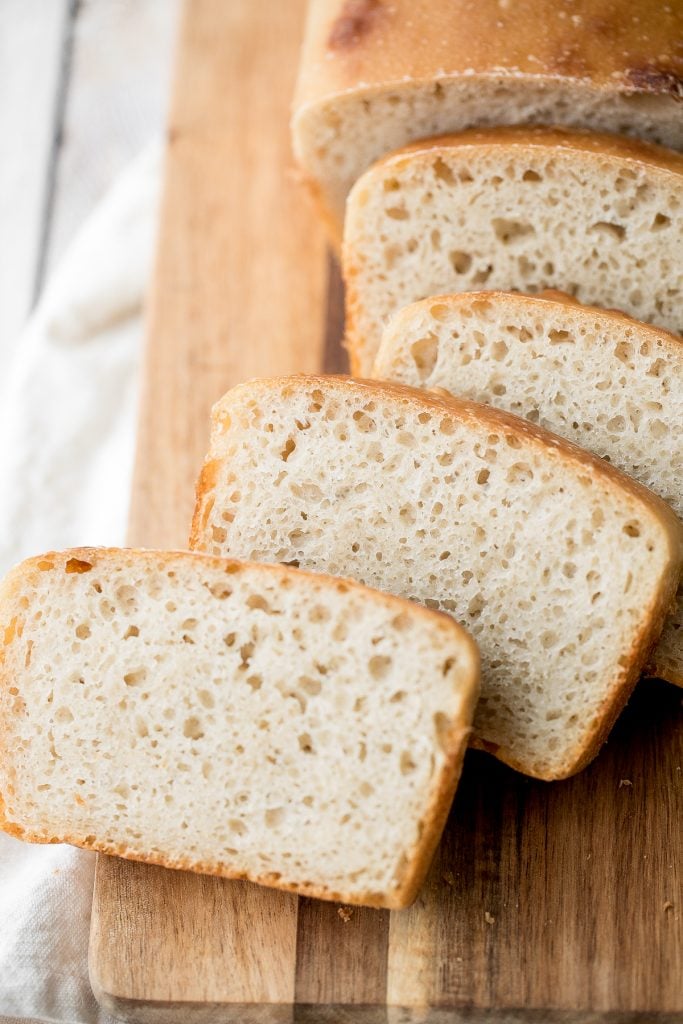
We have had our sourdough starter going since the beginning of March and we love to bake with it almost every week. We usually go for an artisan loaf of bread like small batch sourdough bread, green olive artisan sourdough bread, or fruit and nut sourdough bread, but this week we had plans to head up to the mountains and needed to pack a few egg salad sandwiches. Sourdough sandwich bread was the perfect bread to use.
Ingredients
To make almost any sourdough bread, you will need the following ingredients:
- sourdough starter - make your own sourdough starter using flour and water. It takes about 7 days to create a mature starter.
- all-purpose flour
- water
- salt
You will also need a kitchen scale, mixing bowl, and 5x9 loaf pan (1 lb. loaf pan).

How to Make the Best Sourdough Sandwich Bread
Prepare the Dough + First Rise
- In a large mixing bowl, add sourdough starter, all-purpose flour, salt and water. Whisk to combine, scraping down the sides of the bowl (there should be no dry flour particles visible). Cover the bowl and let the dough rest for one hour. Resting helps build gluten strength naturally.
- Apply some water on your hands and stretch and fold the dough in the bowl by folding the edges over to the centre, one edge at a time. Wet hands makes it easier to work with the dough and it should take you less than a minute to fold all 4 sides. Cover with plastic wrap and let the dough rest for 30 minutes. Since this wet dough is over 70% hydration and quite sticky, stretching and folding is a better technique to build gluten strength than kneading. Stretch and fold the dough again, cover, and let dough rest for another 30 minutes.
- Drizzle and spread a little bit of oil over dough with your hands to help prevent it from drying out. Cover the bowl with plastic wrap and continue to let the dough rest until it almost doubles in size. It takes about 4 to 6 hours for the dough to double in size, depending on room temperature.
Shape the Dough + Second Rise
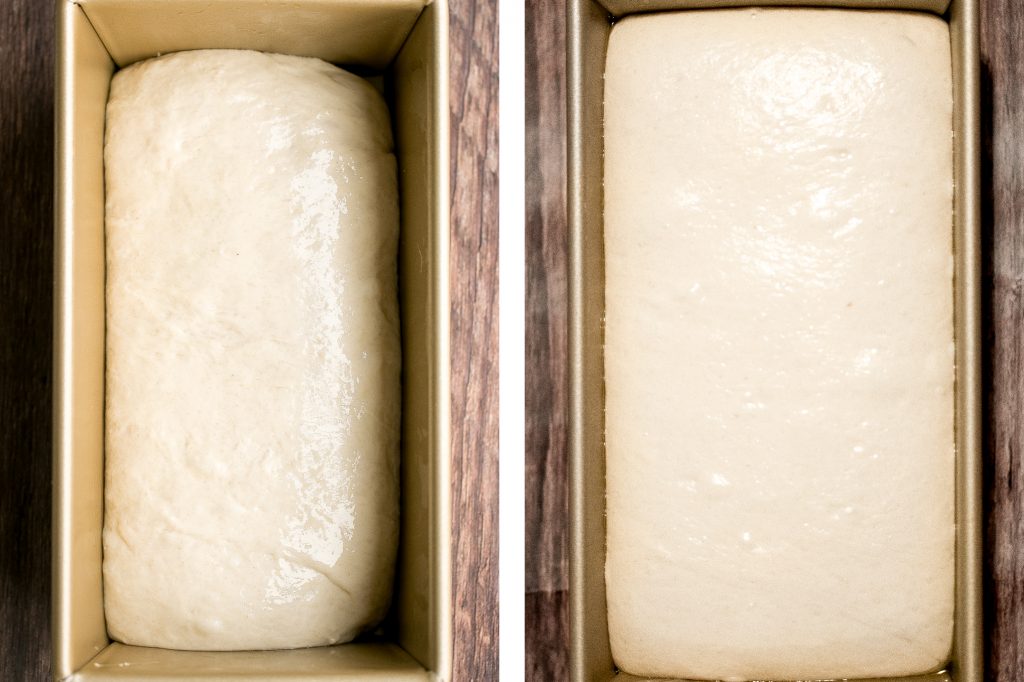
- Transfer the dough to a lightly oiled surface. Flatten the dough into a 5x9-inch rectangle and roll it into a log. Pinch the edges together to seal. (Note that after the first rise, the dough becomes less sticky and easier to handle).
- Transfer the rolled dough into a 5x9-inch loaf pan (1 lb. loaf pan) and press it down with the palm of your hand to spread it to cover the entire pan. This also helps distribute air bubbles evenly in dough when it rises
- Cover the loaf pan with plastic cling wrap or seal it in a large Ziploc bag. Let the dough rise for the second time for 2 to 3 hours or overnight in the refrigerator until it almost rises to the rim of the pan. I often let the dough slowly rise in the refrigerator overnight because bread from slow fermentation tastes better and it is easy to incorporate into your work schedule.
Bake the Sourdough Sandwich Bread
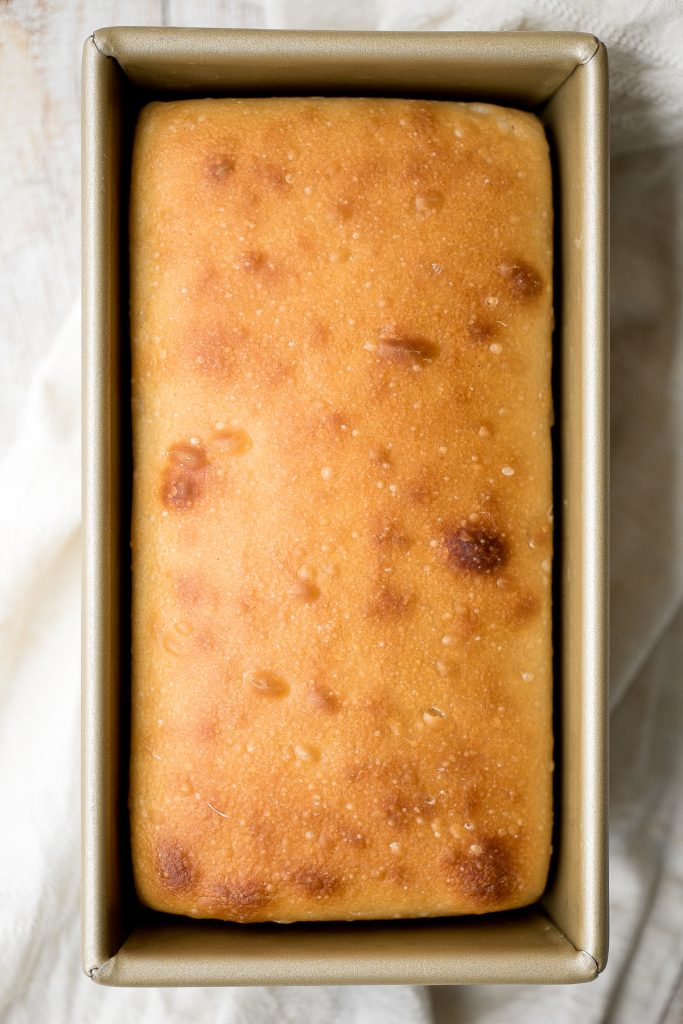
Once the loaf rises to the rim, it's ready for baking. (Note that sourdough bread normally doesn't rise as much as the yeast bread but it is capable of doubling in size). Transfer the loaf pan into a 400F preheated oven and bake for 40 minutes until golden brown on top.
Remove the loaf out of the pan and allow it to cool completely on a wire cooling rack before slicing, about 1 hour.
How to Serve
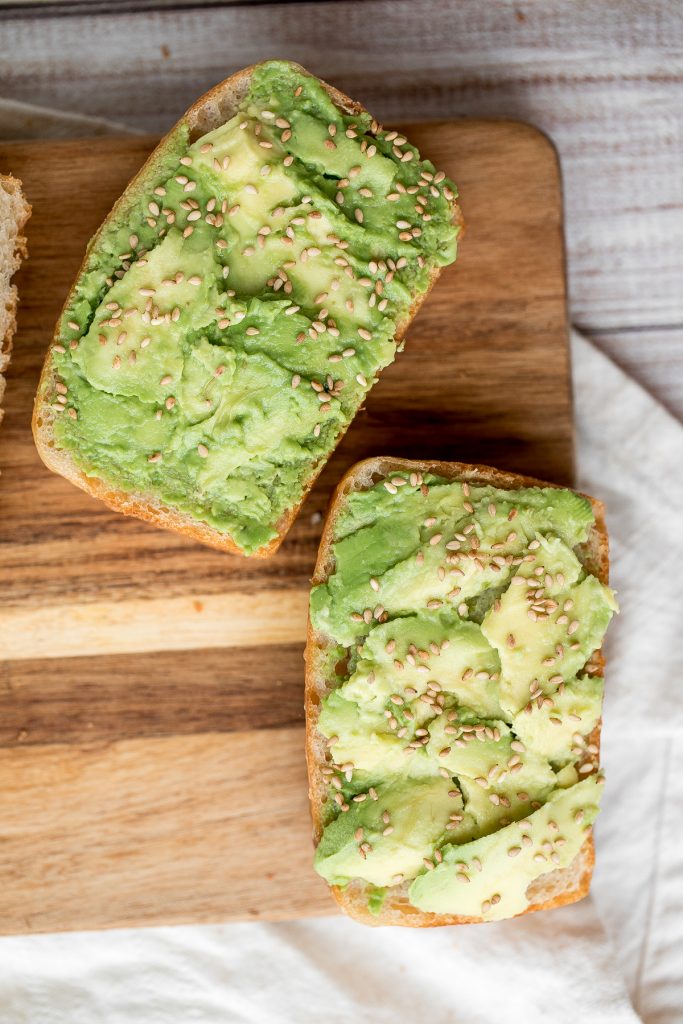
Sourdough sandwich bread is perfect for making toast like banana toast with granola and honey, or to make easy deli sandwiches like egg salad sandwich or a turkey sandwich.
Tips for Making and Storing Sourdough Bread
- How to make sourdough starter: You will need 7 days create a fully mature starter using flour and water. Please refer to my sourdough complete starter guide for help. The guide also includes the top frequently asked questions.
- How to store: Store sourdough sandwich bread covered in a bread basket at room temperature for up to 2 days. You can also store it in an airtight container in the refrigerator for up to 1 week. Slice and toast in the toaster, oven or air fryer.
- How to freeze: Wrap the bread tightly in plastic cling wrap and place into an airtight container or freezer bag, and store in the freezer for up to 3 months. If freezing, I would recommend slicing the bread in half or in slices so that it is easy to reheat a slice or two at a time.
- How to reheat: Toast the frozen sourdough slices in the toaster on the freezer setting, or let the bread thaw to to room temperature first and then reheat in the toaster, oven or air fryer.
More Sourdough Recipes
- Small Batch Sourdough Bread
- Sourdough Ciabatta Bread
- Sourdough Cinnamon Roll Twist Bread
- Savoury Chive Pancakes with Sourdough Starter
- Small Batch Sourdough Pizza Dough
- Artisan Green Olive Sourdough Bread
- Sourdough Discard Crackers with Sesame Seeds
Tried this recipe?
I'd love to hear what you think! Leave a comment and rating below to share your feedback. Your reviews help others discover this recipe and help me keep creating more free recipes for you. Snap a photo and tag me on social media @aheadofthyme too.
Recipe

Sourdough Sandwich Bread
- Total Time: 9 hours
- Yield: 1 loaf of bread (10-12 slices) 1x
- Diet: Vegan
Description
Sourdough sandwich bread is chewy with the perfect air holes inside, and has a crispy crust with a delicious signature sourdough taste.
Ingredients
- 70 grams sourdough starter
- 350 grams all-purpose white flour
- 6 grams salt (about 1 teaspoon)
- 230 grams water
Instructions
Prepare the Dough (first rise):
- In a large mixing bowl, add sourdough starter, all-purpose flour, salt and water. Whisk to combine, scraping down the sides of the bowl (there should be no dry flour particles visible). Cover the bowl and let the dough rest for one hour. Resting helps build gluten strength naturally.
- Apply some water on your hands and stretch and fold the dough in the bowl by folding the edges over to the centre, one edge at a time. Wet hands makes it easier to work with the dough and it should take you less than a minute to fold all 4 sides. Cover with plastic wrap and let the dough rest for 30 minutes. Since this wet dough is over 70% hydration and quite sticky, stretching and folding is a better technique to build gluten strength than kneading.
- Stretch and fold the dough again, cover, and let dough rest for another 30 minutes.
- Drizzle and spread a little bit of oil over dough with your hands to help prevent it from drying out. Cover the bowl with plastic wrap and continue to let the dough rest until it almost doubles in size. It takes about 4 to 6 hours for the dough to double in size, depending on room temperature.
Shape the Dough (second rise):
- Transfer the dough to a lightly oiled surface. Flatten the dough into a 5x9-inch rectangle and roll it into a log. Pinch the edges together to seal. (Note that after the first rise, the dough becomes less sticky and easier to handle).
- Transfer the rolled dough into a 5x9-inch loaf pan (1 lb. loaf pan) and press it down with the palm of your hand to spread it to cover the entire pan. This also helps distribute air bubbles evenly in dough when it rises
- Cover the loaf pan with plastic cling wrap or seal it in a large Ziploc bag. Let the dough rise for the second time for 2 to 3 hours or overnight in the refrigerator until it almost rises to the rim of the pan. I often let the dough slowly rise in the refrigerator overnight because bread from slow fermentation tastes better and it is easy to incorporate into your work schedule.
Bake the Bread:
- Preheat the oven to 400F.
- Once the loaf rises to the rim, it's ready for baking. (Note that sourdough bread normally doesn't rise as much as the yeast bread but it is capable of doubling in size). Transfer the loaf pan into the oven and bake for 40 minutes until golden brown on top.
- Remove the loaf out of the pan and allow it to cool completely on a wire cooling rack before slicing, about 1 hour.
Notes
How to make sourdough starter: You will need 7 days create a fully mature starter using flour and water. Please refer to my sourdough complete starter guide for help. The guide also includes the top frequently asked questions.
How to store: Store sourdough sandwich bread covered in a bread basket at room temperature for up to 2 days. You can also store it in an airtight container in the refrigerator for up to 1 week. Slice and toast in the toaster, oven or air fryer.
How to freeze: Wrap the bread tightly in plastic cling wrap and place into an airtight container or freezer bag, and store in the freezer for up to 3 months. If freezing, I would recommend slicing the bread in half or in slices so that it is easy to reheat a slice or two at a time.
How to reheat: Toast the frozen sourdough slices in the toaster on the freezer setting, or let the bread thaw to to room temperature first and then reheat in the toaster, oven or air fryer.
- Prep Time: 10 minutes (+7-10 hours rise time and 1 hour cooling time)
- Cook Time: 40 minutes
- Category: Bread
- Method: Baking
- Cuisine: American


Harshad Datar says
Hi Sam, I am a Sourdough baking Enthusiast who is into Sourdough baking for last two months. I was keen to bake a Sourdough Bread Loaf for some time and reached your page through internet search.
I liked the simplicity and clarity of your recipe. It was indeed very easy to use. I fortified this bread loaf with seeds and coated it with sesame seeds.
And the outcome? The bread came out from the oven all superb and tasted very good.
Thank you for such a good recipe shared by you.
Sam Hu | Ahead of Thyme says
Thank you so much Harshad! That makes me so happy to hear!
Noelle says
This is was amazing! Perfect for making sandwiches! Saving to make again soon 🙂
Sam Hu | Ahead of Thyme says
Thank you! So happy you liked the recipe!
Katie says
This looks so good! I can't wait to try this one with my family.
Sam Hu | Ahead of Thyme says
Thanks Katie! Let me know how it goes!