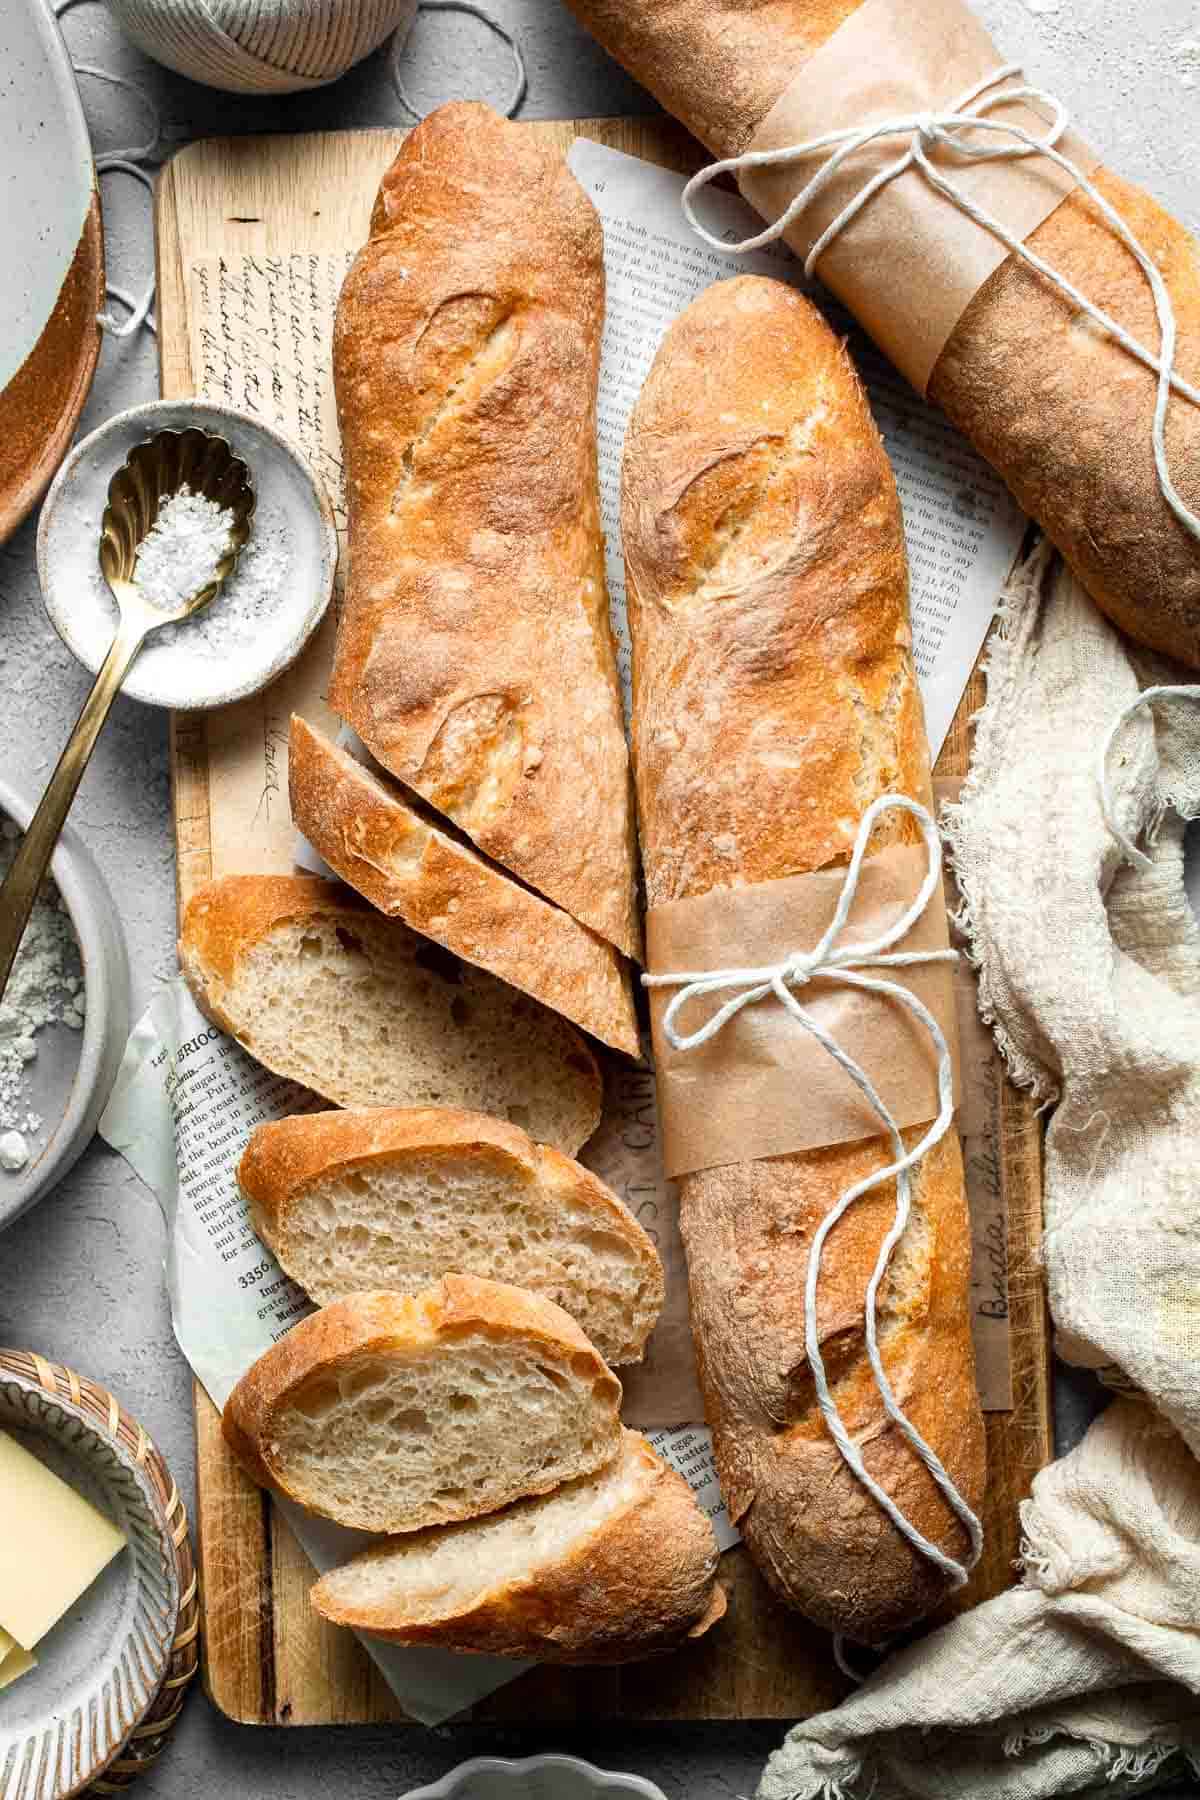
There's nothing quite like the smell of fresh bread wafting from your kitchen, and these Homemade French Baguettes deliver just that - without any kneading! This no-fuss, no-knead baguette recipe yields beautifully golden loaves with a crisp crust and soft, airy interior. With just four basic ingredients and a little patience, you can bring the charm of a Parisian bakery straight to your home.

Though the process is slower than some breads, the long rest time does all the heavy lifting to develop incredible texture and flavor. This is a perfect weekend baking project or make-ahead recipe when you want to serve fresh bread with minimal hands-on effort. The result is worth every moment - crusty, rustic, and totally irresistible.
Why You'll Love this French Baguette Recipe
- Crispy, crackly crust. These baguettes bake up with that signature crusty exterior that shatters with every bite. It's what makes a baguette so satisfying and perfect for dipping, spreading, or enjoying plain with butter.
- No kneading required. This recipe uses a long fermentation process to develop gluten and flavor naturally, which means less hands-on time for you. Simply mix the dough, let it rest, and shape before baking.
- Minimal ingredients. Just flour, water, yeast, and salt - no fancy tools or special ingredients required! It's baking at its simplest and most traditional, , using pantry staples you likely already have on hand.
- Impressively authentic. These baguettes look and taste like they came from a bakery, but you made them from scratch. Serve them at dinner parties or alongside soup and watch them disappear fast.
Ingredient List
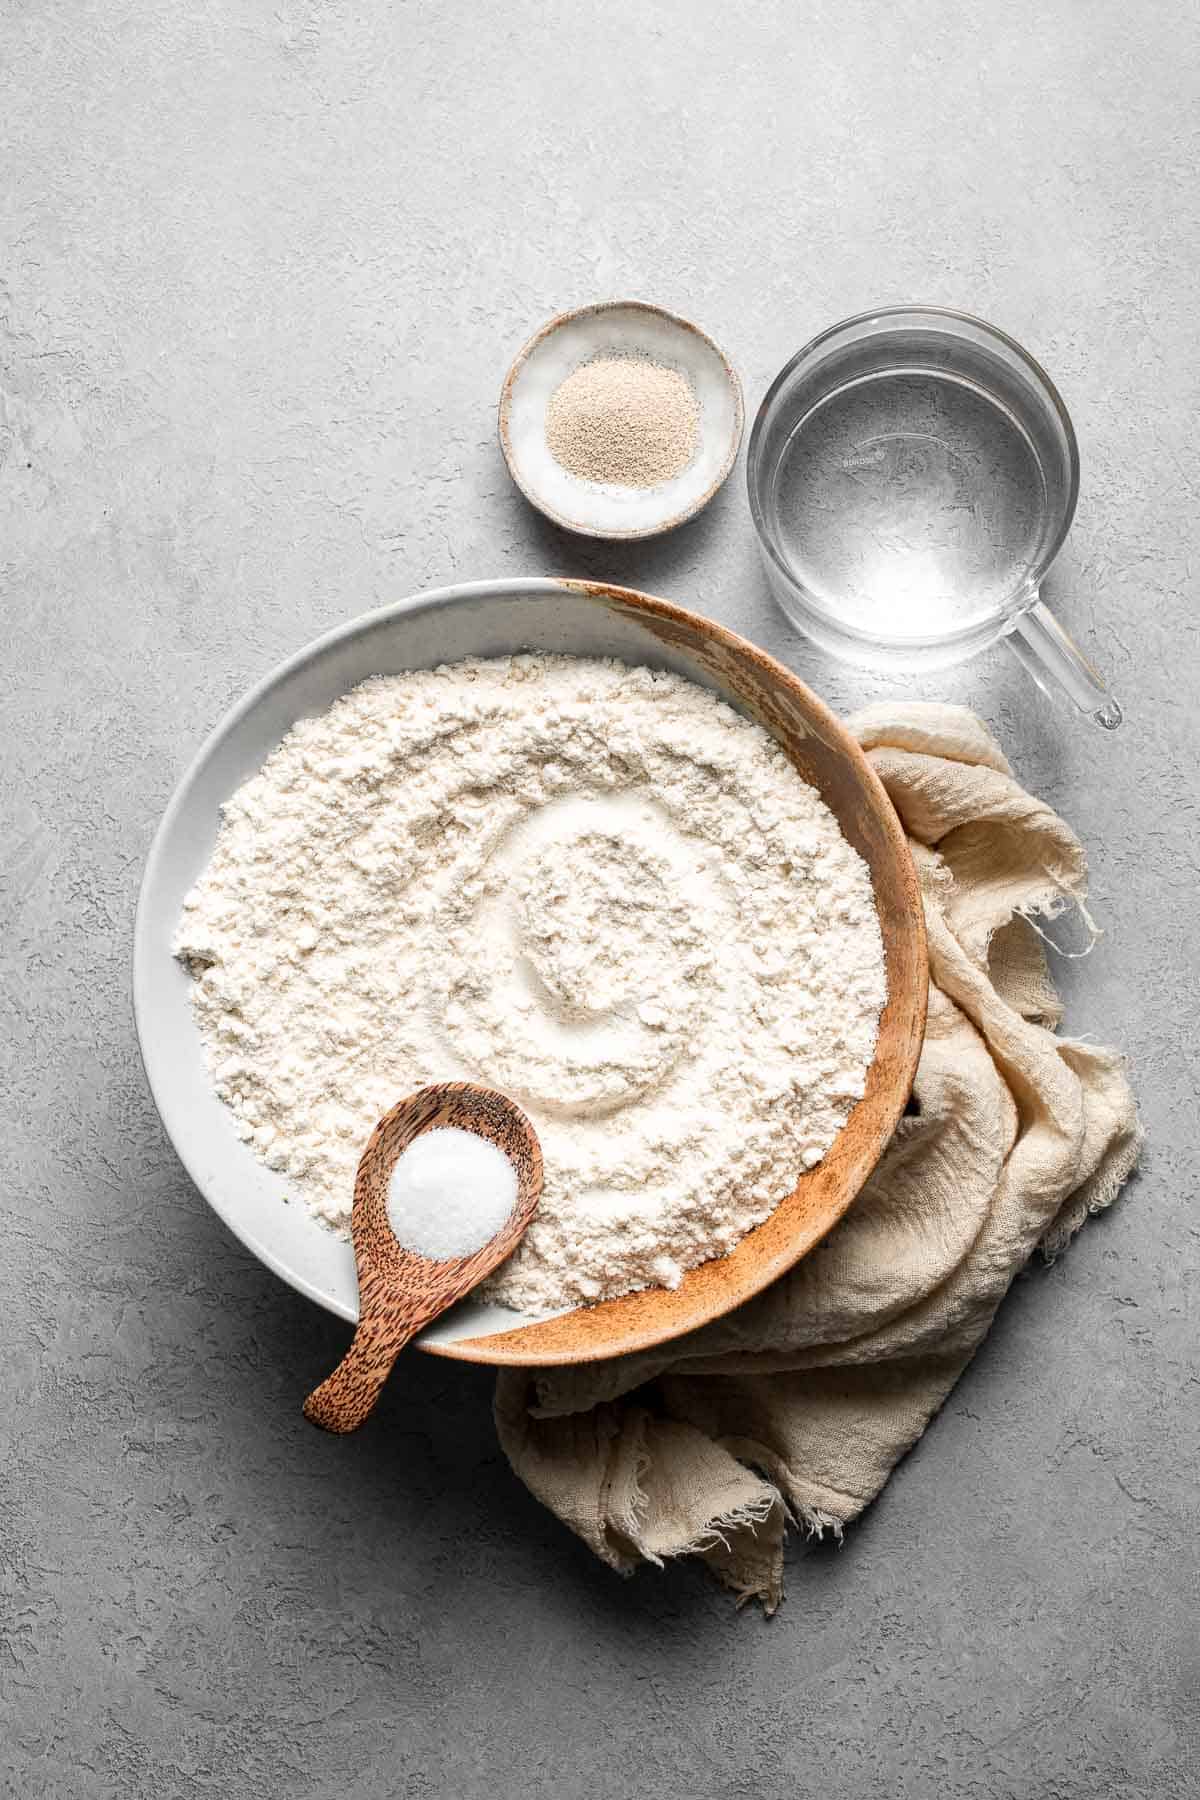
To make almost any rustic homemade bread, including these French Baguettes, you will need just 4 simple ingredients (full measurements in recipe card below):
- flour - all-purpose flour works great here, but you can also use bread flour for a slightly chewier texture.
- yeast - we used instant yeast but you can also use active dry. Instant yeast will rise a bit faster, but both work well in this slow-rise recipe.
- water - lukewarm water activates the yeast and hydrates the flour. Filtered water is ideal, but tap water works too.
- salt - enhances flavor and helps regulate yeast activity. Kosher salt or sea salt are both excellent choices.
You also need a kitchen scale (or measuring cups and spoons), mixing bowl, baking sheet or baguette pan, plastic wrap or kitchen towel for proofing, and a sharp blade or lame for scoring, and another baking pan to create steam in your oven.
How to Make No Knead French Baguettes
French baguettes are so so easy to prepare, taking only 10 minutes of actual active time. The rest of the time is just waiting time for the dough to rise.
Step 1: Prepare the dough
- Activate the yeast. In small cup, dissolve instant yeast in water and stir to mix together (the mixture should start to bubble and develop a yeasty aroma). Let it sit for 2 minutes.


- Prepare dough. In a large mixing bowl, add flour and salt. Pour in yeast mixture and whisk until fully combined, scraping down the sides of the bowl (there should be no dry flour particles visible). The mixture is very sticky and wet, with an 75% hydration (flour to water ratio).


- Allow dough to rise. Cover the bowl with plastic wrap and let it sit at room temperature for 2 hours, or until the dough doubles in size (Note that a higher room temperature will speed up the fermentation process and will cause the dough to rise faster). This is called first proofing or bulk fermentation.


Step 2: Stretch and fold
- Stretch and fold. Apply some water onto your hands and stretch and fold the dough in the bowl by folding the edges into the centre. Wet hands make it easier to work with the dough. Cover with a dry cloth and let the dough rest.


- Repeat. Repeat this stretch and fold step every 30 minutes (you will do it two more times). After 1 hour, with 3 rounds of stretch and folds in total, the dough will build up gluten strength and become less sticky.


Step 3: Divide and shape
- Divide. Using a spatula, transfer dough to a floured surface. Sprinkle dough with flour for easier handling. Divide the dough into 3 equal parts (250 grams each). Shape each dough into a round ball by pulling the edges over to the centre.


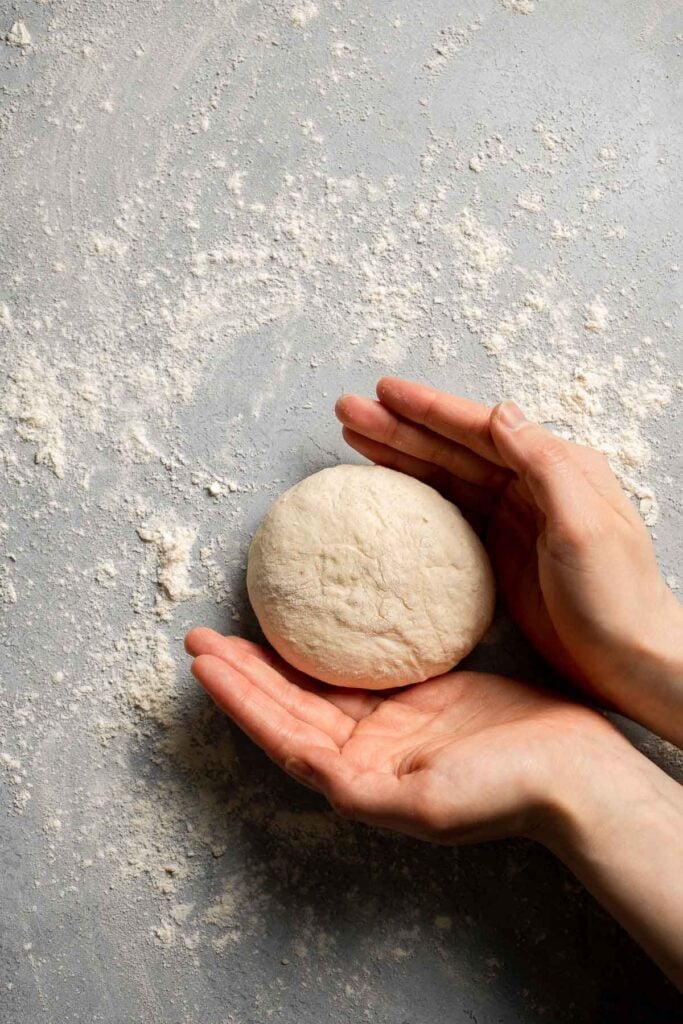
- Rest. Cover with a dry cloth and let it rest for another 45 minutes.


- Shape. Gently press each dough to flatten into an oval shape. Fold the edge over, one inch at a time, and press the edge to seal the seam firmly. It takes 3 folds to seal the seams. Roll the dough into a log with the 2 ends slightly pointy. Repeat this step with remaining 2 dough balls.


- Rest. Place each piece on a well-floured work surface and separate them apart. Sprinkle some flour over the dough and cover with a dry cloth. Let rest for about 45 minutes. This is called the final proofing.


Step 4: Bake
- Transfer. Carefully transfer each piece onto a parchment-lined 8x12-inch baking tray. Because the dough is still quite sticky, dust with flour to help handle them.
- Set up steam bath. Fill a baking pan with water and place it in the bottom of your oven. Preheat the oven to 450 F, and allow it to fill with steam from the water.
- Score. When the oven is ready, use a razor or sharp knife to make 3 incisions at about a 45° angle on each baguette.
- Spray and bake. Slide the baking tray in and spray some water over the dough immediately. Bake for 25 minutes.


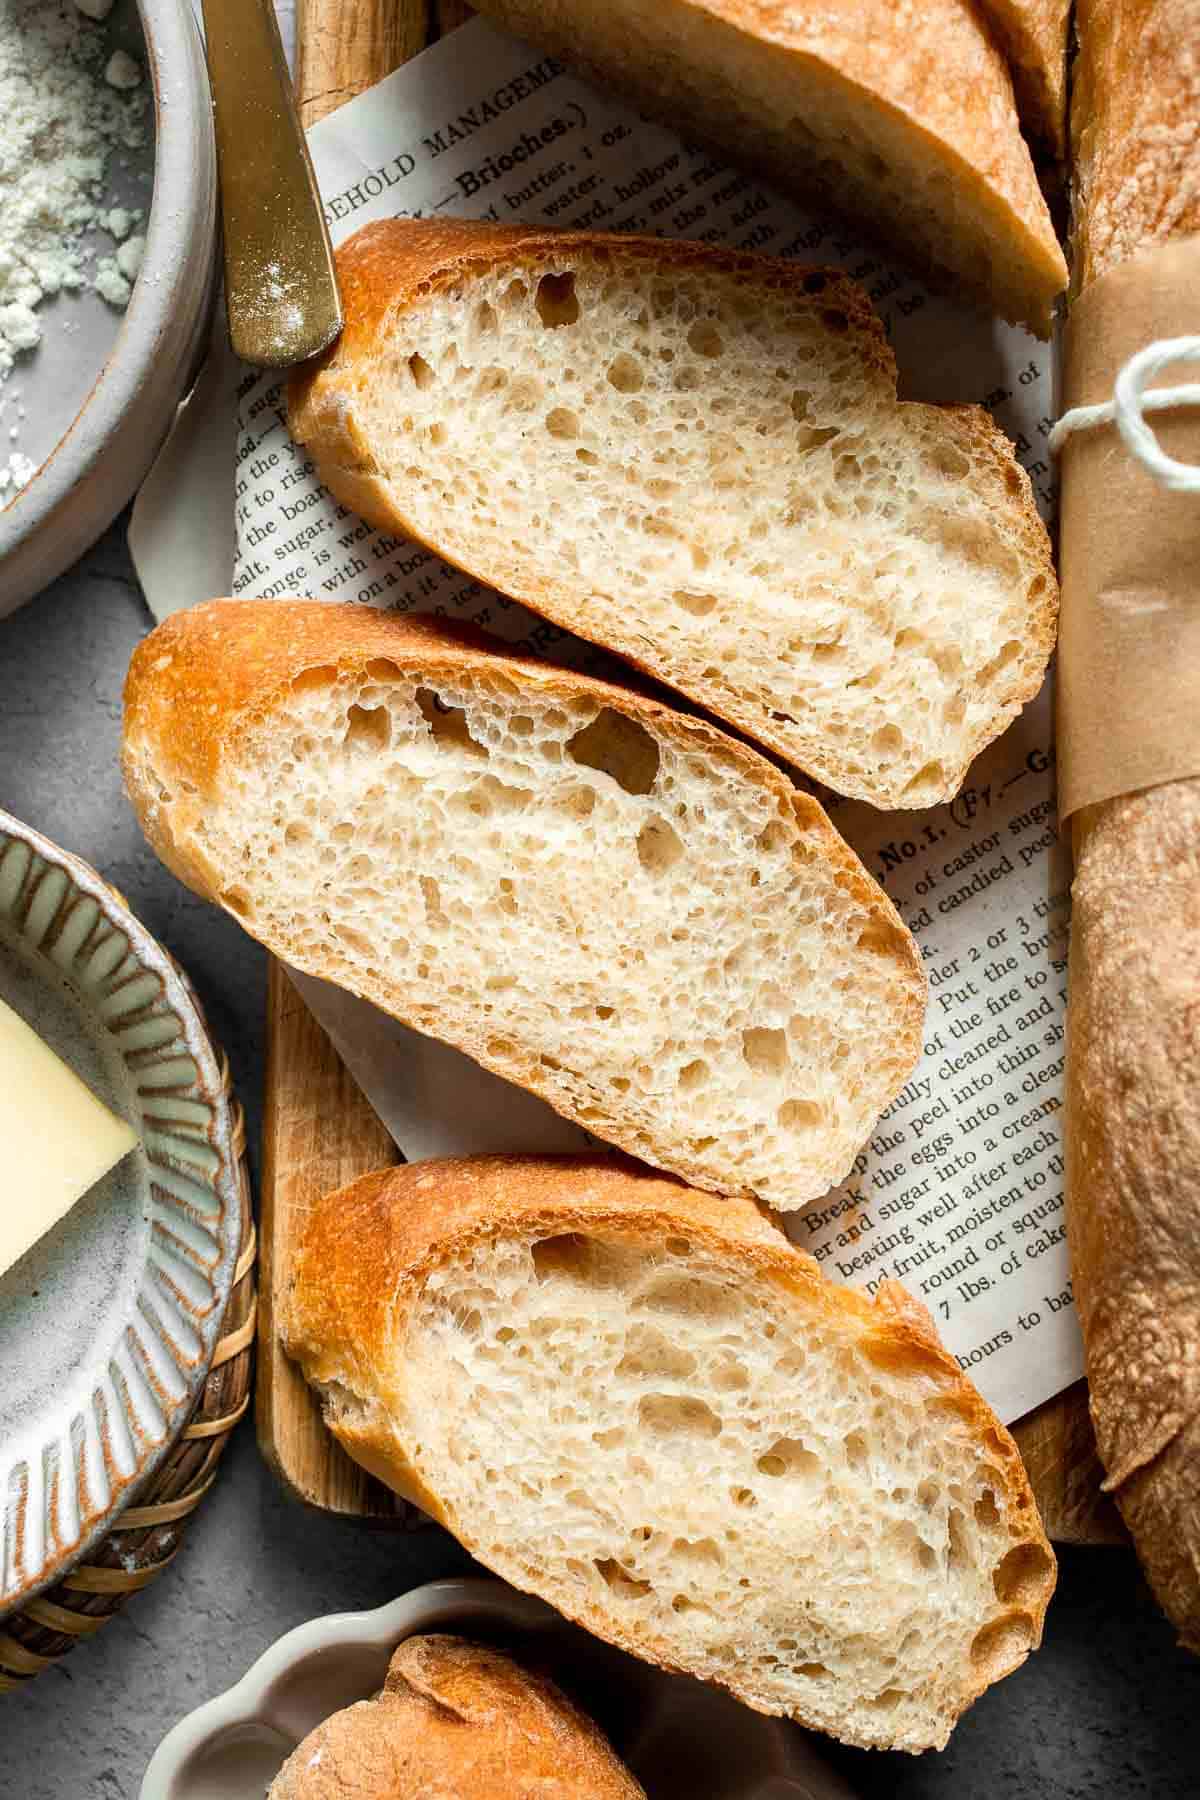
- Cool. Let them cool for 20 minutes. To check if the bread is done, you can tap the bottom of the bread with your finger. The bread will sound hollow when done.
Recipe Variations
- Add herbs. Mix chopped rosemary, thyme, or oregano into the dough before the first rest for a flavorful twist.
- Cheese-stuffed baguette. Add shredded cheese to the center of the dough before shaping for a gooey, savory surprise inside.
- Olive baguettes. Fold chopped, pitted olives into the dough for a salty, Mediterranean-inspired variation that pairs beautifully with dips and spreads. See our Artisan Green Olive Sourdough Bread for a similar idea.
- Whole wheat version. Replace up to 1 cup of all-purpose flour with whole wheat flour for a heartier loaf with nutty flavor and added fiber.
Tips for Baking French Baguettes
Follow the tips below to ensure that you get that perfect French baguette every single time.
- Use unopened and unexpired yeast that was stored int a cool and dry area. Make sure the instant yeast is in an original, unopened package, and that it has not expired (note that instant yeast has a relatively shorter shelf life).
- The yeast mixture should start to bubble. When mixing the yeast in lukewarm water, the mixture should start to bubble and develop a yeasty aroma.
- Add steam to the oven. This is the key to getting the perfect crispy, crackly crust on french baguettes and gives them that classic bakery look and texture. You add steam to the oven by placing a baking pan with water on the bottom of the oven, and then preheating it.
- Use a bench scraper. French baguette dough is very sticky with 75% hydration (flour to water ratio). So a bench scraper is very helpful to help handle and transfer the dough. You can also use flour if needed during transfer.
- Fold and press when shaping the dough. There are many different techniques to use when shaping baguettes. The key is to fold and press to seal the edges so that air pockets get trapped inside the dough. This is why you see large air holes when you cut into baguettes.
- Serve fresh out of the oven. French baguettes are best when they are fresh out of the oven. If you need to store them for longer periods of time, you can freeze them to extend their freshness.
How to Serve French Baguettes
There are endless ways to serve baked French Baguettes, including:
- Warm from the oven with butter or jam.
- Sliced into rounds for bruschetta or crostini.
- As a sandwich with your favorite sandwich fix ins such as Lemongrass Chicken Banh Mi Sandwich, Caprese Sandwich, or Avocado Egg Salad.
- As a base for French bread pizza.
- Alongside soup, stew, or salad for a satisfying meal.
- With a cheese board or charcuterie board for a perfect appetizer.

Storing and Freezing Instructions
How to Store
This bread is best served fresh out of the oven. To store, wrap your baguettes in a clean kitchen towel or in a paper bag at room temperature for up to 2 days. Avoid airtight containers, which can make the crust soften.
How to Reheat
To reheat a baguette, place it directly on the oven rack at 350°F for 10-12 minutes, or until the crust is crisp and the interior is warmed through. You can also spritz it lightly with water before baking to revive the crust even more. Avoid microwaving, as it will make the crust rubbery instead of crisp.
How to Freeze
Freeze fully cooled baguettes by wrapping tightly in plastic wrap and then foil. Store in the freezer for up to 2 months. Thaw at room temperature and reheat in a hot oven for a just-baked feel. You can also slice them first, then store as above. To serve, reheat directly from frozen in the toaster under the defrost setting.
FAQ
Yes, you can adapt this recipe to use sourdough starter instead of commercial yeast. Use ½ cup active sourdough starter and reduce the water slightly. The rise time will be longer, but the flavor will be even more complex and tangy. You may need to experiment a bit to get the texture just right.
If your baguette doesn't come out with that signature crackly crust, it's likely due to lack of steam or baking at too low a temperature. Make sure your oven is properly preheated and add a pan of water or spray the inside of the oven during the first 10 minutes of baking. This helps create the crusty exterior that baguettes are known for.
Yes, you can shape the dough and let it rest overnight in the refrigerator. In the morning, bring it to room temperature for about 30-60 minutes before baking. This makes it easier to plan ahead and still serve fresh baguettes right when you need them.
While a baguette pan helps maintain shape and provides even browning, it's not required. A regular baking sheet with parchment works just fine. Just be sure to space the loaves apart and support the sides with rolled towels or foil if needed for shaping.
More Homemade Bread Recipes
- 50 Best Bread Recipes
- Small Batch No Knead Bread
- Ciabatta Rolls
- No Knead Tomato Focaccia
- Pita Bread
- Skillet Dinner Rolls
Tried this recipe?
I'd love to hear what you think! Leave a comment and rating below to share your feedback. Your reviews help others discover this recipe and help me keep creating more free recipes for you. Snap a photo and tag me on social media @aheadofthyme too.
Recipe

Homemade French Baguettes
- Total Time: 5 hours
- Yield: 3 baguettes (250 grams each) 1x
- Diet: Vegan
Description
There's nothing quite like the smell of fresh bread wafting from your kitchen, and these Homemade French Baguettes deliver just that - without any kneading! This no-fuss, no-knead baguette recipe yields beautifully golden loaves with a crisp crust and soft, airy interior. With just four basic ingredients and a little patience, you can bring the charm of a Parisian bakery straight to your home.
Ingredients
- 1 teaspoon instant yeast
- 320 grams room temperature water
- 430 grams all-purpose flour
- 1 teaspoon salt
Instructions
- In small cup, dissolve instant yeast in water and stir to mix together (the mixture should start to bubble and develop a yeasty aroma). Let it sit for 2 minutes.
- In a large bowl, add flour and salt. Pour in yeast mixture and whisk until fully combined, scraping down the sides of the bowl (there should be no dry flour particles visible). The mixture is very sticky and wet, with an 75% hydration (flour to water ratio).
- Cover the bowl with plastic wrap and let it sit at room temperature for 2 hours, or until the dough doubles in size (Note that a higher room temperature will speed up the fermentation process and will cause the dough to rise faster). This is called first proofing or bulk fermentation.
- Apply some water onto your hands and stretch and fold the dough in the bowl by folding the edges into the centre. Wet hands make it easier to work with the dough. Cover with a dry cloth and let the dough rest. Repeat this stretch and fold step every 30 minutes (you will do it two more times).
- After 1 hour (3 hours total time so far), with 3 rounds of stretch and folds in total, the dough will build up gluten strength and become less sticky.
- Using a spatula, transfer dough to a floured surface. Sprinkle dough with flour for easier handling. Divide the dough into 3 equal parts (250 grams each). Shape each dough into a round ball by pulling the edges over to the centre. Cover with a dry cloth and let it rest for another 45 minutes.
- Gently press each dough to flatten into an oval shape. Fold the edge over, one inch at a time, and press the edge to seal the seam firmly. It takes 3 folds to seal the seams. Roll the dough into a log with the 2 ends slightly pointy. Repeat this step with remaining 2 dough balls.
- Place each piece on a well-floured work surface and separate them apart. Sprinkle some flour over the dough and cover with a dry cloth. Let rest for about 45 minutes. This is called the final proofing.
- Carefully transfer each piece onto a parchment-lined 8x12-inch baking tray. Because the dough is still quite sticky, dust with flour to help handle them.
- Fill a baking pan with water and place it in the bottom of your oven. Preheat the oven to 450 F, and allow it to fill with steam from the water. When the oven is ready, use a razor or sharp knife to make 3 incisions at about a 45° angle on each baguette. Slide the baking tray in and spray some water over the dough immediately. Bake for 25 minutes.
- Let them cool for 20 minutes. To check if the bread is done, you can tap the bottom of the bread with your finger. The bread will sound hollow when done.
Notes
After the first proofing (the initial rise), you can either complete the three sets of stretches and folds (steps 4 and 5 above), OR leave it covered in the refrigerator overnight for at least 8 hours to build up gluten strength naturally.
How to store: This bread is best served fresh out of the oven. To store, wrap your baguettes in a clean kitchen towel or in a paper bag at room temperature for up to 2 days. Avoid airtight containers, which can make the crust soften.
How to reheat: To reheat a baguette, place it directly on the oven rack at 350°F for 10-12 minutes, or until the crust is crisp and the interior is warmed through. You can also spritz it lightly with water before baking to revive the crust even more. Avoid microwaving, as it will make the crust rubbery instead of crisp.
How to freeze: Freeze fully cooled baguettes by wrapping tightly in plastic wrap and then foil. Store in the freezer for up to 2 months. Thaw at room temperature and reheat in a hot oven for a just-baked feel. You can also slice them first, then store as above. To serve, reheat directly from frozen in the toaster under the defrost setting.
- Prep Time: 10 minutes
- Wait Time: 4 hours 30 minutes
- Cook Time: 20 minutes
- Category: Bread
- Method: Baking
- Cuisine: French


Harshad Datar says
I made it. The baguettes came out flying in both taste and texture. Just one question, you have not indicated ant food for yeast when yeast is added to water? Don't we need to add a spoon full of sugar or honey?
I added a spoon of honey.
Deena Mehta says
This recipe worked amazingly! My 8 year old said "no, you didn't make that, it's from the store". Which changed into "these are way better than the ones from the store!". The only thing I changed was that I didn't use parchment paper, I was afraid it would burn - and the loaves did stick so maybe I need a little something to keep them from sticking next time. Outstanding recipe for 6 hour french bread that I can start at lunch and eat at dinner!
Sam | Ahead of Thyme says
This is the best comment! Thank you so much. SO happy your 8 year old was so impressed 🙂
Ramona says
This French baguette looks really, really good. I love the air bubbles in there. You just reminded me I have to make some super soon. Beautiful and I really love that there is no-knead involved!
Sam | Ahead of Thyme says
Thank you! You totally should, it's super easy to make. 🙂
Kathryn Donangelo says
This bread looks so easy to make and looks perfect! I love any bread that requires no kneading. I will definitely be trying this recipe, thank you!
Sam | Ahead of Thyme says
It's really easy and so rewarding when you cut into your freshly baked French baguette! Let me know how it goes 🙂
Vicki Herbig says
I love your recipes.
Sam | Ahead of Thyme says
Thank you so much Vicki! 🙂