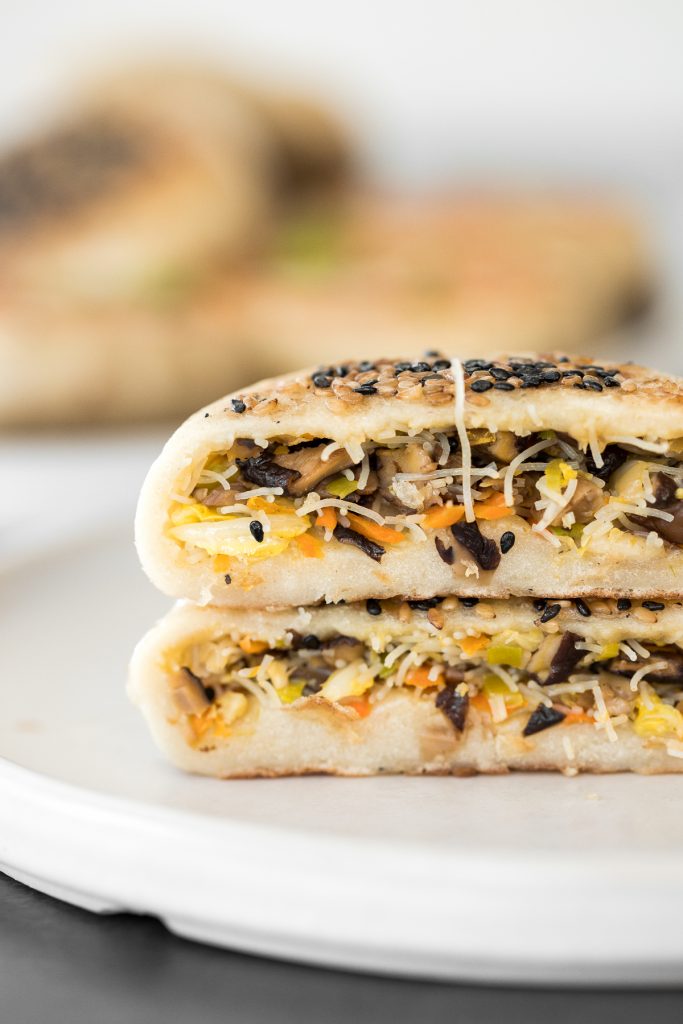
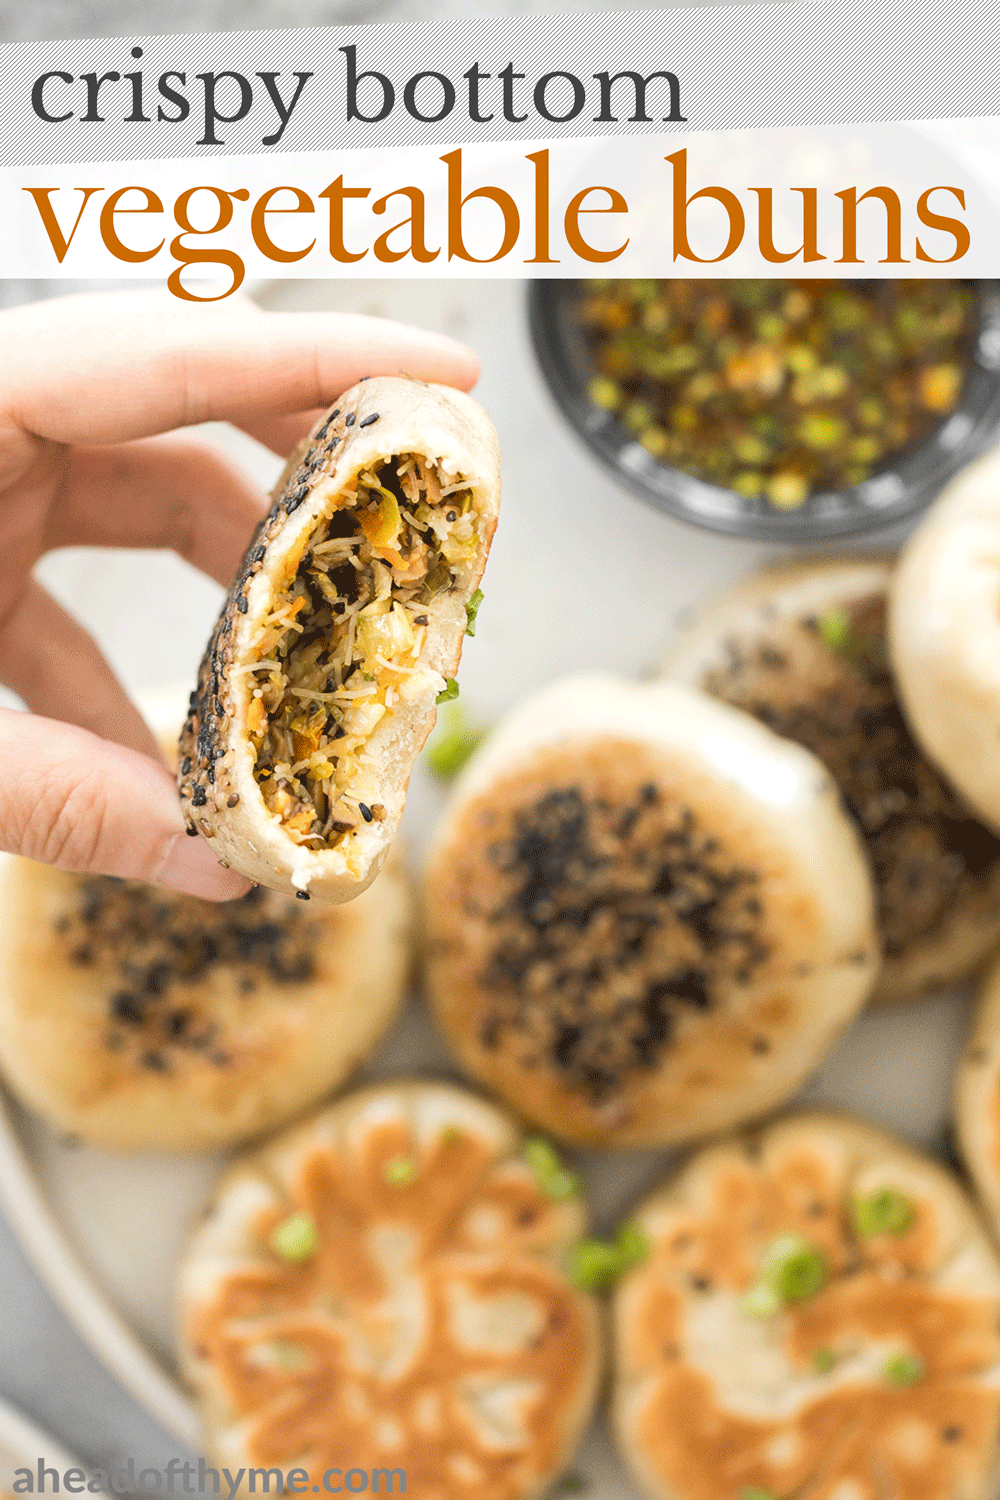
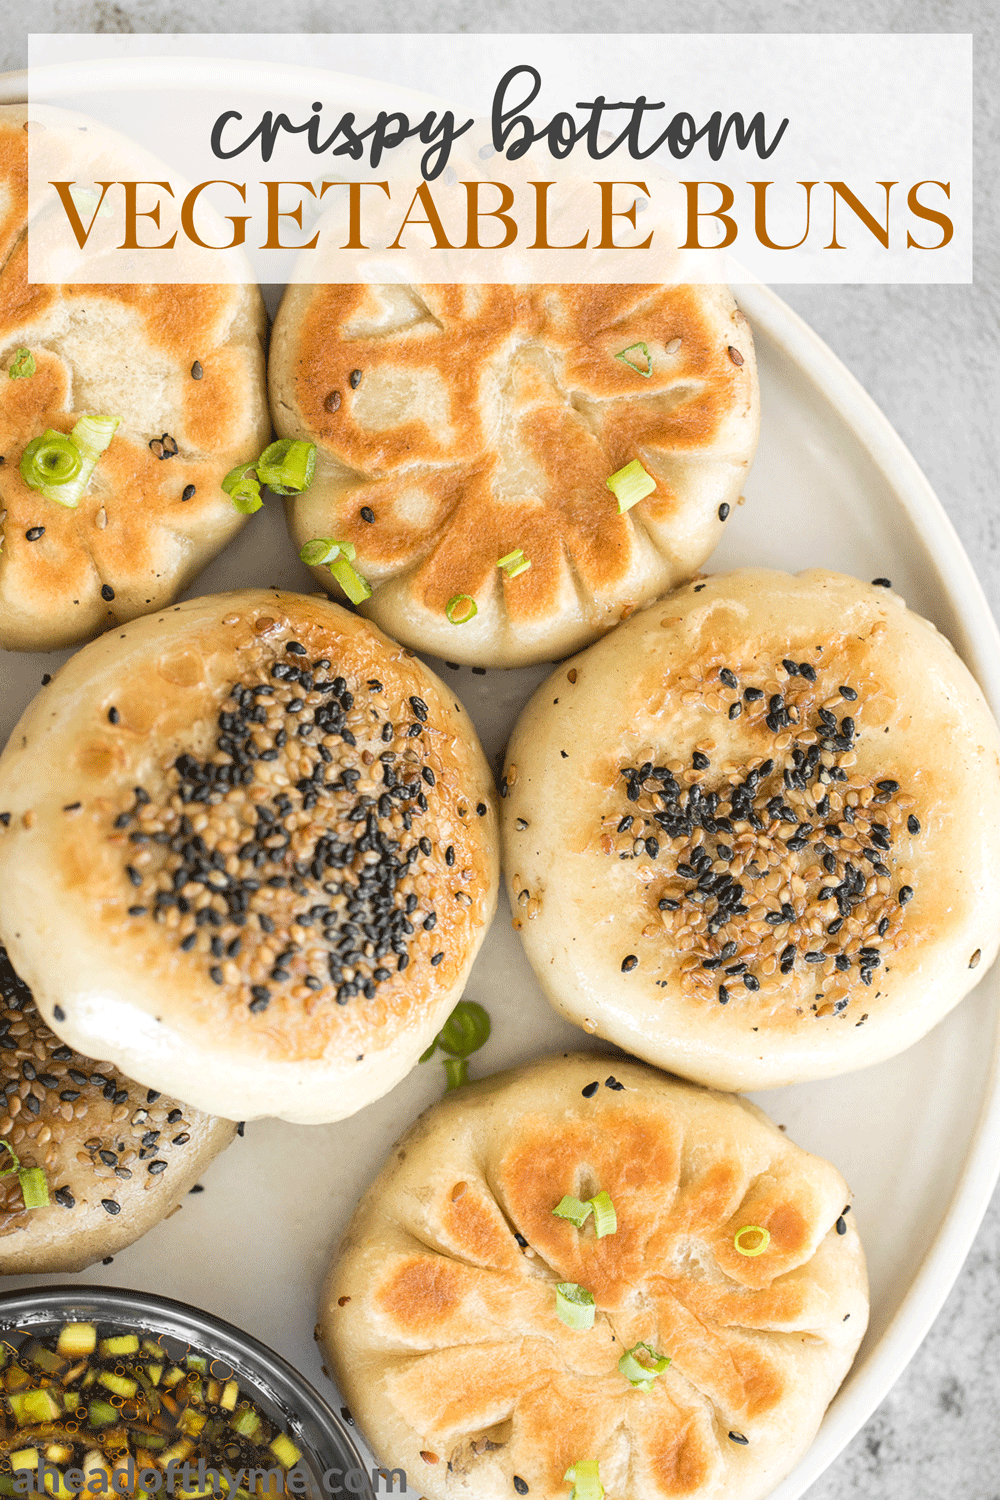
Crispy bottom pan-fried fried vegetable buns made with no yeast, are perfectly crunchy and crispy on the outside, yet tender and chewy on the inside with a savoury vegetarian filling made with stir-fried mushrooms, carrots, and vermicelli noodles. Say goodbye to takeout and serve this popular Chinese snack at home with a homemade vinegar dipping sauce.

What are Crispy Bottom Vegetable Buns?
Crispy bottom vegetable buns are a popular Chinese street food, also known as shui jian bao (which translates to "water fried bun"). They are first fried to get that iconic golden crispy bottom, and then steamed to cook the inside and give the buns their soft and fluffy texture inside.
Here is what you will need to make these vegetable buns:
- bun dough - made with all-purpose flour, salt, and boiling water. Adding hot boiling water in flour is a technique known as flour scalding, which breaks down starch in the flour and makes the dough softer and more stretchy. It also makes the dough much easier to knead.
- rice vermicelli noodles
- brown mushrooms
- carrots
- green onions
- garlic
- seasonings - soy sauce, sesame oil, white pepper, vegetable stock powder (optional), and salt.
- cornstarch - if needed to thicken up the filling.
- vegetable oil - for stir-frying the filling, and for pan-frying the buns.
- black or white sesame seeds - to coat on the buns.
- vinegar dipping sauce - made with black vinegar, soy sauce, sesame oil, and green onions.
You will also need mixing bowls, a small rolling pin, and a non-stick skillet with cover.
How to Make the Best Crispy Bottom Pan-Fried Vegetables Buns with No Yeast
First, make the dough. In a large bowl, whisk together flour and salt to combine. Slowly add in boiling water and stir well to combine, until there are no dry flour particles visible in the bowl. Make sure to scrape down the sides of the bowl. Cover and let the mixture rest for 10 minutes.
Then, transfer the dough onto a clean and lightly greased surface, and knead the dough for 5-10 minutes until the dough is smooth and not sticky at all. Transfer the smooth dough back in the mixing bowl and cover with cling wrap. Let rest for 20 minutes, while you are prepping the filling.
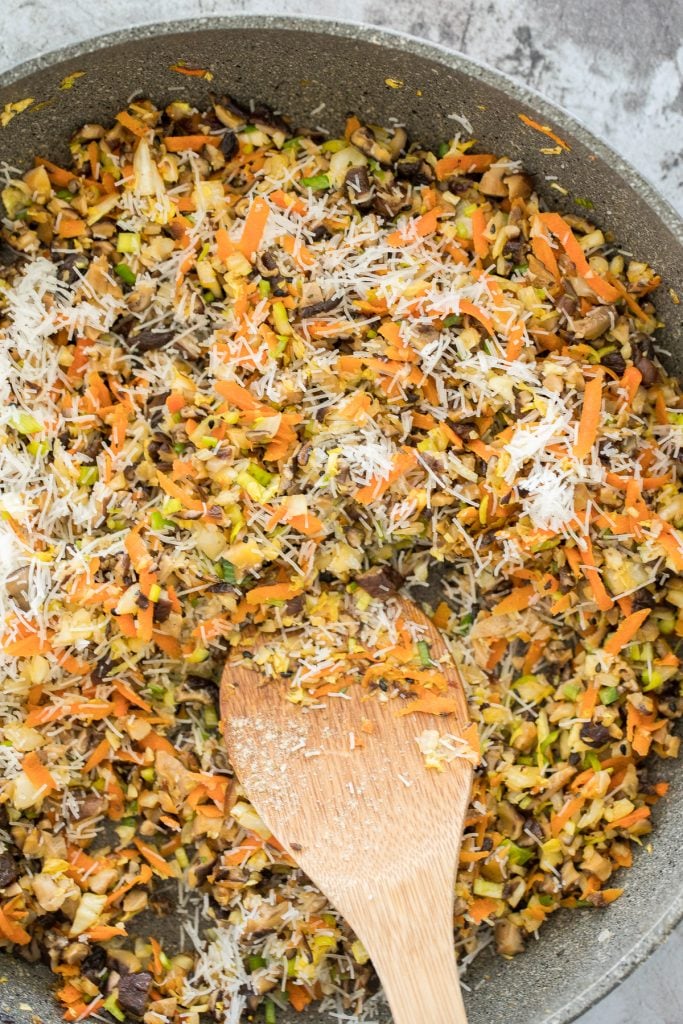
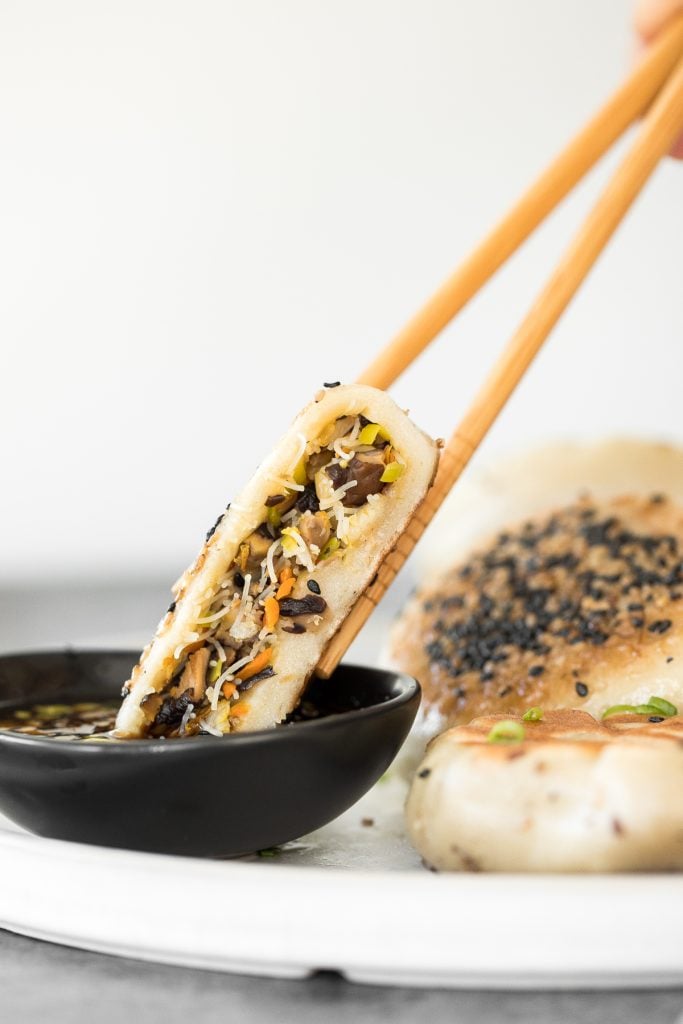
Next, prep the filling ingredients and stir fry them together. In a large skillet or wok, heat oil over medium high heat for 1-2 minutes until the oil is hot and starts to sizzle. Add in all the filling ingredients and stir well with a wooden spatula to mix evenly, about 2 minutes. If you find the vegetable mixture is a bit watery, add a teaspoon of cornstarch to thicken it a bit. Transfer the mixture onto a plate and let it cool down to room temperature, about 15-20 minutes.
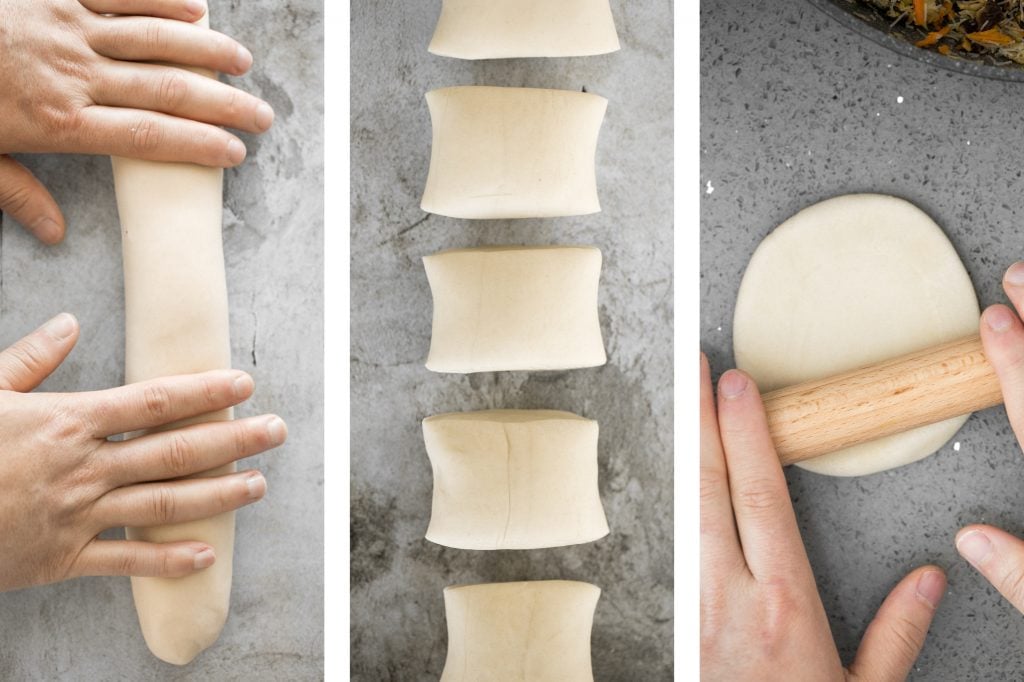
Now let's shape the dough. On a lightly floured surface, roll the dough into a log and divide it into 10 equal pieces using a bench scraper or knife. Take one piece of dough at a time and flatten it with a small dough roller or with your palm.
Shape the dough into a 4-inch circle. Note that the centre should be slightly thicker than the edges. This dough should be particularly softer and more pliable because of the hot water scalding flour technique.
How to Fold Crispy Bottom Buns
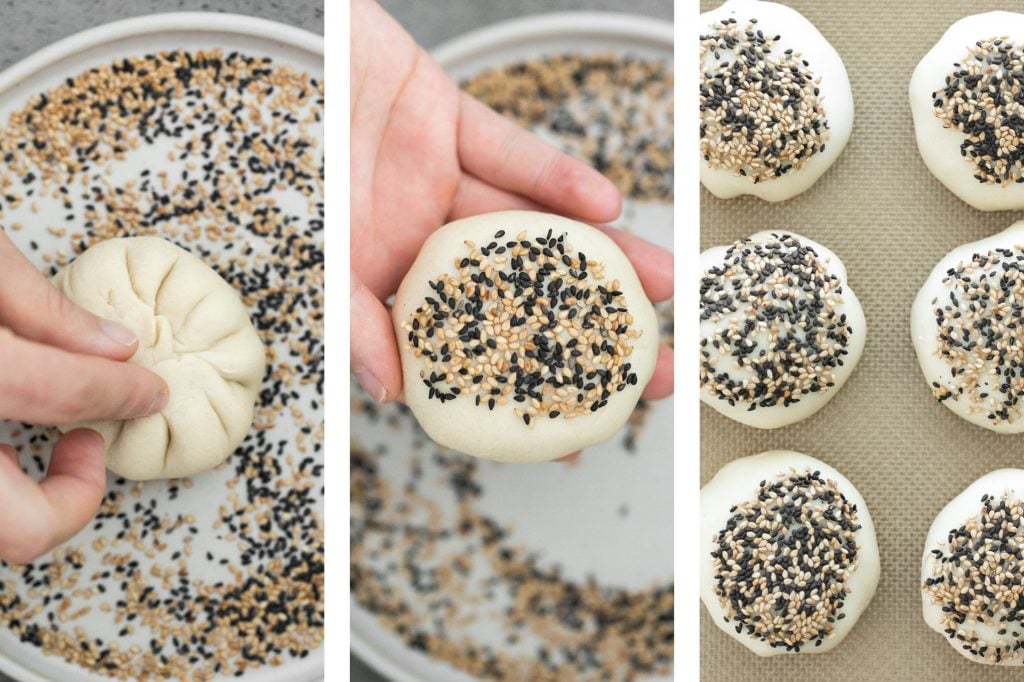
Place 1 tablespoon of filling into the middle of each rolled out dough. Bring the edges of the dough up, enclosing the filling, and pleat the edges together into a little bag to seal the mixture inside.

Add sesame seeds into a shallow dish. Dab the smooth side of the bun with a little bit of water and gently press it into the shallow dish of sesame seeds. The water will help the seeds stick to the bun. Place the bun on a baking tray and cover with a tea towel to prevent it from drying out.
How to Pan Fry Crispy Bottom Buns
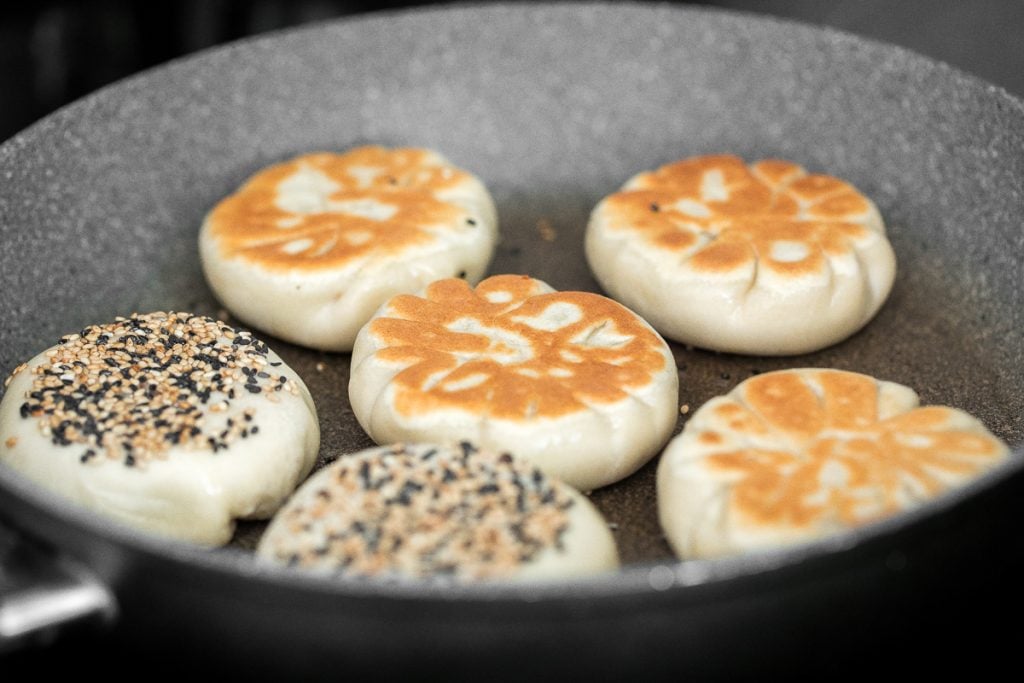
In a large non-stick skillet, heat oil over medium high heat for 2 minutes. Place a batch of 5 buns with the sesame seeds side facing up and placed ½-inch apart to prevent them from sticking together. Cook for 1 minute until the bottom turns golden brown.
Turn the buns over and add ½ cup of water into the pan. The water should start sizzling and boiling immediately. Make sure the water is about ½-inch deep and covers about one-third of the buns' height. Cover with a lid and cook covered for 5-6 minutes until almost all the water has evaporated.
Take off the lid and lower heat to medium. Cook for another 1 minute until all the water has been absorbed and the sesame seeds side has turned golden brown and crispy as well.
How to Serve Crispy Bottom Vegetable Buns
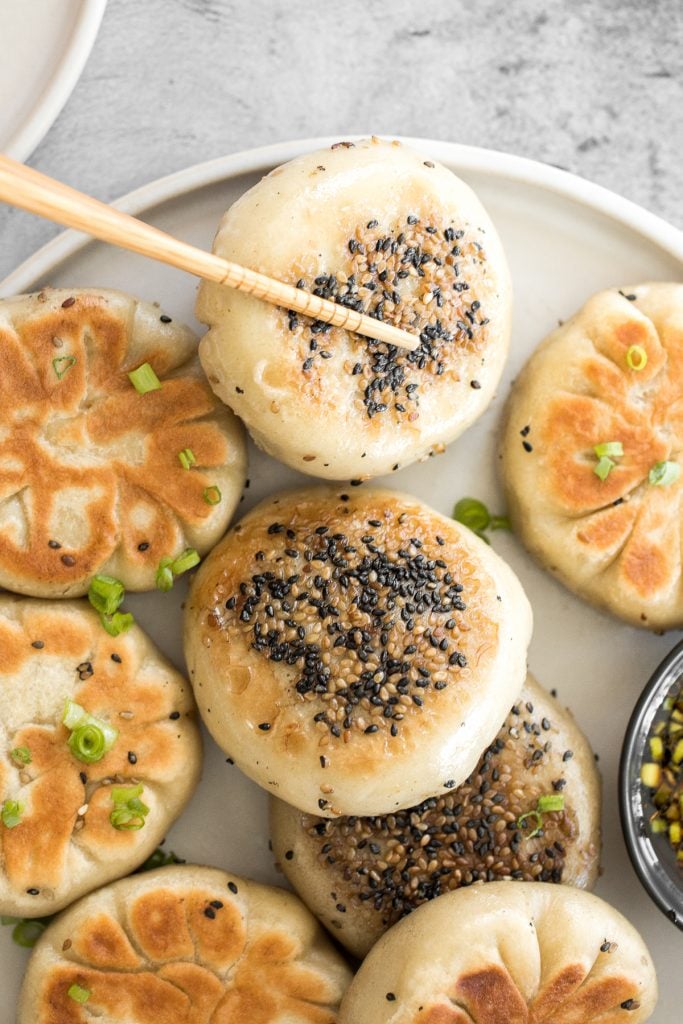
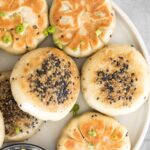
Serve these pan-fried buns hot with a side of vinegar dipping sauce. To make the dipping sauce, combine black vinegar, soy sauce, sesame oil, and green onions in a small bowl and stir to combine.
Tips for Making Pan-Fried Buns
- Make sure the dough is well-kneaded. A well-kneaded dough should be smooth and bounces back quickly when poked with your finger. If the indentation doesn't bounce back right away and stays like a dimple, keep kneading for a few more minutes.
- Customize the filling. There are endless ways that you can customize the filling. You can use different vegetables such as beans sprouts or chives, or add in your favourite protein such as minced pork or chicken. The key is to keep the filling thick and not too runny. If you find it too runny, drain the extra liquid or add cornstarch to thicken it up.
More Dim Sum Recipes
- Crispy Fried Vegetarian Spring Rolls
- Shanghai Style Vegan Steamed Buns
- Spicy Chili Oil Wontons
- Egg and Chive Vegetarian Dumplings
- Savoury Chive Pancakes with Sourdough Starter
- Chicken and Cilantro Wontons
Tried this recipe?
I'd love to hear what you think! Leave a comment and rating below to share your feedback. Your reviews help others discover this recipe and help me keep creating more free recipes for you. Snap a photo and tag me on social media @aheadofthyme too.
Recipe
Crispy Bottom Pan-Fried Vegetable Buns (No Yeast)
- Total Time: 1 hour 8 minutes
- Yield: 10 buns 1x
- Diet: Vegetarian
Description
Crispy bottom pan-fried fried vegetable buns (no yeast) are crunchy on the outside yet tender and chewy on the inside with a savoury mushroom, carrot and vermicelli vegetarian filling.
Ingredients
For the dough:
- 300 grams all-purpose flour (approximately 2 + ⅓ cups)
- 6 grams salt (1 teaspoon)
- 160 grams hot boiling water (⅔ cup)
- ¼ cup black or white sesame seeds
For the vegetable filling:
- 1 cup rice vermicelli
- 1 tablespoon vegetable oil
- 2 cups brown mushrooms, finely chopped
- 1 cup carrots, grated
- 2 tablespoons green onions, finely chopped
- 1 tablespoon garlic, minced
- 1 tablespoon soy sauce
- 1 tablespoon sesame oil
- ½ tablespoon white pepper
- ½ tablespoon vegetable stock powder (optional)
- 1 teaspoon salt
- 1 teaspoon cornstarch (if needed)
For pan-frying the buns:
- 1 tablespoon vegetable oil
- ½ cup water
For the vinegar dipping sauce:
- 2 tablespoons black vinegar
- ½ tablespoon soy sauce
- 1 teaspoon sesame oil
- 1 tablespoon green onions, finely chopped
Instructions
Make the Dough:
- In a large bowl, whisk together flour and salt to combine. Slowly add in boiling water and stir well with a silicone spatula to combine, until there are no dry flour particles visible in the bowl. Make sure to scrape down the sides of the bowl. Cover and let the mixture rest for 10 minutes. (Adding hot boiling water in flour is a technique known as flour scalding, which breaks down starch in the flour and makes the dough softer and more stretchy. It also makes the dough much easier to knead.)
Knead the Dough:
- Transfer the dough onto a clean and lightly greased surface. The oil will help keep the dough from sticking to your hands initially. You can even lightly oil your hands too.
- Knead the dough for 5-10 minutes until the dough is smooth and not sticky at all.
- To knead, push the dough down and outward using the palms of your hands. Fold the dough in half toward you and press down. Repeat this motion by pushing the dough down and outward, and then folding over towards you. This helps build up gluten strength in dough that is responsible for making the bread fluffy.
- It should take less than 10 minutes of kneading by hand to achieve a non-sticky and smooth dough ball. A well-kneaded dough is smooth and can hold its shape. You can test the dough by giving it a firm poke with your finger. The indentation should bounce right back. If it doesn't bounce back and stays like a dimple, keep kneading for a few more minutes.
- Transfer the smooth dough back in the mixing bowl and cover with cling wrap. Let rest for 20 minutes, while you are prepping the filling.
Make the Filling:
- Soak the vermicelli in hot water for 1 minute, or in colder water for 2-3 minutes, until softened. Drain and finely chop (about ¼ or ½-inch pieces).
- In a large skillet or wok, heat oil over medium high heat for 1-2 minutes until the oil is hot and starts to sizzle.
- Add in all the filling ingredients: vermicelli, mushrooms, carrots, green onions, garlic, soy sauce, sesame oil, white pepper, vegetable stock powder (optional), and salt. Stir well with a wooden spatula to mix evenly, about 2 minutes. If you find the vegetable mixture is a bit watery, add a teaspoon of cornstarch to thicken it a bit. Transfer the mixture onto a plate and let it cool down to room temperature, about 15-20 minutes
Assemble the Buns:
- On a lightly floured surface, roll the dough into a log and divide it into 10 equal pieces using a bench scraper or knife. Take one piece of dough at a time and flatten it with a small dough roller or with your palm.
- Shape the dough into a 4-inch circle. Note that the centre should be slightly thicker than the edges. This dough should be particularly softer and more pliable because of the hot water scalding flour technique.
- Place 1 tablespoon of filling into the middle of each rolled out dough. Bring the edges of the dough up, enclosing the filling, and pleat the edges together into a little bag to seal the mixture inside.
- Add sesame seeds into a shallow dish. Dab the smooth side of the bun with a little bit of water and gently press it into the shallow dish of sesame seeds. The water will help the seeds stick to the bun.
- Place the bun on a baking tray and cover with a tea towel to prevent it from drying out.
- Repeat this step with all the buns.
Pan Fry the Buns:
- In a large non-stick skillet, heat oil over medium high heat for 2 minutes. Place a batch of 5 buns with the sesame seeds side facing up and placed ½-inch apart to prevent them from sticking together. Cook for 1 minute until the bottom turns golden brown.
- Turn the buns over and add ½ cup of water into the pan. The water should start sizzling and boiling immediately. Make sure the water is about ½-inch deep and covers about one-third of the buns' height.
- Cover with a lid and cook covered for 5-6 minutes until almost all the water has evaporated. Because the vegetable fillings are previously cooked, it takes approximately only 5 minutes to fully cook the buns.
- Take off the lid and lower heat to medium. Cook for another 1 minute until all the water has been absorbed and the sesame seeds side has turned golden brown and crispy as well.
- Transfer the buns onto a plate and repeat the same method with the second batch.
- Serve them hot with a side of vinegar dipping sauce.
Make the Vinegar Dipping Sauce:
- In a small bowl, combine black vinegar, soy sauce, sesame oil, and green onions. Stir with a spoon.
- Serve alongside the crispy bottom vegetable buns, for dipping.
Notes
Equipment used: measuring cups and spoons, mixing bowls, a small rolling pin, and a non-stick skillet with cover.
Make sure the dough is well-kneaded. A well-kneaded dough should be smooth and bounces back quickly when poked with your finger. If the indentation doesn't bounce back right away and stays like a dimple, keep kneading for a few more minutes.
Customize the filling. There are endless ways that you can customize the filling. You can use different vegetables such as beans sprouts or chives, or add in your favourite protein such as minced pork or chicken. The key is to keep the filling thick and not too runny. If you find it too runny, drain the extra liquid or add cornstarch to thicken it up.
- Prep Time: 30 minutes (+30 minutes rest time)
- Cook Time: 8 minutes
- Category: Dim Sum
- Method: Pan Fry
- Cuisine: Chinese


Ash says
I made mine but at the end the food was kind of gooey idk if it was correct and if it was supposed to taste that way pls help apart from that I really liked it😃👍🏽
Sam Hu | Ahead of Thyme says
Hi Ash, the main reason they would be gooey is if the filling was too watery. Did you drain the extra liquid or add cornstarch to thicken it up?
Kari says
These were great. Make sure to thicken it or the dough wont close and water drips out. I used bok choy, mushroom, mook yee and gr. Onion. It tasted good but made the bok choy made it to watery. I will definitely try again but with tofu.
Sam Hu | Ahead of Thyme says
Thanks Kari, that is a really good point. As mentioned in the tips, the key is to keep the filling thick and not too runny. If you find it too runny, drain the extra liquid or add cornstarch to thicken it up. Let me know how it goes with tofu. =)
Carly says
These buns were delicious! I filled mine with mushroom, carrot, and green onion. The dough was really tough and probably took 30 minutes to get it to the right consistency. Aside from that, it was a very yummy meal!
Sam Hu | Ahead of Thyme says
Thank you so much Carly! So happy you liked the recipe.
Jennifer K says
I really enjoyed making this recipe! The buns came out great! I did tofu, carrot, green beans, and onion in mine. Next time I might play around with adding some meat. The dough felt really dry while I was shaping the buns, but it didn't tear and had a really nice consistency once it was cooked. Thanks for the great recipe. I will definitely be making it again. 🙂
Sam | Ahead of Thyme says
Thank you so much Jennifer! So glad you liked the recipe. The fillings you used sound amazing. 🙂
Vivian says
First time I've heard of this dough technique. Simple but interesting...I must try the recipe just for the dough! Thank you, Sam.
Sam | Ahead of Thyme says
You totally do! Let me know what you think of it.