Description
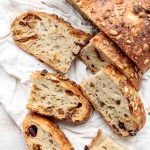
Fruit and nut sourdough bread is chewy and airy with a crunchy crackly crust is so delicious, packed with dried figs, raisins, walnuts, and seeds.
Ingredients
- 80 grams sourdough starter
- 200 grams all-purpose flour (1 + 2/3 cups)
- 200 grams whole wheat flour (1 + 2/3 cups)
- 260 grams water
- 8 grams salt
- 1/3 cup dried figs, chopped into 1/4-inch cubes
- 1/4 cup raisins
- 1/4 cup walnuts
- 2 tablespoons pepitas (pumpkin seeds)
- 2 tablespoons sunflower seeds
Instructions
Prepare the Starter:
- If your sourdough starter is not ready to go, and is stored in the fridge, take it out and feed it 12 hours in advance. Discard half of the old starter and add 50 grams all-purpose flour and 50 grams water. Let it rise for 6 hours or until doubled in size.
- Take out a spoonful of new starter and drop it into a glass of room-temperature water. If it floats, the starter is ready. If it sinks, you either need to let the starter sit longer to develop more bubbles, or feed it again and let it sit until it passes the float test (usually 6–12 hours).
Prepare the Dough:
- In a large mixing bowl, add sourdough starter, all-purpose flour, whole wheat flour, and water, and whisk to combine, scraping down the sides of the bowl (there should be no dry flour particles visible). Cover the bowl and let the dough rest for 30 minutes. The resting period not only promotes yeast growth known as bulk fermentation, but it also allows the dough to start building gluten strength naturally without kneading.
- Add salt and fold into the dough for a few seconds to combine. Salt slows down yeast growth in the fermentation process, so it is recommended to incorporate it after allowing the dough to rest for 30 minutes first.
Build the Gluten in the Dough:
- There are many techniques used to help develop the gluten network in the dough. Because this recipe calls for 68% hydration in the dough, it's not as sticky and can hold its shape relatively well. Therefore, you can choose to either knead the dough by hand, OR stretch and fold the dough:
- To knead the dough by hand: Transfer the dough onto a clean and dry surface. Push the dough down and outward using the palms of your hands. Fold the dough in half toward you and press down. Repeat this motion for 5 minutes by pushing the dough down and outward, and then folding over towards you. You can also pick up the dough and slap it down onto the counter and fold over towards you. (A kneading technique known as slap and fold). Cover the dough with a large bowl upside down on top and let it rest for 5 minutes. Resting allows gluten in dough to relax and further strengthen gluten more efficiently. Knead the dough for another 5 minutes until the ball of dough is smooth and supple. A well-kneaded dough is smooth and can hold its shape. Also, when you give the dough a firm poke with your finger, the indentation should bounce right back. If it doesn't bounce back and stays like a dimple, keep kneading for a few minutes. Cover and let the dough rest in a large bowl for 2.5 hours, or until it almost doubles in size.
- To stretch and fold the dough: Apply some water on your hands and stretch and fold the dough in the bowl by folding the edges over to the centre, one edge at a time. Wet hands makes it easier to work with the dough and it should take you less than a minute to fold all 4 sides. Cover with plastic wrap and let the dough rest for 30 minutes. Stretch and fold the dough again, cover, and let dough rest for another 30 minutes. Repeat this step one final time -- stretch and fold the dough, cover, and let it rest until it almost doubles in size, up to 90 minutes.
Add Fruit and Nuts and Shape the Dough:
- Fold in the dried figs, raisins and walnuts into the dough. Flatten and fold the dough until all the dried fruit is evenly distributed into the dough.
- Transfer dough to a floured surface and sprinkle dough with a little flour. Shape the dough into a tight ball by folding the edges over to the centre. Stretch the dough a little and fold all four sides to the centre like wrapping a present. Turn the dough over and use your bench scraper to push the dough back and forth to create a tight ball. Repeat this motion until the surface of the dough appears tight.
- Mix the pepitas and sunflower seeds together in a shallow bowl and whisk to combine. Dampen the surface of the dough by lightly pressing the dough on a clean damp dish cloth first and then dip it into the seeds. Swirl the dough to cover it evenly with seeds.
Proof the Dough:
- Line a medium-sized bowl (approximately 7-inches in diameter) with a clean dishcloth. Generously flour the dishcloth so that the dough doesn't stick to the dishcloth. Place the ball of dough, with the seeded side down into the lined bowl (or into a proofing basket). Cover the bowl with a lid or another towel so that the dough won’t lose moisture and dry out.
- Let the dough rest it at room temperature for approximately 3 to 3.5 hours (OR transfer the bowl into the refrigerator and let the dough rest overnight for 8 to 12 hrs).
Score the Dough:
- Remove the bowl from the refrigerator and place it upside down onto the centre of a 9x9-inch piece of parchment paper.
- Because the dough is covered with seeds on top, score the dough by gently snipping with scissors. Do not make deep cuts more than 1/2-inch deep.
- Place the dough together with parchment paper back into the same bowl and cover with a towel until the oven is preheated. Staying in the bowl before baking with help the dough keep its shape.
Bake the Sourdough Bread:
- Place a 4-quart Dutch oven with lid (or a medium oven-safe cooking pot (9-inches) with a metal lid) into the oven and preheat to 450° F. Dutch ovens are great for baking. They hold the heat in a lot better than other cooking pots.
- Take out the parchment paper and dough from the bowl and carefully place them both into the preheated Dutch oven. Cover the lid and bake for 30 minutes.
- After 30 minutes, remove the lid and continue to bake the bread uncovered in the oven for another 20 more minutes.
- Remove the bread from the Dutch oven, and take off the parchment paper. Allow the bread to cool down completely on a cooling rack for one hour. To check if the bread is done, you can tap the bottom of the bread with your finger. The bread will sound hollow when it's done.
Notes
Equipment used: digital scale, mixing bowl, bench scraper, proofing basket (or bowl with dish cloth), and scoring blade.
How to make sourdough starter. You make sourdough starter with a combination of flour and water. It takes about 7 days to create a mature starter. Learn how in my sourdough starter guide which includes the top frequently asked questions.
Always use a fully mature sourdough starter. Otherwise, your bread will not rise as it is supposed to. A lively and mature sourdough smells yeasty and a bit fruity. You can check that your starter is ready by dropping a teaspoon of starter in a cup of water and see if it floats. This is known as the float test.
Do not over proof the dough. Over proofing breaks down gluten in dough and makes dough sticky and slack. The dough will not rise, but instead will be flat and taste more sour. You can prevent this by letting the dough rise at a cooler temperature (such as in the refrigerator overnight).
How to store. Sourdough bread will last for up to 2 days at room temperature. Cover it so that it does not dry out. You can also store in the refrigerator in an airtight container for up to 1 week.
How to freeze. Wrap the sourdough tightly in plastic cling wrap and place into an airtight container or freezer bag, and store in the freezer for up to 3 months. If freezing, I would recommend slicing the bread first so that it is easy to reheat a slice or two at a time. To reheat, toast in the toaster on the freezer setting, or let the bread thaw to to room temperature first and then reheat in the toaster, oven or air fryer.
- Prep Time: 15 minutes (+ at least 6 hours rising time + 1 hour cooling time)
- Cook Time: 50 minutes
- Category: Bread
- Method: Baking
- Cuisine: American